
Welcome to my Jeep Interests blog.I will post things about my Jeep projects in general. My interests may include some historical info and maybe a bit of amateur radio mixed in for good measure.
To clarify the intent of this blog: If you came here looking for instructions, how-to or tutorials, I'm sorry to disappoint. It is not meant to be a tutorial, how-to, or otherwise training or instructional blog. I may write things down in a loose attempt at describing what I'm doing but I really just needed a place to download my brain and keep it somewhere I knew where it was for reference.
These posts will be in chronological order so newest is at the bottom.
If you are interested in Heathkit, electronics or amateur radio, I also have a blog here.
The second phase to this blog is available here.
Jump to the Project Build post |
| September 21, 2020 |
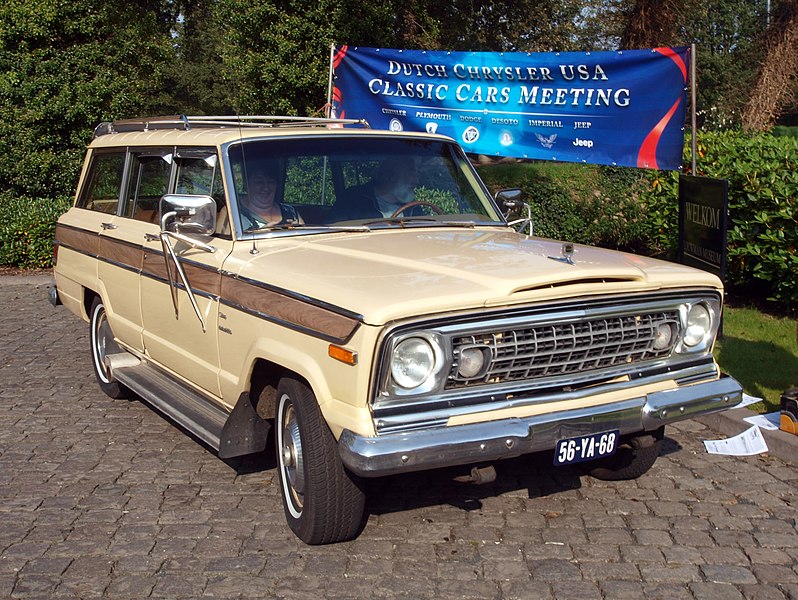
1993 Cherokee (XJ) Sport
Engine: AMC 4.0L (242ci) MPI with Chrysler OBD-I PCM
Transmission: AW4
Transfer Case: NP231 Selec-Trac Part Time 4WD w/Low Range
Axles: Front - Dana 30 High Pinion (HP) - Open
Rear - Chrysler 8.25 - Open
Ratio: 3.55
Exterior Color: Hunter Green Metallic - Code: G5 (PG5)
Interior Color: Dark Sand - Code: A7Y6
Tires: 30x9.50R15 Hankook DynaPro ATM RF10s on Jeep 15x7 five spoke stamped styled steel wheels
Parts acquired for XJ
Engine - Refresh
Main Bearings - King SI series .010" undersize - MB7719SI010 - (did not install)Connecting Rod Bearings - Sealed Power CPA Series Standard size - 6-3310CPA
Connecting Rod Bearings - Sealed Power CPA Series .001" Undersized - 6-3310CPA1
Harmonic Balancer - Crown Automotive 33002920
Timing Set - Cloyes C3085
Timing Chain Guide - Cloyes - 9-5337
Camshaft & Lifter Kit - Melling - CL-MC809
Oil Pump - Melling - Stock Pressure/Volume - M81A
Oil Pump Pickup - Melling - 242S
Oil Filter Adapter O-Ring Kit - MOPAR - 4720363 (Crown Automotive - Same P/N: 4720363)
Rear Crankshaft Seal - Mahle - JV1611 - (did not install)
Engine Gasket kit - Enginetech - J242L - (used gaskets for: valve cover, timing cover, front crankshaft oil seal, oil pan gasket)
Rocker Arm/Bridge/Fulcrum Kit - Crown Automotive - 3242393K
Distributor - CarQuest (World Power Systems?) T4693
Spark Plugs - Champion - RC12LYC (#412)
Thermostat Housing and gasket - Gates - CO34741
Thermostat - Stant -Superstat 45358
Upper Radiator Hose - Gates - 21616
Lower Radiator Hose - Gates - 21615
Radiator Cap - Stant - 10229
Auxiliary Fan (A/C) - TYC - 620560 (for 1997 Cherokee XJ. More efficient design. Use connector from old fan unit.)
Thermostatic Fan Clutch - Heavy Duty for ZJ 4.0L during Summer - Carquest - 215160
" - Standard Duty for non-Summer months - Carquest - 215101
Body
Rear Liftgate Seal - Fairchild - D4045Left Front Turn Signal Lens - Crown Automotive - 56000853 (Export Version)
Right Front Turn Signal Lens - Crown Automotive - 56000852 (Export Version)
Lighting
Headlights - Dynamik Glass Projector with H4(9003) bulbs sold by Xtralights - LHP-7X6 - (Removed! Very poor lighting pattern. Do Not Buy!)
Side Marker "Repeater" Lamps - Export Models - Crown Automotive - 55055014 - (Used only on Exported models until the end of production but finally adopted by US market for added safety. We are so behind the rest of the world.
Drivetrain
Front Dana 30 Differential Cover Gasket - Fel-Pro - RDS55019
Rear Chrysler 8.25" Differential Cover Gasket - Fel-Pro - RDS55047
Axle Shaft - USA Standard Gear - USA21040Y - Will NOT work with 9 inch drums! Flange must be ground down to match drum seat diameter.
Axle Shaft Bearing Kits - USA Standard Gear - Koyo Brand Bearings - USA10001
Suspension & Steering
Front Shock Absorbers - Gabriel ProGuard - 61535
Rear Shock Absorbers - Gabriel ProGuard - 61536
Front Sway Bar End Link - AC-Delco - 46G0038A
Rear Bump Stops - Crown Automotive - 52002393
Front Lower Ball Joints - Mevotech GK3161T - Standard
Unit Bearing & Hub Assembly - Mevotech - H513084 - Standard
Front Left Outer Tie Rod End (@knuckle) - Moog - ES3094L
Front Right Inner Tie Rod End (@drag link to tie rod) - Moog - ES3095R
Brake System
Front Left Brake Hose - CarQuest - BHA38895
Front Right Brake Hose - CarQuest - BHA38894
Front Brake Rotor/Pad Kit - Centric - CE90867032
Radio Equipment
Amateur Radio - HF/6M/2M/70cm Mobile Unit - Icom IC-7100 (VHF/UHF feature is for backup use on the local repeaters.)
Amateur Radio - VHF/UHF Dual Band Mobile Unit - Alinco DR-605 (Local-use transceiver)
Citizens Band Radio - Cobra 18 WX ST-II
Antenna - DX Engineering 17-7 Stainless Steel 102 inch (2.59M) whip - DXE-WP-102 (One for HF, one for CB)
Antenna - Diamond Super Gainer Dual Band NMO Mount - SG-7500N
Antenna Tuner - Icom AH-4 (for HF transceiver)
Coaxial Cable - The Wireman - 12 feet; CQ Mini 8 Low Loss - #118 with SMA-F/PL-259 (Will be cut to length for use with Icom AH-4 antenna tuner. The rest will be custom made with two PL-259 ends for the Alinco transceiver on a second antenna.)
Coaxial Cable - The Wireman - 18 feet; CQ Mini 8 Low Loss - #118 with SMA-F/PL-259
Fluids (so far)
Front and Rear Differential Lubrication - Lucas Synthetic 85-140 - 2.5qt-Rear/ 2qt-Front
Transfer Case - New Process NP231 - Castrol ATF+4 - 1.5qt
Brake Fluid - Valvoline Synthetic Dot 3 and 4 - 601458
Oils used for Camshaft Break-in- CarQuest 10W-30 High Mileage - CQ943 - 7qts.
Lucas Break-In Oil Additive - 10063 - 16 oz.
AW4 Automatic Transmission - CarQuest CQ420 - 4 quarts initially (5.5 qts total)
Filters
Engine Oil Filter - CarQuest - 85515 (Wix 51515 or 51515XP)
Engine Air Filter - CarQuest - 88077 (Wix 46077)
Transmission Filter - AW4 - AC Delco - TF271
Paint
Krylon Duplicolor
Cummins Beige - Gloss
Khaki Flat
Olive Ultra Flat
Jump to the latest blog post
____________________________________
June 3, 2018
 |
| Stock Photo |
 |
| Stock Photo |
Growing up in Colorado where mom and dad each got a Jeep SJ series was pretty cool. We couldn't wait for the snow to fall just so we could go out in it. Mom got the Wagoneer in white (a 4 door which I eventually bought from her in 1992) and Dad got the Cherokee Chief Wide-Track (2 door) in red. Both had AMC's 401ci V8 4bbl engine, Quadra-Trac Full-Time 4WD with GM Turbo Hydra-Matic 400 automatic transmission and were 1977 models IIRC.
Now it's 2018 and I have added a Jeep to my family. Ah, yes. I forgot. I name my Jeeps. They all have their own personality, temperament, quirks and character. The '77 I bought from mom was named Jesse. She was big and tough, reliable and would go anywhere I needed. She could tow 7500 pounds with a load-leveling hitch like it was nothing. Of course she drank a lot and no matter how much coaxing and coaching I did she wouldn't let up. Things got a bit rough and I had to sell her as she was too expensive at the time to keep full. I regret doing that to this day.
 |
| My 2000 TJ Sahara - Terra-Jean (now my daughter's) |
Though I was still driving over-the-road at the time having settled for driving a big rig for a living since late 2004, I had wheels whenever I wanted when I was home. We went several places but the most favorite locale was the Outer Banks of North Carolina. She loved just getting out there on the beaches and watch the other 4x4's wheeling around as well as sit, listening to the waves crash on shore with the gentle sea breezes blowing through her grill and windows. Equipped with a 4.0L engine with 50 state legal emissions, she's been very reliable in the power department. Her tired front suspension was causing the infamous "death wobble" at that time and had to be completely replaced in 2014. Everything was replaced from the steering gear box down to the wheel bearings including the control arms, shocks, steering knuckles, and ball joints. She's done great since!
Enter the newest member, Nanye-hi (pron: nunn-yeh-hee). Nanye-hi is a Cherokee word for, "one who goes about", is pretty obvious as applied to the Jeep Cherokee. She'll go about anywhere I need her to. There is a second name for this vehicle, Ghigau (or Agigau) meaning "The beloved Woman" was used by the tribes to describe a woman of high standing and exceptional ability who made remarkable contributions to the well-being of the people. My Jeep is a very respected woman indeed.
 |
| My 1993 Cherokee XJ - Nanye-hi |
When I went to check this Jeep out, I didn't know really know what kind of shape she was in. I figured there'd be a lot of rust, some holes to patch and basically be the needy sort. Not this one. Though she had been neglected in the last four years by her previous owners (third), I was surprised to have found a 1993 Cherokee Sport in such good condition. This was nothing short of surprising considering where she grew up in Virginia in her first 21 years of ownership. After pulling the interior out I found very little rust, a very straight body and, with the exception of a single 1 inch hole where I expected to find a much bigger one, there has only been surface rust found. Even the headliner fabric is only just starting to come loose and the backing seems to be in excellent shape. But I'm getting ahead of myself.
Indeed this one deserves the respect her first two owners bestowed on her. It was good they garaged and maintained her very well for their ownership of about 21 years. Considering they lived in Virginia, they had to have washed it every week underneath to keep the road salts from eating away at the floor pans all winter long.
The third owners basically just used her as transportation and deferred any maintenance that was needed. In short, she was used up in the fours years they owned it. The third owners would let the oil pressure gauge drop and bounce to zero and then put oil in the crankcase. This was because of the deferment of an $8 driveway repair to stop the oil filter adapter from leaking like a sieve. My brother-in-law and I put in three quarts of 10W-40 and it was still one quart low. It's a 5.5 quart system.
Now for the not-so-good news...
The A/C worked really good, if you were moving down the road since the auxiliary fan couldn't run at full speed due to a bad bushing in the electric motor. Funny that this old R-12 system just doesn't leak even though it was converted to R-134a. The heater controls all work and there is heat but the heater core is leaking. No problem. I removed the interior from the front carpeting back to the rear lift-gate so removing the dash panel shouldn't be any more difficult than my TJ (my daughter is going to buy mine). Remove dash panel, unbolt HVAC box, replace core, re-installation is the reverse of removal, etc.
The driver's seat has the typical "broke down" feel on the left side of the bottom cushion. This was from a broken seat pan that is attached to the cushion foam. American Motors Corporation used replaceable seat bottom cushions. I think in 1995 Chrysler finally took over the design and put in seats with integrated seat backs. If you wanted to replace a seat cushion, you'll replace the whole seat instead. Sounds expensive and I'm sure it was. They weren't that comfortable either. There are better aftermarket seats out there but I have yet to find a good one I can try out and see for myself. Those I have been able to sit in are very hard like a racing seat. She'll be my daily driver, commuter and sometime recreational vehicle so she'll have to play a lot of roles. I don't rock crawl but I do have some off-road capability for storm spotting, camping and such when the need arises.
So I'll let the pics sort of tell what's happening so far. Enjoy!
 |
| Acquired in April, 2018 |


 |
| Yeah. Clearcoats aren't worth a damn. |
 |
| This looks like a good spot for my Icom HF radio. |


 |
| Very clean. No sludge or build-up after 226K! |
 |
| Hmmm. Those cam lobes don't look quite right. |
 |
| Oh really?! The bottom cushion isn't integrated into the seat back on this model. Thanks for the suggestion Jerry! |
 |
| Jerry also suggested the cushions can be swapped between the driver's and passenger's side. On this type of seat, he is correct. |

 |
| Eh? Thought the driver's side would get all the rustention. |
 |
| Heater core leaks and the backing to the carpet held the moisture. |

 |
| The floor pan plugs also leak. Will need to replace them. |


 |
| Compare to the TJ accessories. Discovered the mounting bosses on this engine aren't there for the TJ brackets. |
 |
| Very little room for a radiator and fan. The fit with the 4.0L is so tight the belt driven fan is mounted on a special bracket with it's own pulley instead of on the water pump. If you can find one new, $300. This is why so many either go all electric fans or it winds up in the junkyard. |
 |
| Toothless grin. |


June 9, 2018
Getting up early isn't my thing really. But then there's Nanye-hi outside waiting for more repair work which motivates me pretty good.Once I got the shed opened, the tools out, the hood, doors and liftgate open, I felt ready to tackle the camshaft removal. I open up the doors and such to let it air out to check for leaks and any new surface rust. It's a routine that helps me get into "looking" for things and paying attention to detail. At least it helps me feel better about doing those things. I've said it before, she's in darn good shape considering. I want to keep her that way.
So on to camshaft removal...
I know I don't work very fast and I'm cautious when I don't have the proper work space to do what I'm doing here. A lost bolt could ruin the mood. So the first order of business is to get the A/C compressor out of the way. "SNAP!" Ah that sound you know so well. Yep. The first compressor bolt snapped right off. "Oh the pain, the pain." It seems that having a vehicle that never needed any work on it because it was taken care of so well also has another edge. Seized bolts and galled threads due to non-use. I had remembered that after I heard the sound of breaking metal. But only just after. Seems my memory is a tad rusty too.
So there's the thing. The bracket the compressor is mounted on isn't made any longer and hasn't been in a long time. If a new-old-stock (NOS) unit is located, it'll go for nothing short of $300. There is a service on ebay that refurbished them with a new bearing for the mechanical fan for $250. You still pay shipping there and back so you're still paying about $300. Used units with questionable life left in them run as little as $50 unless you find one in the local pick your own part yard. The bearings are water pump bearings and can be had for less than $20. Pressing the old one out after pressing the fan hub off is doable but very, very prone to cracking the aluminum housing when pressing in the new bearing. Never ever, EVER use an impact gun or hammer to remove/install this bearing on this bracket. A good machinist will clean up the bracket, micrometer the bore and the new bearing housing then do what it necessary to ensure a good fit without damage. You see, some of those bearings are .010" larger than the bore and are guaranteed to crack the housing. Once cracked, the fan will not line up properly on the belt and the bearing will experience loading it wasn't meant to in the same direction all the time. The vibrations will eventually cause the crack to become worse until the failure point is reached. what that happens, all sorts of bad things and associated noises happen.
Enough of that. So I was a bit more careful on removing the other bolts on the compressor and found none of them were galled and came out easily. I will take the bracket to a machine shop to have the bolt removed. I will need to put in a Heli-Coil to repair the threads.
Compressor is off and the alternator now must be removed. Pain the butt that it is, there are four nuts holding the cable assembly on. Those off and next come the mounting bolts. Finally the alternator is free and the bracket attaching it to the fan-A/C bracket can be removed too. Removing the bolts attaching this bracket to the block allows full access to all the bolts on the timing cover.

 |
| Fan mount on the left hub with four studs and water pump on the right. I am hoping to find another solution before the fan bearing goes out. |

 |
| A single roller timing set in this '93 is factory. My 2000 TJ used a Silent Chain. The camshaft sprocket retaining bolt here has a pin and spring to prevent the cam from walking forward. Oil starvation can cause the nub in the timing cover the pin presses against to wear off and cause other issues later. So far, things are looking good. |

 |
| No build-up on the top either. Good condition so far. Inspecting the rocker arms revealed good wear patterns. No scoring of the fulcrum surfaces or chipped tips of the valve stems. I will replace these rocker arms but keep them as spares. |
 |
| Like a cadet review, all lined up proper. This engine is in amazingly clean condition. Even the factory paint marks are still present. Removing these parts will allow me to raise the lifters up onto the dowel. |
 |
| Look! No lifters or camshaft! |
Now I didn't get a pic of the set up to lift the lifters in their bores and supporting them on a dowel rod through the oil gallery that supplies oil to them before removing the dowel rod and let them fall to the tarp. Unfortunately I wasn't able to get all twelve of them to stay in their bores as I wasn't able to slip the magnet off of 5 of them before they came out. This has led me to a decision point. Remove the head to retrieve them while risking other issues later? This will increase the work and funds load needed to complete this project. Leave the head on and try to right them to let them fall out through the bores so the new ones can be installed from underneath. Many have condemned me for even trying this. That's fine. It's easy to criticize others. They are the ones incapable of attempting anything outside their comfort zone let alone capable of understanding what it will take to accomplish. Another has done it and documented it at the link below. I haven't seen the condemnation in the comments for his attempt that I've experienced with mine.
http://www.jeepforum.com/forum/f9/how-do-4-0l-cam-swap-w-o-pulling-head-1218328/
Here's the post about how this was done on a Jeep TJ with a 4.0L. I had heard this being done a long time ago but had never the opportunity (unfortunately) to try this myself. The reason for not removing the head is that all of my cylinders have good compression, no vacuum leaks at the intake manifold and no exhaust leaks at the manifold either. So why remove the head? I don't think I should have to break something that doesn't need it in order to fix something else that does. Call it poor design engineering from a maintenance stand point. The other side of the coin is that these engines were tough, reliable and performed well.
The second image in the article is a great shot of the front of the engine. Notice where the belt driven accessories are. Now compare that to a Cherokee XJ. There's a lot less room between the radiator and front of the engine. The Cherokee also has a radiator three feet wide but only 11.5" tall so there's no room for a water pump-mounted fan. Thus the fan was moved to the side on it's own mount. I can go all electric but even that needs to be about 2500 CFM to match the amount the mechanical fan could flow. Try to find an electric only 11 inches in diameter that won't break the bank!
So that's it for today's update. I hope to recuperate tomorrow but I will most likely try to get the lifters out in the morning before the work area is in direct sunlight. A challenge to be sure.
Good night for now!
______________________________
June 10, 2018
I slept in as I was so sore from all the leaning over to get the lifters up. Back still hurts as I write this. I did go out and try to retrieve the lifters I dislocated yesterday using the following items:Laptop
Borescope
Magnet
Patience
I bought the borescope with the intention of inspecting the cylinders through the spark plug holes. I tried to use the 90 degree mirror attachment and half the image was washed out from the LEDs reflection on the housing. Not much light actually shined on anything until I was too close for it to focus (about 40mm distance from the object to infinity). So I removed it and went in through the pushrod hole after the magnet on a telescoping stick. I could at least see the top and sometimes to the side of the lifter. I had to pay attention in the camera's rotation to keep my orientation straight.
The first attempt took about 30 minutes fiddling with the lifter to get it lined up with the lifter bore straight so it would start its downward slide to the ground below. The second one took about 20 minutes and the back was feeling the strain of leaning over again. I took a break as the work area was now directly exposed to the Sun.
After the area was back in shade I spent the better part of an hour to get the third lifter out. The borescope wasn't helping much after that first one though. Once you get the lifter over the bore, you have to wiggle it around to get it to line up. I tried using the magnet from underneath to get it lined up. Going back up top I used a pushrod to wiggle it around until it found the bore alignment. Not easy when you can't see it. The camera of the borescope is about 1.25 inches long and I can't send it down the next pushrod guide over to angle and see the lifter from the side. That's when I figured out how useless the mirror attachment was. If the end of the camera wound up dipping into any oil, I have to pull it out, wipe it off and try again. Got to be a bother so I quit using the borescope.
The fourth and fifth lifters are from cylinder six. Waaaaaaay in the back. I don't have anything I can lean on over the engine to try and make it easier to work them out. So I thought I would use the magnet and a long reach screw driver to try and move them forward. You can't move them too far because of the cast support webbing in that part of the block.
With a sore back I packed it up and came inside to cool down, get cleaned up and chill for the evening. At least I was able to get three out. If I can get the last two out without removing the cylinder head, it's a small victory.
Though I still need to purchase main and rod bearings, distributor drive gear and timing chain set, I'm still hopeful to get her running by the middle of August at the latest.
Have a good night!
______________________________
Jun 23, 2018
Good evening. As I mentioned in the previous post, I hurt my back while trying to fish out the flopped lifters in the block two weeks ago and had to take a break. I got three of the five that flopped over and out through their bores. Upon waking Sunday the 10th, I realized I couldn't move without a great deal of pain. Too much time bent over the top of the engine strained the muscles pretty bad. Sure, many say this can't be done or that I should've done it the "right" way. I have my reasons and if for no other, it's my Jeep and I'll work on it my way. I prefer to do repairs instead of "shotgun" parts replacement like most do today. I just can't justify removing the cylinder head and breaking a perfectly good seal just to retrieve the lifters.So with that said, I've taken some pics and a few videos. The first video was one from the initial use of the bore scope to right a lifter so it will fall through its bore now that the camshaft is out.
https://youtu.be/fq88e5Vr2LI

 |
| Looking up from below at cylinder 1's lifter bores. |
 |
| Lifter on a stick. Hard to see but it was lubed up with break-in lube from Melling that was included with the cam and lifter kit. I will get some assembly grease and swipe the lobes instead of relying on the runny break-in lube before I button it up. |
 |
| Inserting into the bore. |
 |
| Pushing up just high enough to get the dowel rod under it and keep it in place for now. You can just make out the dowel rod to the right of the magnet protruding past the edge of the bore. |
 |
| Cylinder 2 complete. |
https://youtu.be/VCAExBkvi5s
About 3 minutes long
https://youtu.be/vjuX-dM9jno
About 5 minutes long
https://youtu.be/r-LKA3Fw0Fg
Video showing me pulling the dowel rod out so the lifters will sit on their respective cam lobes. One thing to note is one lifter did not fall as expected. A slight tap on the pushrod and it dropped onto the cam. I will look into whether or not it will rotate in the bore as it should. If I feel any resistance I will have to raise the lifters again, remove the cam and wipe the top edge of the bore with some 1000 grit Emory cloth to take off any burrs.
I need a tripod and a decent camera if I'm going to do more videos. The phone is convenient but poor quality. Better than the bore scope to be sure but not good enough. It's what I have though and I'll figure out something to get that third hand I need for camera work. Hmmm...where's my duct tape?
__________________________________
June 26, 2018
I ordered the remaining internals needed to complete the refresh of the bottom end of this engine. A list of the parts I have ordered thus far for this refresh is below. This parts list will be posted at the top of this page as parts are acquired for the Cherokee.Engine
Main Bearings - King SI series .010" undersize - MB7719SI010Con Rod Bearings - Sealed Power CPA Series .010" Undersize - 6-3310CPA10
Harmonic Balancer - Crown Automotive 33002920
Timing Set - Cloyes C3085
Camshaft & Lifter Kit - Melling - CL-MC809
Oil Pump - Melling - Stock Pressure/Volume - M81A
Oil Pump Pickup - Melling - 242S
Rear Crankshaft Seal - Mahle - JV1611
Engine Gasket kit - Enginetech - J242L
Crown Automotive Rocker Arm/Bridge/Fulcrum Kit - 3242393K
Body
Rear Liftgate Seal - Fairchild - D4045Interior wise I think I'll wait to wire brush the floor pans until I get a couple of cans of Chassis Saver. I hope to get underneath where the rust hole is and scrape off any undercoating around that area to see how far the rust goes. Wouldn't do any good to save the inside if the outside were worse off. Besides, the leaf spring mount needs all of the sheet metal for it to function properly.
I think I mentioned I will swap the passenger seat bottom to the driver's side and locate a passenger seat bottom from another donor vehicle. Now I wished I had snagged the one in that '94 at LKQ.
____________________________
June 28, 2018
Good evening. I ordered the main and connecting rod bearings with the harmonic balancer from Summit Racing yesterday evening. It arrived on my door step this evening. I didn't ask or pay for overnight service either. They said free shipping for orders over $100 so I spent $140. Their sister company, DX Engineering, claims the fastest shipping in the industry. I believe it now. Absolutely astounding! Well, I have a few more parts coming from other vendors like the oil pump pickup so I'm really only waiting for Saturday the 30th to start finishing the engine's refresh. If things work out well, I might just get to fire it up on the 1st. |
| Crown Automotive harmonic balancer pulley Sealed Power tri-metal CP series connecting rod bearings King tri-metal SI series main bearings |
____________________________
June 30, 2018
I got home to find the engine gasket kit from Enginetech arrived. The only things I'm waiting on now are the timing set, rear main oil seal and oil pump pick up.I also purchased a new distributor made by World Power Systems. The gear on the old distributor was worn and the tip of the oil pump drive had heavy wear. I'll knock off the gear and use the old dizzy to act as an oil primer for the engine. Once I get the pick up attached to the pump I'll dunk it in oil and turn it by hand to prime the pump. Then I can install it and it'll be ready to operate. Doing it this way doesn't require me to open up the pump and pack it with Vaseline. There's no reason to risk taking it apart if there really is no need. So the old fashioned way of priming the pump was chosen.
There is the matter of the whole thing that started the oil starvation by the previous owner. The oil filter adapter leak. I have an O-ring kit containing several O-rings for different versions used on different vehicles. Hopefully I will have all three. I will postpone the remote oil filter adapter kit until I need to do this part again, which may be never. We'll see.
So the items needing preparation are cleanup of the timing cover, oil pan, oil filter adapter. The A/C compressor and fan bracket needs to be taken to the machine shop to get the broken bolt extracted. If it goes well, I'll reinstall it. If not, I'll have to locate another one.
The Chrysler 8.25 rear axle. Yep. Still roars. I haven't opened it up yet to see if it's carrier bearings or pinion bearings. That's next up on this projects major items.
Interior: I won't be installing a new heater core since it will require me to evacuate a perfectly functioning R-12 A/C system. Until that fails, I'll probably use a 12V ceramic heater. I'm not putting the carpet back in right away either. It's really dirty and I'd like to do some cleaning processes. It's not something you just put back in and take out whenever you want. The front carpet is pretty heavy and difficult to handle around the gear selector and parking brake. Whoever came up with the hand brake ide in this thing must have been on the Mustang II's design team. This just sucks bigtime. I'm going to look into the foot operated E-Brake used on the CJ, MJ and SJ's. The Police version of the Cherokee used the one from the MJ but those aren't available. I think the YJ e-brake will work though. NAXJA.com, cherokeeforum.com and maybe a couple of others for researching the subject will garner some more information and availability.
That's it for now. I'm going to turn some of my attention to a Heathkit project tonight that I've had on hold.
_______________________
July 1, 2018
Got out earlier this morning to begin installing the connecting rod bearings. According to the Plastigage, my clearance was less than .001" with the .010" undersized bearing. .001" oil clearance is the minimum specified for this engine. Not understanding why the crankshaft was marked red as .010" undersized at each connecting rod journal, I decided to buy a set of Sealed Power .001" undersized bearings from Rockauto just in case the crank is a standard connecting rod bearing journal diameter. They should be here by the 12th. I don't trust the micrometer I have available or my digital caliper at this point.I left in the .010" undersized bearing halves in the connecting rod upper half for now on cylinders 3 and 4. Until I get a final fit I won't need to do any of the others.
Nothing else came up so I didn't get anything else done beyond this. Glad I did it though. Saved me a week of lost time checking it now to take action rather than my two day weekend off next weekend.
Bye for now!
____________________________
July 2, 2018
I received a package containing an antenna mount for my Icom IC-7100 installation. To read more, please visit my Shack Happenings page in my Heathkit Interests blog. https://heathkit-interests.blogspot.com/2018/01/shack-happenings.htmlI have the 4th off and I'm planning to do some work. I might install this antenna mount or I might go back to the engine and see if I can verify the issue with the bearing size. Just not sure if I can trust either my digital caliper or the old micrometer I'm borrowing. I will get a much better idea when I get the .001" undersized bearing shells and try them. I know I'm not supposed to mix the .010" with the .001" so I won't consider that. I am however interested in finding what the oil clearance is with just the .001" bearings. Tightening the bearing cap shouldn't have left a mark on the new bearing surface but an slight imprint of the oil feed hole in the journal was made. Because of its location so close to the parting line between the two shell halves, It may just be the distortion from the crush amount built into the shells for a tight fit in the connecting rod. I still don't like it so I'm going to see if I can borrow a micrometer from my brother-in-law to see if I get different results on the bearing journal diameter of the crankshaft.
That's it for tonight's update.
TTFN!
________________________________
July 4, 2018
Happy Independence Day to my fellow U.S. citizens!Just a short post today. I got up under the engine this morning to micrometer connecting rod journal 3 and 4. According to the tool it measures 2.095 and 2.095 respectively. So the paint markings on the crankshaft are incorrect. They are red and should be Yellow or Orange. I will take into account that the yellow dye in an Orange paint might disappear over time due to chemical reaction to the oil detergents and wear compounds used in motor oil. I can also accept the MOPAR Jeep Engines book is wrong and doesn't take into account any changes to procedure after its revision date since no mention of any other paint colors were made outside of the tables supplied in the book. So I'll have to order standard size bearings. This is in addition to the .001" undersize I already ordered and are on the way. So it looks like I won't get the bearings done until the 21st.
The main journal bearings are also in question even though the color on the rear flange of the crankshaft shows red to indicate Journal 7 is Standard. I haven't removed the transfer case or transmission anticipating the crankshaft would not need removal. Checking the main journals will be impossible without removing from the block. I may roll the upper shells out to inspect them. If they don't have any significant wear I'll put them back in. If they do, I'll cross that bridge when I get to it.
I installed an antenna on the vehicle in preparation for the radio installation in the future. To find out more about that, check out my other blog here. Heathkit Interests. Click on the Shack Happenings to view general updates at my QTH.
Bye for now!
_______________________________
July 10, 2018
Good evening! I've finally received the last of my engine bearing order today. After changing, I got straight to work on it. Since rod bearing 3 and 4 were already in the BDC position from last time, I just started with those. After removing the cap on 3, I pushed the piston up so the bolts would clear the crankshaft rod journal. I removed the bearing shell I left in there from my .010 inch undersize experiment, wiped down the connecting rod then shot it with Brake Kleen from CRC to wash any debris off of it. Next I shot the journal and ran a blue paper shop towel around the journal and then wiped the connecting rod. I performed a similar task with the rod cap.Once satisfied it was clean I installed the standard bearing shell half into the connecting rod and a .001 inch undersized shell half into the cap. The standard bearing size shell half must always be installed into the half of the bearing that sees the most forces applied to it. In the case of connecting rods, it's the connecting rod half that gets all the stress. The cap gets the .001 undersized half and Plastigage for the oil clearance check. No oil is used for this check or it will be distorted. You want to know the dry clearance.
In the case of the main bearing shells, the cap gets the standard bearing and the block gets the .001 undersized half. This is because of the force of the power stroke against the crankshaft is always in a generally down direction, plus the weight of the assembly itself so the thicker bearing half must be in the cap.
 |
| Trying to aim the camera to reduce glare and get the scale lined up correctly isn't easy laying on your back. After the second failed shot, I made one last try but still didn't line up the scale very well. |
It's spot on at .0015 inch clearance, which is where the sweet spot is on this engine in stock trim. This is the combination the factory actually did use regardless of the color of the paint markings I saw. Side-to-side clearance is also within spec. I'll get pics of the old bearing shells from 1 and 6 next post. The upper bearing halves were down to the copper layer. The bottom showed signs of oil starvation streaking. I did cylinder 3 and 4 first but I'll try to video doing 2 and or 4 tomorrow morning.
To make the pistons slide up and down their bores easier I squirt a tad bit of oil into the cylinders like yo would for a compression test, before I work on the bearings to keep the rings lubricated. WD40 is too thin so I use plain old 5W-30 synthetic. Synthetic oil flows better so I won't worry about it getting where it should or varnishing up from sitting. I'll shoot WD40 into the cylinders before I fire it up as I don't want the oil captured in the ring lands to cause any hydraulic action and break a ring land. I'll use some SeaFoam later in the tank after the engine is running and the camshaft broken in.
Speaking of lubrication, the assembly lube of choice for me is CRC's Sta-Lube Extreme Pressure Assembly Lube with moly-graphite. Check it out here. I install the bearing half into the connecting rod then goop on the assembly lube on the bearing surface. I pull the piston and rod down carefully onto the crank journal. Remove the protective hoses over the connecting rod bolts and goop up the bearing half in the cap and install. Install the nuts and torque to 33lbs/ft or 396lbs/in in two passes. One to snug and the second to final torque. You want to torque down the nuts carefully to give the assembly lube a chance to squeeze out as they are tightened or you could crack a cap. Once you are done, go back and recheck the torque after it sits a while to make sure it is still tight and you weren't torquing against the hydraulic effect of the lube. I used an inch-pound wrench since my foot-pound wrench won't work below 45lbs/ft.
What about the paint markings on the crankshaft? It's probably red now because the yellow pigment in orange probably faded from the temperatures cycles, detergent oils, blow-by, and additives over the years. I will have to see what the paint color on the rear flange of the crankshaft is denoting the rear main bearing size since it's not been exposed to oil or grease. In fact, I hesitate the remove the main bearing cap because there is no leak at the rear main seal. However, I must replace the bearing. To see if the rear main bearing is Standard, Standard with .001 undersized or .010 undersized total I'll have to drop the exhaust pipe from the exhaust header. Then pull the flex plate shield from the bell housing and rotate the crank until I can see the paint mark. Dang. Another risky fastener removal. The rear main bearing is sometimes a different size than the rest of the bearings.
The A/C compressor bracket with the mechanical fan and clutch was taken to the machine shop. I got word that the broken bolt was successfully extracted. Now I just need to get a replacement bolt and see if I need to Heli-Coil the hole for the proper size.
It seems things are starting to come together on this and unless the main bearings are not the correct size, I hope to have this engine started on the 21st or 22nd of this month.
I've got an amateur radio related update on this Cherokee. To view, please go to my Shack Happenings on my Heathkit Interests blog.
Have a good night!
_____________________________
July 11, 2018
This morning was really nice. A bit on the humid side but it was a welcome refreshing relief from the heat of the days.I got set up to get the last two connecting rod bearings replaced. After lighting the two small Citronella candle buckets to help keep the bugs away, I crawled underneath and began work on filming. Filming? Is that even used as a term anymore? Whatever it's called this month, I tried to capture the process of changing out one connecting rod bearing. I am editing now and will post when I can. The audio was so bad I just muted the track. Thanks to YT's restriction of 10 minutes for us po folk, I am not going to be able to show the whole thing start to finish. Yeah, it's long with some dead video time as I had to get out from under the vehicle because I forgot something but you'll get the idea.
Now in no way do I endorse this action or even recommend it, except for extreme instances like a trail repair. If I had the time and money and place, I would have pulled the engine and done the refresh on a stand. But, many on the forums are stout believers that it cannot be done. That's only because they either never tried themselves or had a bad experience and gave up rather than understand what went wrong. Changing bearings is easier than changing a camshaft without removing the head on the Jeep 4.0L. Believe me.
The photos are of numbers 1 through 6 connecting rod bearings.
 |
| 1 |
 |
| 2 |
 |
| 3 |
 |
| 4 |
 |
| 5 |
 |
| 6 |
The upper shell halves are the standard sized bearing halves. The bearing halves in the cap are .001 inch undersized the factory used to optimize the oil clearance. There are no markings on these bearing shells. Only a very faint, if visible, painted edge to identify what the size of the bearing is. I saw only the faintest red mark on the edge of the cylinder 2 bearing but I could not get the camera to pick it up. You can see all of the upper bearing halves are worn to the copper plating. This is the last layer before you reach the steel bearing shell insert. Cylinders 1 and 5 had worn through to the steel backing. 5 was worse and could have been the source of the faint sounding knock at 1500RPM. When I went to go check out the Jeep back in April, there was the usual lifter knock you get when a lifter collapses. It usually goes away as the RPM's come up and the lifter pumps up. Only a faint knock sound remained at 1500RPM so I figured there was a totally dead lifter in there. I will have to get the borescope working again and view the interior of each cylinder as best as can be done.
That's it for today. Goodnight everyone!
______________________________
July 14, 2018
I received more parts this week from RockAuto, CarParts.com and DX Engineering.From RockAuto: Auxiliary cooling fan assembly for the A/C system; Upper, lower radiator hoses and thermostat housing by Gates; SuperStat thermostat and radiator cap by Stant; Dana 30 and Chrysler 8.25 differential cover gaskets by Fel-Pro.
From Car-Parts.com: Export version of the front turn signal/parking lamp housing by Crown Automotive. These were clear, non-colored lenses for USA sold vehicles while Europe, Australia and several other countries required amber colored lenses. Since the clear bulbs are far more numerous and available than the amber light bulbs, I chose the amber lenses. The amber contrasts better than the clear with the Hunter Green finish with black accents.
From DX Engineering: Two 17-7 Stainless Steel 102 inch (2.59M) whip antennas; Hustler SSM-2 antenna ball mount; DXE folding camp chair. Click here to read my post entry evaluation on the ball mount. Scroll down to my July 10, 2018 posting.
I've added these parts to my list of parts used in working on the Cherokee by category to help keep them a little organized.
The oil pan and valve cover have been delivered to the machine shop I use. I dropped something heavy, I can't remember what, that hit an edge of the pan's flange. It bent it pretty good at the very edge. The sealing surface was not affected and I think I'm pretty lucky to have only gotten that. Hopefully my machinist, Steve, can reshape it after cleaning it. If not, I'll be scrounging for another pan and have to put off the first start up and cam break-in. I hope to have them cleaned up next week so I can prep and paint them.
Steve was successful in removing the seized portion of a snapped off bolt in the bracket for the A/C compressor. All I need is another bolt, or four, to fasten down the compressor properly. This saved me a lot of time and $$$ in locating a used unit for around $80 used to $300 new-old-stock or re-manufactured. The used units may last quite a while or die next start up. It's crap shoot. The bearing in mine seems to be fine for now. Time will tell. Worst case scenario is I have to press the bearing for the fan out and convert to all electric fan use with a 3 row radiator. There have been those that have attempted to replace the bearing since the bearing is about $20 or less. The problem has two faces. First: the aluminum is brittle by nature and pressing in a new bearing may or may not crack the bearing housing thus ruining the bracket as a whole. Second: If the replacement bearing has a larger outside diameter, you'll crack the housing. Steve would likely check this to make sure it fits. If not, he can either bore or hone the housing ID to the correct size and press in the bearing.
If you recall, this bracket supports the A/C compressor, mechanical fan, alternator, and an idler pulley. It may be possible to use the A/C bracket for the Grand Cherokee of the same year and lose the mechanical fan. The GC also had a mechanical fan but was mounted in the traditional location on the water pump pulley. But it had more space between the water pump and radiator that could use a much larger fan and clutch arrangement.
I was able to install the oil pump pick up tube into the pump's inlet port. Lemme tell ya. I don't like trail fixes unless they are absolutely necessary. Well, funds are running low and I didn't want to spend the $15+ to have the machine shop press it in. Before I started, I dribbled some oil into the inlet and smeared some on the insert length of the tube. Setting the pump up into a wedge to hold it still, I used a 5/8 inch open ended wrench and a nylon/plastic hammer. Striking the side of the wrench close to the end, the wrench engaged the flare in the tube to drive it into the pump. Once complete, I wiped the 3000 grit cloth against the marks left by the contact with the wrench on the flare to knock down the sharp edges left behind. There is a tool that performs the same task but shaped to closely hold to the pipe and engage 180 degrees of the flare instead of three points. I do not recommend this unless you are in a bind and must get it done. Always spray it down with brake cleaner after any sanding or grinding to smooth out any marks left behind by the tool.
Next I poured motor oil into the outlet port of the pump and turned the shaft counter clockwise to move the oil into the rotors to prime the pump. When I get the oil pan back, I'll do it again only this time I'll turn it with the sump submerged to ensure it will draw up the tube. Wiping down the gasket surface, I'll bolt the pump in, bolt the pan up, fill it with oil and use the old distributor, sans drive gear, to spin the pump and prime the engine's lubrication system. This will get oil to all the bearings, lifters, and up to the rocker arms before I start the engine up for the first time for the camshaft break in.
What's in store for this weekend? Install the timing set, clean the cover and install the front crankshaft seal. Next I'll smear the Sta-Lube Molly-Graphite assembly lube onto each cam lobe in preparation for the first start up.
I should be able to install the A/C compressor and fan bracket after clean up with simple green, a bucket and a brush. I don't think I'll paint this as the natural look of aluminum (aluminium) looks good. I might seal it with clear paint. I might paint it a bright royal yellow or Denver & Rio Grande Railroad Aspen Gold to honor my favorite railroad (a fallen flag). I will not paint it Ford blue or Chrysler Corporate Blue. But AMC had a pretty cool blue-green metallic color called AMC Lancelot Turquoise Metallic. But copper might be a nice contrast with the green, black and aluminum coloring.
So at this point I still have a lot to get done by September 1, 2018. That's the day my daughter gets the keys to the TJ as the new owner. Sooner if possible but certainly no later. If the XJ isn't done, I'll have to ask to borrow her Jeep.
Have a good night!
___________________________________
July 15, 2018
A short update this time. This morning I went out to diagnose the roaring sound coming from the rear axle when I drove it home back in April. It was so loud I thought it was the carrier or pinion bearings. I don't think so now. After disconnecting the drive shaft, pulling the axle shafts out along with the drive and spider gears, the action of the bearings for the center section don't have any rough spots or abnormal noises. That prompted me to look at the axle shafts. Sure enough, the right side shaft where the bearing contacts it was very rough indeed. Looked worse than my TJ's right rear axle, which also had to be replaced.
So back to RockAuto to order a 1050 axle (OEM material) from USA Standard Gear and two axle shaft bearing kits featuring Koyo bearings. I would have chosen Timken if they were offered but RockAuto didn't have them for my axle. East Coast Gear Supply uses USA made Timken and Japan made Koyo bearings according to their Chrysler 8.25 master bearing kit description.
Previously I mentioned (I think) I ordered Gabriel ProGuard Heavy Duty shocks. Those and the front sway bar end links are also in the order. This order is coming from three warehouses so the shipping ain't cheap but the total bill is cheaper than anywhere else. Even Amazon. I perused Quadratec, 4WD.com, and a few others but the total bill was less with RockAuto.
So I wait for more parts to arrive to complete some other tasks. The oil pan and valve cover will be cleaned this week at the shop so I can get the engine buttoned up and ready to start.
Next task is changing the transfer case fluid. Will tackle that sometime this week after work.
That's all for now!
______________________________--
July 19, 2018
Good evening folks. Yesterday I brought the oil pan and valve cover home from the machine shop for a Jet cleaning. I was hoping the oil pan would be hot-tanked but I forgot to check the box. The valve cover is aluminum and cannot be hot-tanked lest it dissolve into the liquid death.I used a medium wire wheel with my battery drill on high-speed on the valve cover to scrape away the bare corroded aluminum into a dull gray finish. Once those areas were de-greased and dry I then sprayed them with the etching primer to prevent exposure to air and thus oxidize the aluminum. I had Krylon's Dupli-Color Etching Primer on hand. I'll get back to that later since I'll need to strip all the paint off the valve cover.
Using the wire wheel again, on the oil pan, I roughed up the Phosphor costing from the factory and knocked off as much off as would come off. First was the area where the bolts cinch the pan to the block. Grease loves the creases and corners and using some Simple Green was needed with a small brush to get that out. So all of the rust around the holes were taken care of. A couple of other places where rust appeared was also wheeled clean.
With another de-greasing event completed and dry the pan was sprayed with the etching primer. This primer has a bit of Olive Drab coloring when dry. Pretty nice looking actually. Once this was done, it was getting a bit too dark to photograph it. I hung the pan from a hook in the shed to dry and cure through the day today. I believe the shed gets pretty hot inside. 120+ degrees F. I have to be careful storing anything flammable in a pressurized can in the shed. I keep those on the floor in a plastic crate against the North wall. The pan was hung from a truss to get the most benefit.
This evening I pulled it down, dusted it off with a tack cloth and began painting with Desert Sand engine paint, again from Krylon's Dupli-Color line. The first two coats went on well and while waiting for the second coat to tack up I started cleaning the rear differential cover. I use Simple Green whenever I can and CRC or 3M brake parts cleaner for stubborn spots. They de-grease and don't leave a residue. The cover had quite a bit of surface rust and took out one battery of two for my drill to get only 75% done. Popped a fresh battery in and I was able to complete the wire wheeling.
 |
| A contrast to show how bad the Chrysler 8 1/4 rear axle cover was. |
 |
| Wire wheeled and ready for degreasing and a tack cloth. |
 |
| Primed with Krylon's Dupli-Color Etching Primer. |
So here's the oil pan with the completed primer finish.


Hard to see in the photos but it is a bit like Olive Drab.
Now here's the finished pan.


It's interesting how the trees reflecting off the finish changes the color of the curves and bends in the pan. Where it looks like there not enough paint, there plenty. It has four coats.
"Tan! Why THAT color?!!!" You might be asking. I thought about going retro back to the Kaiser Jeep or AMC Jeep era's to see what engine colors were available. There was one color I especially liked called AMC Lancelot Turquoise Metallic. It clashes a tad bit with the Hunter Green Metallic the body already has so I scrapped that idea. There is also a Cape Cod Blue Metallic that is quite nice but again, it clashes with the Hunter Green, which I like more. Of course the engine was painted black and that's okay too but I wanted something a little different without being loud.
Lancelot Turquoise Metallic
https://www.amarkamc.com/product.sc?productId=781&categoryId=39
Cape Cod Blue Metallic
https://www.amarkamc.com/product.sc?productId=541&categoryId=39
Seeing as how Jeep had been synonymous with US military hardware, I like the Olive Drab (OD Green) and the desert sand tan or beige colors. I don't know if there's an actual color name other than Desert Sand so I'll go with that. I've seen pictures of Cherokee XJ's in this color (http://www.ericsxj.com/paint/paint2.htm ) as well as the Willy's in Navy Gray
( https://www.pinterest.com/pin/170855379586187483/?lp=true )
I know flat or ultra flat is the correct finish but the color is what I'm after, not to mention the gloss coat is easier to keep clean. Powder coating is the best option unless the aluminum can't take the heat, then I'll opt for an epoxy paint sometime in the future.
Tomorrow, if it's not raining, I should get the rear diff cover finished and reassemble the rear end with new axle shaft bearings, seals, and a new axle shaft. Button it up with the diff cover fill with 80-90 fluid and call it done. I do still need to clean the bolts up and paint them. I'll go with black to contrast the sand color.
That's it for now!
______________________________
July 20, 1969
"Houston ah,...Tranquility base here. The Eagle has landed."Neil Armstrong - NASA - Apollo 11
Today marks the 49th anniversary of Man's first landing on the Moon. I remember watching this on television when I was little. Such a time in Human history. Between my Dad's electronics background, automotive mechanical interests and the space program, I feel fortunate to have some knowledge and skills to work with. So with that, on to the Jeep...
The weather is threatening to be nasty this weekend and I've been working on the Cherokee after work this week with the hour and a half of usable daylight I have. So far I've gotten the oil pan, valve cover and the rear diff cover cleaned. The oil pan is primed and painted as is the diff cover. The valve cover, however is a bit more of a challenge. The paint seems to be either an epoxy type or a really heavy enamel. Hard to chip or wire brush off so I will have to resort to a chemical solution to remove the paint. As posted earlier, I wire wheeled the already exposed aluminum and primed over that to prevent further oxidation. Now I know the oxidation is a layer that actually protects the aluminum underneath as found in aluminum antennas that spend their time outdoors.
In the valve cover's case, there is a sharply defined edge where the paint ends making it look pretty bad trying to just apply primer and paint. For now, I may just leave it alone to get the engine completed over the next two weeks.
The rear diff cover was to be painted the Desert Sand but seeing as how the rest of the rear of the Jeep is black, I'll go for the Olive Drab Green (OD Green) to bring a little bit of subtle color to the underside but keeping it toned down. My use of these colors is intentional to honor, even if in some small way, the US military and the original Willy's vehicle. If I had the time and the funds, I would buy more XJ's and do each of them up in military colors. Air Force Blue, Army Green, Navy Gray and the Marine version of green. The Marines are part of the Navy and did have their own shade of Green (Forest Green?) but also used the Army's color to save time as the vehicles were in very high demand and nobody wanted to complain and risk delaying their delivery. If I remember correctly, many of the Navy Jeeps were gray but the underside was OD Green to save time during production.
Interested in military Jeeps? Go to Olive-Drab for more info!
Since the morning looks to be relatively dry and will deteriorate as the day progresses. Hoping it will happen later rather than sooner, I have draped a large tarp over the front of the Jeep using the hood as the main support to help protect the engine and myself from getting soaked while working underneath. So the plan this weekend is to remove the oil filter adapter (finally) and put new O-rings on it then put it back on the block with blue thread locker. Then I'll install the oil pump, timing cover, and oil pan. I still have to knock the distributor drive gear from the old dizzy to use as an oil system primer tool. From there re-installation of the various bracketry and accessories can commence depending on a few factors.
The rear axle will have to wait until Sunday morning since I will have to extract the axle shaft seals and bearings from the axle tubes and install new ones. Once that's done, the shafts go back in, the C-Clips installed with the cross pin shaft secured. I'll chase the threads for the cover bolts with a tap to clean them out, reinstall the cover and fill with Lucas 75W-140.
The old rear shocks can be removed and replaced with new ones.
While the driveshaft is disconnected from the rear end, I'll pull it out and check the front U-joint. I didn't hear anything before but now I can get my hands on it to see.
Should I get this far in my plans for this weekend, I'll go ahead and do a drain-n-fill on the transfer case.
The stock front sway bar end links arrived today but their installation is a little ways off until I get the front axle re-installed.
Nothing more on the radio installation so that'll end it for tonight.
________________________________
July 22, 2018
Wow! It didn't rain during the day at all this weekend here! Was never so happy for the weather reports to be so inaccurate this time!Previously I cleaned, primed and painted the oil pan and rear diff cover. Saturday I spent time on the engine to clean various bolts, timing cover and such. While the primer on the cover was drying, I brushed and rinsed the fasteners for the timing cover, oil pan and rear diff cover.
After wire brushing the threads with the Dremel tool and a wire wheel, I tackled the holes in the block and used a tap to chase the threads and clean them out. Lotsa junk in there. I did the same thing with the rear diff since it had soooooo much orange RTV I figured there would be quite a bit packed in the cover bolt threads. There was. Shooting a shot of WD-40 then running the tap in cleaned them right up. NOTE: If you change your rear diff fluid, don't just glob RTV over everything on the mating surface please. You can damage the threads with a hydraulic lock when the goo can't escape the hole as the bolt is tightened down. You'll be torquing against that goo and you can strip the threads or worse. If using a gasket, clean the axle housing mating surface with a good quality scraper and work around the opening. Never scrape toward the inside or outside of the case. Always scrape around in the direction the gasket follows the surface so any scratches or gouges in the metal don't offer a direct path for the fluid to leak through. You can also use a die grinder and a 2" 3M Roloc Medium (Maroon) surface prep disc. It's a kind of spongy pad with abrasives fused to the fibers. This will clean the metal without damaging it. You can get them at CarQuest or Advance Auto Parts. They have a starter kit for a high speed drill. I can't find the small refill kit number right now but you can buy the 07481 box of 25 2 inch medium grit discs. These do wear out pretty fast as the abrasive is sacrificial.
3M Starter Kit - 03050
The only parts for gasket removal are the base piece and the Maroon disc. The others might be useful on other items but be careful using any of it on aluminum gasket mating surfaces.
Now that the gasket surface was clean, all that was needed was the cover, gasket and RTV. I applied the RTV Ultra Black to the cover in a very thing layer. I only used the RTV on the cover so as to fill in any imperfections the cover has such as deformed hole, heavy nicks from previous service done with a screw driver and a hammer or flexing of the cover. The cover flexes pretty good actually. The axle housing is a machined surface and should never need RTV.
Finding out that I can install the wheel studs into the flange of the new axle shaft, I put in the C-Clip and reinstalled the crosspin. After thread locking the crosspin retaining bolt I installed the cover and clean bolts torquing them to 35 lbs/ft as per the specs. Funny that they need two more pounds than the connecting rod bearing caps.
I went on to install the rear shock absorbers. Looking back through the service paperwork, they had never been replaced. It's possible considering the I could collapse one with virtually no effort. The driver's side shock had only a slight amount of resistance. The bolts were soaked with several shots of an ATF+4 and Acetone 1:1 mix I use as a nut buster. I have gotten better results with this than with anything else on the market. The upper shock bolts are usually the ones that rust badly and snap off. The lack of rear rebound bumpers suggests they would be rusted pretty bad. Shooting the mix up behind the bracket they bolt through was hard. Hitting the threads was so shooting a lot in there hoping some would find the bolts seemed okay.
I let them sit for several minutes as I went to try out some paint remover on the valve cover. It's aluminum so I had to be careful not the let the stuff sit too long on it. 10 minutes when by and very little bubbling of paint was seen. 20 minutes passed with little change. It was a bust. I rinsed off the chemical with water and took the wire wheel to it to knock off what I could. It knocked some off but not that much. On to more aggressive stuff later.
Back under the rear of the Cherokee I went with three bottles of Luca Synthetic 75W-140 gear oil. Traditionally you'd wait a few hours before introducing gear oil to the case with RTV. However, I didn't use RTV exclusively thus the wait time was a lot less. I had to jack up the axle to take the weight of the Jeep in an effort to level the fluid fill. I got a shade over 2 quarts in and popped in the rubber plug calling it done.
Back to the shocks and the bolts started stiff and hard to turn. A couple of reverse turnings to tighten then loosen and the bolts came out pretty easily. There was some rust on the threads but not as much as I'd thought. With the shocks removed I wire wheeled the lower shock mount studs, greased them with white lithium grease and reinstalled. These are Gabriel ProGuard shocks and are advertised as gas charged heavy duty. I liked Gabriel back in the '80s but haven't used them since. My go-to shocks have been KYB's and Rancho steering stabilizers. Will be interesting to see if these Gabriel's are good or not. The only things left back here are brake system flush, and rebound bumpers. The old ones barely had anything left from the rusted bases. There wasn't any rubber at all. Sorry I didn't get any pics. I was in one of those rare "in the zone" mental states and stopping for pics wasn't in the program lest I lose the momentum.
Checked out the rear driveshaft and U-joints. Blobbed a bit of grease into the caps for good measure and reinstalled them and the driveshaft. On to the transfer case...Drain, flush, fill, done. The fluid that came out looked like light maple syrup like straight SAE 30. I know the fluids had been changed sometime prior to my purchase. Knowing that didn't help my sense of confidence it was done right. Some run 30 weight oil but I prefer what the factory recommended in the later NP231 cases, ATF+4. Dexron II was specified but you can't find it anymore as Dexron VI supersedes it now. I don't know enough about the new fluids properties to trust it will work so I use the same as what my TJ specified. The flushing part was only to pour in good fluid to force out the old stuff until it flowed clear red. Since the NP231 hadn't been run or operated, all the fluid would drain out over the hour I let it while doing other parts cleaning work.
By this time I was getting pretty hungry so I closed up shop, grabbed a showed and a change of clothes and took my daughter out to lunch followed by a trip to the grocery store. When we got back the front of the Cherokee was bathed in bright sun light so I had to wait until after the NHRA Mile High Nationals and Bandimere Speedway in Denver, CO were complete. Nice to see John Force winning races at age 69 with his 8th win at the Mile High Nationals in Funny Car! Equally nice to see Top Fuel racer, Leah Pritchett win Top Fuel at Bandimere too! She is truly a woman of power!
Back to the Transfer case work and after plugging it I filled it with 1 1/2 quarts of ATF+4 from Castrol. Once the whole vehicle is done and back on the ground, I'll go back through and top off the fluid levels.
While underneath I looked around and noticed some carbon build up on the muffler. Will need a new one by January and I'm already looking for a quiet one. The SoundFX from Thrush (Walker Exhaust) sounds pretty good but it's not a stroker or a V8 and doesn't need to sound like one. The tail pipe is quite rusted and probably the original as well. The catalytic converter had been changed out at some point since it and the link tube to the muffler look relatively recent. A few years maybe. The front pipe looks to be in OK shape and the header looks to have been replaced a few years ago as well. The only really rusted parts are the tail pipe and muffler.
The engine...
So the sun has gone down past the tree line and I again have shade. So I snagged the RTV, gasket, harmonic balancer pulley, painted and dried timing cover with new crank seal, timing chain set and some bolts. The RTV went on the cover first in a very thin layer then the gasket was stuck to it. I debated using the RTV on the block side but I wasn't convinced the gasket surface was perfectly flat. Even with two new razor blades there was some snagging of the blades in a couple of spots so I decided to use a very thin film of RTV on block side as well. The dry fit went perfect but the blades snagging on some rust bothered me a bit.
The camshaft sprocket bolt contains a spring and pin in its center. It's to keep the camshaft from walking forward. In 1999 a redesigned block was produced that used a thrust plate and eliminated the spring and pin. By using the plate, the double-roller timing set was no longer available due to the spacing the plate used up.
I lubed the spring and pin and inserted them into the bolt head then brushed on some Sta-Lube assembly lube on the chain and sprockets and the end of the bolt and pin. The timing cover was ready to install and careful positioning, and strategic placement of the bolts needed, the cover was cinched down. The harmonic balancer pulley was pushed up to the end of the crankshaft but without an installer, I couldn't press it on. So I hope the balancer's machine surface the crank seal uses was centered. The Jeep engine book specifically states to use the harmonic balancer to center the seal then tighten the timing cover bolts. The 6 small bolts were tightened to about 5 lbs/ft and the stud to 16 lbs/ft. There was a bolt at the top of the cover with a 5/8 inch head that was also tightened to 16 lbs/ft.
 |
| Classic OD Green |
 |
| Done! |
 |
| Driver's side upper shock mount. You can see what's left of the rebound bumper in the lower right where the two bolt holes are in the sub-frame. |
 |
| New Gabriel ProGuard heavy duty shock. |
 |
| Passenger's side. Shock is mounted forward of the axle. |
 |
| Timing set installed and then the Sun came out from behind the clouds. The red on the end of the crankshaft is the sealant used to keep oil from getting past the harmonic balancer pulley. |
 |
| Classic OD Green cover installed. I used white lithium grease on the crankshaft seal. I'll wipe that and use motor oil since that is what will be flowing through the engine. |
 |
| Almost 8PM so I closed up shop and put Nanye-hi (pron: nun-yeh-hee) to sleep for the night. |
Oil pump and pan install!
Until next time!
___________________________________
July 25, 2018
Getting up early on your day off isn't usually in the cards. The Cherokee is a special case and I'm on a deadline. The first order of business was to finally install the vibration damper/pulley. Borrowing an installer, that went quick. The process was to grease the crankshaft where the damper is installed but leave the woodruff key clean. A smearing of black RTV on and around the key and oil, not grease, around the seal surface of the damper is a must. If you don't seal the woodruff key, oil will seep around past the woodruff key and you get the grimy buildup so common. Some leak so bad many a mechanic mistakenly replaced the front crank seal. You can't totally depend on the oil slinger to keep oil from getting the the key.Now I said oil, not grease, for the seal surface. Some greases are not oil soluble. Some greases will ball up and destroy the seal and other greases are just fine to use. Know what the grease you intend to use does on a fast moving surface. Does it flow or not? Is it oil soluble or not? Or you can just use what the engine uses and oil the seal and the seal surface of the damper. I do pack vaseline around the retaining spring of the seal lip because now and then the spring will roll off back of the seal lip. It's thick, is oil soluble and stays put. Most white lithium greases are too thin and ball joint/u-joint grease has stuff in them that make them unsoluble.
Wrenching the damper on to the crank is easy until the crank begins to turn. I held the crankshaft in place at the flex plate since I already had the starter out. The best way is to use the proper tool. Most I've seen are basically a flat metal tool shaped like a pin spanner and holds the damper with one wrench while using the other to tighten the bolt. https://www.amazon.com/OTC-6495-Harmonic-Balancer-Chrysler/dp/B000F5HUYO
The torque on the damper bolt is 80 lbs/ft.
 |
| Damper installed. Water pump doesn't need replacing but should be wire wheeled so the pulley sits flat on it. |
With the damper installed it was time to finally get to work on the oil filter adapter. The very piece that was the root of this whole refresh scenario. The o-rings in this don't get changed until they leak. When they leak, it's a major PITA to get off the first time because the factory used red thread locker. This is nasty stuff and if they use a lot, you'll pull more than 100 lbs/ft before it breaks loose. The only reason Jeep used it was to prevent vibration from loosening it up with the filter attached. The Renix engine had the filter angled up toward the hood. Some said this allowed oil to drain into the block and empty the filter. Unless air could seep past any of the bearings to reach the oil filter, oil stayed in the filter, except for a small air bubble that never really evacuated. Oil couldn't drain back through the oil pump because of the oil pump rotor's design. Oh it could if left alone for several weeks giving the oil a chance to seep past the rotors in the pump but air would still have to get into the filter to equalize the static pressure for it to do so. For example: Put a straw into a glass of water. Holding your finger over the top of the straw, pull the straw out. The water doesn't run out of the straw until the pressure behind the water at the top equalized when you lift your finger and allow the water to escape the straw. The exact same principle is in use on the 4.0L regardless of the position of the filter. But, it still makes much more of a mess than it should.
 |
| Filter adapter housing with 9/16 Allen head tool inserted in the housing bolt. The tool uses a 17mm wrench and some leverage with a longer piece to break it free. |
 |
| All of the pieces of the filter adapter plus tools. |
I will band-aid the adapter leaking problem for now but will plan for a filter relocation kit in the future.
Which brings me to the oil pump install.
It's not hard and it was short enough I didn't try to edit it. The bolts are torqued as follows: Long bolt 17 lbs/ft, short bolt 10 lbs/ft. I did it in two steps to prevent warping the gasket.
BTW - in editing the video where I showed the installation of the rod bearings without removing the pistons, I need another piece of editing software. My old version of Power Director seems to have some issues with Windows 10. I'll keep trying but don't hold your breath on that vid coming out soon.
Now the oil pump is installed and I was finally ready to install the oil pan.


Yeah. I chose glossy paint. Only because glossy is easier to clean than flat. I like the FelPro one-piece pan gasket. No more fussing with four pieces and getting them to fit together. The valve cover will be flat though.
So with this done, I can put oil in the crankcase and prime the oil system once I knock the gear off the old distributor. I'm a few steps closer to the first start!
TTFN!
_____________________________
July 28, 2018
It's getting to be a lot like crunch time,Til the engine starts.
For the prettiest site I'll see is the fan and belt spin-ning,
to bring a glow to my heart.
Okay. I know that was bad but I really wish it were holiday time and a lot cooler weather. I have only two full weekends off to get my XJ on the road by September 1st and hand the keys over to my daughter, officially delivering the TJ into her possession. It's been hot, humid, rainy, and storming enough to keep me from going outside much. I work every other Saturday, like today, so I don't get all my weekends to get anything done. I get one four day weekend from the 15th-18th which is the last weekend I don't work before September. This was a vacation time weekend and the final push to get the Cherokee registered and on the road. This is on top of all the other "gotta do's" on the list that help make up life in general. Sometimes I'm so tired I fall asleep at the computer here at home. But I digress...
Tonight's work, after work, was to simply install a stripped wheel stud into the new axle shaft. A bad lug nut goobered up the thread so I had to knock it out and get another. Finally done with that, I cleaned, lubed, and adjusted the drum brakes and put the drums back on.

Sunday morning will be cooler and I will pull the transmission pan and change the filter and gasket. I bought two new oil cooler line fittings for the transmission end so those will go in after that. Installing them will be pretty easy and lubing the steel lines with ATF will let them slip into the new O-rings more easily. I have the brackets to support the cooler lines but can't find a before-picture to help locate which oil pan bolts they were attached to so the lines will have to help me out with that.
I hope to get the, fan and A/C compressor bracket with new idler pulley installed first. Then I can reinstall the alternator, power steering pump, and finally the drive belt. If all goes well I can begin reinstalling the grille header to put the condenser and radiator back into place.
Of course fluids are a must and once the trans cooler lines are reconnected I can do a preliminary fill on the old AW4 with Dex/Merc. I'll have to drain it in a month as the old stuff stank beyond belief and I want to get as much out of there as possible since so much is trapped in the torque converter at any given time. They say that flushing out the old via the trans cooler pressure line will get it all out but I'm a bit skeptical since the fluid intermixes in the torque converter with eddies and currents that are not linear. It might work but the aggravation of having to control how much goes in matching what's coming out is tricky. Easier to just drain the pan, fill with fresh and know there's a little more clean fluid in there. Another possibility is to install a full-flow inline filter to the cooler. This seems a bit more practical and I might do that in the future. It's easy to install one even if you use compression fittings or a spin on type filter with AN fittings.
First Start is planned for next weekend. I have to get as much done tomorrow and this week to be ready to get the XJ registered and tagged. Not looking forward to the new insurance bill but daughter is working and pays her portion which helps quite a bit.
The Curse of the Oil Filter Adapter
Ah yes. I remember why all of this transpired. A fresh undercoating every few miles with every quart. That should have been the selling point by the previous owner. I don't know if my grass will ever grow there again. Just kidding. I had a tarp or pan or board to catch anything that dripped while I cleaned and worked under the engine. |
| Correct O-ring |
 |
| Wrong O-ring. Get a clue Fel-Pro, Mahle, Dorman, and every other parts supplier that doesn't know Sh*t about this adapter! |
 |
| Here ya go! The one on the left is the original and is correct. The one on the right came in the kit and is wrong! WTF Fel-Pro?! |
After waiting two days for the Fel-Pro ES72962 to arrive, I was really excited to get the adapter back on tonight. Well, Federal Mogul, parent to Fel-Pro, is a mass fail! Mahle did the same thing. Dorman, which is pretty darn good for fit, also failed this litmus test. We know their stupid now! What I want to know is what kind of stupid people they are?! It's hard to believe they can't get this right after all these years! I say that only because tonight, I researched some forums and similar things were being said over many years of complaints as to where to find the right O-ring. Two others fit fine but two out of three is still a fail when you can't use it.
So once again I find myself considering a relocation kit for the future. I don't have time now to wait for one then work out where the mount the remote filter base and complete a transition. The cost is too high right now so the "quick"(?) fix is to replace O-rings and remount the adapter and work out the details before the next failure is reached.
That oil filter adapter was banned by the FAA because of it's propensity to leaks and failure. Not sure why AMC and later Chrysler, couldn't have redesigned the XJ to use the same set up at the TJ. They both used the same front suspension so why the different blocks? It sucks they didn't at least try. I'll be ready to install a relocated filter by the end of Winter. I'm not going to let happen what the third owner (previous) did and let it slide. She deserves at least to be taken care of like the first two owners did.
That's it for tonight. Wish me luck in the morning.
_______________________________
July 29, 2018
All good plans must never be executed lest they work. To put it bluntly, I screwed up and forgot to add the transmission filter kit to my last order. So I don't have one. I realized this when I went searching for it and then followed up with checking all my receipts for the stuff I had. It wasn't among them. Step three: Order the dang thing and opt for two day express service to get it before your next full weekend off. Read that as, don't panic, pay more to get it before you run out of time.I also ordered the oil filter adapter's O-ring kit. I found out that Crown Automotive has one. So when I searched for the part number, RockAuto had the same number, as a MOPAR kit. Okay. I'll get it. Should have gone to Crown on the search for the kit the first time. They have good stuff. I like them more than Dorman to be honest but Dorman is easier to get and less expensive. Fel-Pro is good for some things and really stink at others. Like the O-ring kit. Idiots!
So I didn't get to the transmission cooling lines as I don't want to deal with them until after the transmission has been serviced. So I told myself, I said, "Self? Raise the hood and start putting the engine back together." And so I didn't argue with myself.


Doesn't look like I got much done for three hours work. I had to locate the tubs with the fasteners and then clean them before putting them back on. The brackets are aluminum and the grease and grime was removed with CarQuest Heavy Duty Engine Degreaser, Simple Green and a thorough rinsing with water. The bolts were sprayed down with WD40 after rinsing. The skinny black front alternator bracket is stamped steel. It came out the cleanest of them. It still has its factory EDP coating which is great! No need to prime and paint. The aluminum is not going to be primed and painted as I don't have time to have them media blasted. So they only look a little cleaner but no corrosion is present.
I took the old distributor and knocked the roll pin out to get the driven gear off. This turned it into an oil system primer tool. Very convenient the shaft has a 1/4 inch stub I can put my drill on and pressurize the system. I'll do that next weekend. For now, it sits where it used to in the block ready for use.
Now the valve cover is proving difficult. I don't know what kind of paint it is but is resisting the paint stripper I'm using. Having to do this in small sections but slow progress is being made. Depending on how soon First Start will be determines if I'll finish the valve cover paint job or not.
Some time back I snagged an auxiliary automatic transmission cooler from a Grand Cherokee ZJ. It's a bit small to be used as a stand-alone unit but tied in series with the radiator's transmission cooler, it will work better in keeping the AW4 temps down. The routing will go from the transmission to the radiator's cooler then out of that it goes into the auxiliary cooler then returns to the AW4. I am considering adding an inline filter as well. Some use one by Magnafine that uses a magnet to catch ferrous particles in the fluid. Others use on by Wix or AC Delco. These are really used for power steering systems but work well in transmission hydraulics as well. Of course a more traditional inline filter is one using a spin-on type of hydraulic filter like those made by B&M Performance in their remote filter system. I don't think I'll have time to add this into the system unless I can pick one up locally. The lines use 3/8 inch tubing so I'll spend some of my lunch time tomorrow to find out if my local store can get one.
By the time I got the point in the last photo, the sun was beating down on me and it would be a few hours before the work space would be in shade. I could have bought a couple of poles and guy line to hold them up to prop the tarp on and work under cover. I may still do that. However I had some other things that needed my attention and had to stop anyway.
This is about it. Future work includes reinstalling the power steering pump, thermostat and housing as well as plumbing a heater bypass arrangement. As soon as the front of the engine is complete, the grille header and radiator can be reinstalled and connected followed by the new auxiliary fan I picked up that originally was specified for a 1997+ XJ but fits the '96 and earlier just fine. The only thing that needs to be done is to cut the connector off of the old unit and replace the one on the new unit. Or option 2, get a connector for the newer XJ and replace the one on mine to make it an upgrade. We'll see if I can get one before next weekend.
The trans filter kit and O-ring kit are due in on Wednesday so I may be able to get those two tasks done before the weekend, weather permitting.
Bye for now!
________________________________
August 1, 2018
Rolling on like thunder as progress is made. The MOPAR oil filter adapter O-ring kit arrived as did the transmission filter kit and headlight set. Once the adapter was installed on the block the filter was filled about half full and installed on the adapter. In inserted the old dizzy, without driven gear, into the block to engage the oil pump and acts as a dirt plug for now.


The starter and alternator passed their respective tests yesterday. I shot video for the alternator test.
The starter motor test wasn't shot. It passed all the same. That was installed this evening after the oil filter was spun on. The harness to the starter was really grimy and needed some brake cleaner to get it off. The contact lugs were sanded with 3000 grit emery cloth and were attached to the starter. With the bottom of the engine now completely buttoned up, I moved to the top.

It was getting dark by the time I finished up the housing so the temperature sender will be installed next session. All-in-all I'm happy this is looking like it's coming together. Last night's rain didn't go unproductive. I worked on the XJ-7100 project and mounted the main unit of my Icom IC-7100 to the right rear quarter interior panel. Check out the posting here.
My new headlights have arrived as well.

These are modern projector assemblies to replace the original 7x6 oblong sealed beam style headlight. These use the current 9003 (H4) bulbs. I debated going with these versus LED or remain with the halogen version of the sealed beam (H6054). I liked the classic look of the original bulbs because you can't see inside the housing. All of the light is directed via the small lens/prisms in the glass. These use facets in the reflector and a projector lens to accomplish the same thing but use crystal clear glass faceplates instead. Since the facets are visible, some of the classic look remains sans hidden bulb element, and doesn't look too Mad Max-ish like LED's would have. Also, I wasn't happy with any of the beam patterns. They mostly act like floods with very little 'beam' down the road with them on High. This appears to make too much glare for oncoming traffic as well as anyone in front of me. I think I'll be safe with these Dynamik brand lights. I bought them here...
http://www.xtralights.com/79-01jeepcherokeeprojectorheadlights-chromepair
They were on sale for $39 plus S/H.
The 9003 bulbs that came with them have some kind of blue coating on them. I won't bother with these and will replace them with Wagner, GE, or Philips bulbs. Sylvania is a name brand I haven't been happy with and isn't one I'd use unless I couldn't get any of the others.
If the next two evenings are rain-free I'll have a decent chance to achieve First Start this weekend. I have put 10 gallons of 93 octane fuel into the tank in preparation for that event. If successful I'll register the vehicle and transfer my current license plate to the XJ in a couple of weeks.
That's it for this work session. Bye for now!
____________________________________
August 3, 2018
Getting it togetherI have been fortunate to have had three days this week without it raining when I get home after work. Tonight was iffy but turned out well. I was able to get the alternator reinstalled and got started on the power steering pump. I have a new idler pulley to install since the old one has a bad bearing.
 |
| The anti-seize I used made thread impressions just inside the hole. The real threads start further in. I chased the threads with a 5/16-18 tap to clean them out only to find the hole did not go completely through as it should have. Turns out there's a remnant of a broken bolt in there. |
 |
| Looking darn near a complete engine assembly! |
Saturday's tasks are to drop the transmission pan, change the filter and reinstall the pan.
Some the other items to be done are to install the pulleys, inspect and replace either or both battery terminals, install new spark plugs, connect the plug wires in preparation for the distributor installation, and install the battery for a power up test. Once I get more of the front end completed, ending with the radiator install, I'll connect the trans cooler lines. I should be ready then to fill the crankcase, transmission and cooling system with fluids. If all goes well I can purge the fuel system of air and begin the engine pre-oiling procedure with the old distributor then install the new one, connect the wires and attempt the first start. Simple.
That's it for tonight. Have a good night.
___________________________________
August 4, 2018
Almost there!
 |
| Where I ended last night. |
 |
| Looks good so far. No burnt wiring. |
 |
| New AC Delco filter |
 |
| Not an aluminum pan but galvanized steel. This was probably painted when new or this is an aluminized coating over steel. |
 |
| Cooling lines are installed. |
 |
| Rust-seized tensioner bolt. Heating with a barbecue lighter worked when the butane micro pen torch couldn't be located. |
 |
| New heavy duty fan clutch for the ZJ in my XJ. Clearance isn't a problem with the 1 or 2 row radiators but may have an issue with some aftermarket 3 row versions. |
 |
| Believe it or not, this is the actual color of a rocker arm. |
 |
| Beginning of the end. |
 |
| Fresh oil held in the convenient cups that also act as rocker arms. |
 |
| Where I finished at the end of today. |
____________________________
August 5, 2018
No start First Start.
Things were going along pretty well. That should have been the first clue something was going to go wrong. But seriously I thought things were going good.


I was on a roll after that and didn't think to stop and take pics. Once in the zone, nothing else matters. Sorry.
So I painted the valve cover in OD Green instead of Desert Tan. The crappy leftover pain from the factory doesn't look good through the tan and only looks slightly better in ODG. So I chose ODG. It was drying during the above tasks. After it was dry, I used a thin coat of RTV on the cover to stick the gasket to. After it tacked up and would stay put, I could turn it over without worrying it would fall off and placed it on the engine. Fit like a glove, as it should. Retrieved all the bolts, so I thought, and cinched it down. Some how, somewhere there is a bolt that needs a home. I went to the hardware stores but they don't carry this particular thread. It looks to be an M6-1.25 thread they only carried M6-1.00. Well, I moved the empty bolt hole to the pushrod side of the cover to make sure all the oil slung off the rocker arms wouldn't find an easy path there. So the hunt goes on to replace a missing bolt.
I installed the radiator and cinched it to the condenser via their common brackets on the top. I did this without having to install the grille header. Installing the new upper and lower radiator hoses wasn't a problem. Plumbing the heater hoses to bypass the heater core was a little bit of a challenge due to the dissimilar hose sizes. But I was able to salvage a piece of hose from the old set up to run the bypass from the thermostat housing to the water pump pipe. I removed the heater valve too. For now, until I check the heater core is actually leaking, I'm not going to reconnect it.
Next the transmission cooling lines were reconnected without difficulty. I hope the ones up front will still seal. Won't know until I start the engine.
I filled up the radiator with coolant, filled the transmission with fluid and just needed a battery for a power-on sanity test. The battery I had laying around, connected to my UPS for my computer, was a tad too long to fit the battery tray. I'll cut the edge off the tray so it will sit flat at a later time.
After cleaning the battery terminals and clamps (which aren't as bad as I thought) I connected the battery. I turned the key in the ignition to the ON position and heard the fuel pump run for about two seconds. Turned the key off then one again and it ran another two seconds. I did this until it wouldn't come back on. The whole time the return line was disconnected as I was trying to purge the air from the fuel rail. It wouldn't open. I applied a vacuum to the port on the regulator but it still wouldn't open up. I removed it and air and fuel spewed out. Okaaaaaaay. I have pressure but no return flow. I cleaned it up with some Seafoam spray and let it sit a while.
That seemed to work and after I reinstalled the regulator when the pressure got up there, fuel flowed out the regulator valve. After connecting the return line I got in the driver's seat I reinstalled and turned the key to START. It cranked. And cranked, and cranked and stumbled and cranked and the oil pressure came up, and it still cranked.
I quit and let the starter cool down while I checked all the electrical connections. After twenty minutes went by I asked my daughter for some help. I had her watch the spark from the ignition coil through a spark plug to ground. She said the spark looked orange in color instead of the blue-white it should be. So it would seem I have a bad coil. Hard to figure since it ran fine when I went to go look at and test drive back in April. Maybe it's because it sat too long and a failure in the making made it's presence known now. I dunno. All indications show the coil is weak and may not fire the plugs hot enough to promote ignition. I may shoot an email to ScannerDanner or Eric The Car Guy for some insight after I run through the various Jeep forums for this No Start issue. The book didn't offer me any other suggestions that haven't been checked yet so I may have a stumper.

I checked on the coolant level to top it off. I squeezed the upper hose to get more air out of the system a few times then topped off the coolant again. When I squeezed the hose again, I heard liquid dripping. Looking below I saw coolant leaking out from around the draincock on the passenger's side plastic tank. I didn't have a clean bucket or drain pan and just watched my money leaking out into a drain pan I quickly grabbed from the shed.

Well, this sucked. There won't be a second attempt to start until this is fixed. I tried installing the grille header and I snapped off two screws and decided I'd had enough failures for one weekend. I cleaned up, shut down and through the tarp over the old girl before heading in for a hot shower.
_______________________________
August 6, 2018
After having some time to think about the problem I went back to Engines 101 in thought and went through everything I could think of that the engine needed in order to run. It needs air, fuel and fire. So why won't it run? Let's take a little closer look at each of these elements.1. Air : All us air breathers need it. Without it, we can't sustain life. An engine is said to be a pump of sorts. In the most rudimentary way, air goes in and comes out. I connected a vacuum gauge to a full manifold pressure fitting so make sure the engine sucked....air. When cranking, the gauge read below Zero. So in the most simple of terms, it's getting air by creating a vacuum below the throttle plate. I questioned whether or not it was getting enough or too much. There aren't any open vacuum lines so I'm presuming a lot by believing it's not getting too much. That will have to checked out further.
2. Fuel : We all need energy conversions to make our muscles work. An engine needs to convert energy stored in the gasoline and air mix at some flash point to do work. Combine them in an enclosed space and you compress the mix into a smaller space until ignition begins. A diesel does just that without the help of spark plugs. In our fuel injected engines, a pressure of fuel is present in the fuel rail so when the injector is commanded to open, fuel will spray into the intake air stream and flow into the cylinder. I asked the question whether or not it's getting enough or too much or too little. If and injector is stuck open in any way, fuel will just run into the cylinder when the intake valve opens, flooding the cylinder. If it doesn't open at all, nothing goes into the cylinder to mix with air and burn. This will also be checked on.
3. Fire : When Man discovered fire, he invented barbecue and thus the party started. The spark plugs are the ignition point in a properly running gasoline, propane, natural gas, or any such engine requiring an assisted ignition source. Diesels don't require this once they are started, unless it's very cold and the glow plugs remain active a little longer to sustain operation. The spark plugs in our engines provide a flash of heat. From this point during the compression stroke, a few degrees Before Top Dead Center, the fuel and air mix begins to burn in a flame front that spreads out from the point of ignition. Some engines do this better than others like those with a hemispherical combustion chamber design. The burning fuel/air mix causes temperatures to rise and expand rapidly increasing the pressures inside the cylinder. This rise in pressure pushes against the already-moving-downward piston top transferring the expanding gases into mechanical work from reciprocal to rotational forces as the energy is transferred into the crankshaft.
So seeing as how I have all three, I had to ask myself if I was getting them in the right order. The timing of the crankshaft to camshaft is correct. No I didn't use a degree wheel to verify it was exactly on target. I did what most mechanics and DIY'ers do and line up the dots between the camshaft and crank shaft sprockets verified by a straight edge between the centers of each shaft.
Next I asked if the fuel was getting into the cylinders? I pulled the plugs and each was wet with fuel.
Aha! Now I'm getting somewhere! I think. If I get fuel and air and fire, why doesn't it run? There is a fourth item I haven't mentioned yet. Ignition Timing. It's is an added benefit to a running engine. At least that's what I'm told. So I pulled the ignition coil first to test whether it met factory specification with an Ohmmeter.
Setting the meter to it's lowest range (200 ohms) the Primary to Primary terminal test read 1.8 ohms. It should be, on this factory coil, .8 to 1.2 ohms. Then the test moved from one Primary terminal to the Secondary terminal and got 12.5K ohms. I repeated the test with the other Primary terminal and got the same reading. This reading was in the normal range of 11K ohms to 15K ohms. So the orange spark my daughter saw coincides with the Weak Coil theory and the meter reading corroborates that line of thinking with a factory ignition coil.
 |
| BWD E64P Ignition Coil |
I purchased a new E64P ignition coil made by BWD, Borg Warner Division of Standard Motor Products, to head off any further questions about the coil's ability to fire hot. The picture above shows the part in their catalog. Mine was black and may be an E64 unit that supersedes this one. I know it's not a MOPAR coil so the test readings will be different. How different? I wasn't able to get any technical specification from BWD so I had to calculate the readings between the two coils find the amperage difference between them.
The new coil read 2.4 ohms from Primary to Primary. Primary to Secondary read 9.5K ohms.
Now using Ohm's Law, I calculated the amperage used between the two coils:
Factory Coil: 12V divided by 1.8 ohms equals 6.666 amps.
BWD Coil: 12V divided by 2.4 ohms equals 5 amps.
Now whether it's a stronger coil or not remained to be seen. So I installed it after work, and checked for spark the same way as yesterday except without my daughter's help. The spark was whiter and brighter and thus seemed stronger and used less current. I reconnected the coil to the distributor and tried to crank it up. Nothing. It turned over but would not stumble even a little. This tells me something else has changed. Ignition timing may be retarded by a single cog on the distributor gear.
Tomorrow I will remove plug No. 1 and connect my compression gauge to it to find the compression stroke. Then I'll locate TDC by hand turning the crankshaft until the timing mark reaches 10 degrees BTDC and pull the distributor cap to locate the rotor button in its rotation. I'll likely mark the notch in the vibration damper to make it easier to see.
I'm pretty sure this is the problem. It has the three basic items. The fourth requirement of a running engine, Ignition Timing, has to be redone. The engine won't even stumble with one cog retarded in the firing position in the distributor. It might with it advanced one cog and miss as RPM's rise. In the retarded ignition position, the computer would have to advance it quite a bit more for the rotor to be within striking distance of the terminal inside the cap. At 300RPM cranking speed, the only advance will be in the initial advance the computer has programmed into it.
 |
| Starting to look like herself again. |
_________________________________
August 8, 2018
Back to Normal-ish.
Yesterday:Well, I gooped up RTV on the draincock of the radiator and screwed it in in hopes that it will hold long enough for tests while I wait for the new radiator to arrive.
I reset the dizzy's position and cranked it up. She started with only a couple of revolutions. She ran steady but rough like a misfire. After shutting down I checked the wires with the ohmmeter again and connected a vacuum gauge to the intake manifold. Restarting the engine the vacuum gauge showed a small fluctuation between 13 and 15in/Hg. The interesting thing is that it wasn't fluctuating rapidly. Just enough to be able to discern it might be only happening on one cylinder. I took a video and played it back in slow motion and the fluctuation only happened once and not twice in succession. So now the problem was to determine which cylinder was causing it. It could be one of three things. Poor ignition timing, sticking valve or poor valve seating.
This morning:
Pulling the spark plugs I checked the compression again and found all but cylinder one generating a reading on the gauge. Cylinders 3-6 tested at 135 PSI. Cylinder 2 showed 133 and cylinder 1 showed next to nothing which meant the valve cover had to come off. No way I could have dropped a valve and the vacuum gauge didn't indicate a broke valve spring. The needle did move that much.
Almost as soon as I pulled the cover off I found the issue. Seeing the pushrod sitting next to it was alarming to say the least and I began to doubt if I had somehow missed seating into the rocker arm's pushrod seat. Pulling the pushrod out I rolled it along a flat surface to check to see if it was bent. Lucky that it wasn't. I put it back in and set the rocker arms in place then torqued the bolts down making sure the arms were centered over the valve stem tip. The torque was set to 19 lbs/ft (228 lbs/in or 25.76 Nm)
So here's what I think happened: When I primed the oil system I watched all the pushrods bubble up oil including the intake rocker arm on #1. After correcting the problem, I went inside to view the video I shot of this process and saw the pushrod was engaged with the rocker arm. What I think happened was the valve stuck open long enough for the pushrod to unseat when the lifter let down. From then on, it wasn't going to operate anything and run like it was misfiring which, in a way, it was. There was no fuel or air thus no combustion. I forgot to mention that pulling the #1 spark plug yielded a wet plug which indicates the valve leaks a tad. But compression numbers made it to 130 so all cylinders are withing the 10% of each other withing the 120-150 range. She's showing her age.
So with all of that said and done, she's running quite smooth and the vacuum is up to 17in/Hg. I adjusted the dizzy one cog advance again since the low/steady vacuum may indicate ignition is retarded. It wouldn't start so retarded one cog for the last time to set it in place and it started right up.
I took the transmission cooler I got from a Grand Cherokee, at the local pick your parts yard back in May to see where I would like to put it. The rivets for the bracket can't be drilled out as they just spin so I'll have to find another way to deal with those. I can't use the brackets so I want to remove them to make it easier to put where I want. Later I installed the grille header and fastened the lighting wire harness in place. That 's all I got done for today. The heat index was heading for over 100 and the humidity was way up there.
There are two broken screws to hold the driver's side headlight/parking light bezel in place. This header is fiberglass and I'm not sure how to proceed to extract it. Since there's a bit of a nub on the screw and it's very small I am unable to keep the drill bit from slipping off and digging in to fiberglass next to it. The screw has a sharp point so trying to drill from the back is impossible. So is grabbing with pliers from either side. Not sure how to solve this one. Can't run around without it since it holds the front parking/turn signal lamp in. Anyone with a suggestion? Maybe someone with a boat that had to extract a 1/8 inch screw? Anyone?
Just know the video and audio suck. Turn your mute on.
So this is where I've stopped for this work session. I'm back on schedule so when I get my four day weekend in a week and a half, I should have this ready to drive.
Good night.
____________________________
August 9, 2018
Homestretch
Good evening folks. It's been a kind of race again time and so far I'm one lap from the White Flag. After work this evening I began to reinstall the front axle housing. The springs are on as are the control arms. |
| The Dana 30 High Pinion (HP) is resting on jack stands while the control arms are lined up and bolts installed. |
 |
| The floor jack was used to rotate the axle into proper pinion angle to make the control arm bolts easier to insert. |

 |
| Addition of the passenger's side front spring. |
The next thing I will have to purchase are brake hoses due to their age and condition. The axle has sat outside and the brake rotors are very rusty. Wasn't planning on re-using them but with the budget exhausted I'll try to use them if they can be salvaged. I'll take them to a shop for an evaluation if I measure their thickness is within tolerance. Maybe wire brushing them will let me see the condition of their friction surfaces.
The calipers will be tested too. The pistons will be pushed to its furthest point then pushed back in a couple of times to see if there is any binding or resistance in either direction. Wouldn't do any good to have gotten this far and find out the brake system won't do its job during a road test.
The rear brake hose looked to be in good shape but due to the oil leak, a lot of oil migrated to the rear area just in front of the rear axle. I will replace this one too as a preventative measure.
I found a hole in the Dana 30's vent hose. I can splice it with a double barbed hose mender and rerouting it from where it was. Movement against the driver's side upper control arm is what caused the hole. I'll open up the axle and change out the fluid making sure to get any contaminants out. So far there have not been any leaks but the hole in the vent hose may have introduced water. I'll know once the cover comes off.
My next work session should complete the axle installation and reconnect the forward driveshaft. From there the new brake parts will be installed and the brake system flushed and bled. The wheels will be reinstalled with a few new lug nuts too. After that, I'll fire it up for transmission and transfer case operation while on the jack stands one last time before letting her stand on her own.
Good night everyone.
__________________________
August 10, 2018
Good evening. There was a couple of things I needed to do before getting home tonight so I didn't get much done.The Dana 30 is still sitting on the jack stands waiting for me to jack it up to install the shock absorbers.
I did pull the calipers off and the rusty rotors from the hubs. Where the brake pads ride against the integrated guides on the steering knuckle, there is a bit of a notch which would cause the pad to hang up or bind. I can use a file or grinder to flatten out the ridge but the pad will still catch on it. There is a hardware kit that places a shim over the cast iron guide so the pad will slide properly. These will have to be replaced every pad change. Even when it's time to replace the knuckle, I'll used these to protect the new one.
The rotors only had a lot of surface rust. I used my Porter Cable 18V orbital sander with 120 grit paper to break down the rust and see good metal again. These rotors are really close to needing replacement as they look thin but are just barely thick enough to meet requirements. They won't turn down on a lathe so the pennies will be saved up to buy two and a set of ceramic pads. Semi-metallic pads were the specified type with the factory rotors. The aftermarket rotors will work well with ceramic pad material as I found with the TJ. I'll need to wire wheel the inside the top hat of each rotor and the flat of the hub since they have a lot of surface rust too and want them to sit flat.
The calipers are a bit rusty too but will clean up pretty good. The issue that might arise with them is any piston binding in the bore. It was getting dark so I wasn't able to connect them to the new hoses to work the pistons in and out. That might come tomorrow if it's not raining when I get home after work. I sprayed the hubs, nuts, cotter pins and wheel studs with PB Blaster. I don't feel any grinding or rough movement in either hub bearing assembly so I'm going to call them good.
I found out today the new radiator won't be shipped from CSF until September 7 or 8. The price was good for an old-school brass and copper radiator so I'll be patient. If the old radiator's patchwork leaks too much I may spring for a cheap disposable radiator to get me by. Then I'll have the CSF ready to install at anytime after it arrives.
That's it for tonight. Sorry, there wasn't time to shoot photos this time. I'll try to get some this weekend.
______________________________
August 11, 2018
It began raining only 30 minutes after getting home tonight. Just long enough to clean up and re-attach the driver's side caliper. I figured since I'm replacing the hose, I'll do the testing first and get all the old fluid out via the old hoses first then switch to the new hoses. I'll need to get new crush rings for the brake hose ends but those are easy to get.With the rain coming quick, I had to throw the tarp back over the XJ a close up the shed before I could make a dash inside. After getting cleaned up I began looking for a new headlight harness that will handle the new H4(9003) headlight bulbs. I'm doing this more as a preventative measure than a needed one. I do however believe that as the harness ages it will become less capable of handling the current of the stock headlamps. Partly due to water intrusion at the connectors where the wires are the most susceptible to moisture contamination. But also due to aging plastics technology of the era which become more brittle as the elastomers evaporate from the insulation. The high current draw and high resistance of the wire causes to heat from within. This is why many old wiring harnesses at the headlamp switch seem overheated, charred, bubbled or flaking of insulation.
To prepare for the eventual failure of the original wiring, I decided to see what these "Upgraded Harness" products are and if they are worth the effort and the price. I settled on two that seemed to get all the attention.
Putco and Ksuspensions make upgraded harnesses. Each have 16AWG wire and a pair of relays to handle the current from the battery to the headlamps. I opted for Ksuspension's product as it was $25 with free shipping. The model I chose does not have the fog lamp option. I will wire a separate circuit for those at a later time. At the very least I can replace the relays with more robust units in the future. For now, I'm not interested in watching all my work go up in flames because the wiring may be too weak.
Here's why: The stock harness is adequate to providing the current to old style sealed beam headlights. The old part number on this XJ was 6052 made by Wagner. The halogen version is H6054. But I discovered an interesting piece of information. So many believe you can't use the H4(9003) conversion because they draw more current than the original sealed beam type. To illustrate, read on...
For the XJ headlamps, power has to come from the battery at the front passenger's corner of the engine bay, back to the firewall then over to the headlight switch on the driver's side. From there it runs through the dimmer switch on the floor and on to the driver's side headlamp. From there it runs over to the passenger's side headlamp in a parallel circuit pair for Low and High beams. That's almost 20 feet of wire from the battery to the passenger side headlamp. It's also a fair amount of voltage drop on a 12VDC system when things work better at 12 volts rather than below! So when I did the test I noted that I'm only getting 11.89 volts to the passenger's headlight socket on the low beam circuit with the engine running and 13.92 volts at the battery. That's a difference of 2.03 volts. Not bad, right? It comes out to be a 14.58% drop in voltage from the batter to that headlamp. The driver's side is a little better at 12.77 volts measuring a 1.15 volt drop from the battery which is an 8.26% drop in voltage. What this means to me is there is a much larger resistance in teh circuit wiring than there ought be to be for efficiency. Smaller gauge wires have higher resistances over long lengths than larger wires. Wires used in tail lights are probably larger because of the longer run from the battery. Here are the specs on the two Wagner brand of headlamp bulbs:
Design
Model Type Volts Watts Amperage
H6054 Headlamp Lo - 12.80 +/- 3% 35.00 2.73
High/Low Hi - 12.80 +/- 3% 65.00 5.08
9003 Headlamp Lo - 12.00 55.00 4.58 + 1.85 amps
(H4) High/Low Hi - 12.00 60.00 5.00 - .08 amps
As you can see there is a difference in the elements of the two styles. To be fair, the 6052 headlamps that were in the XJ have the same amperage draw at the Hi beam setting as the H4 (9003). The Lo beam setting used 4.30 amps, again similar to the H4(9003).
This means that the stock wiring can handle the newer H4(9003) bulb conversion. But, because of the age of the system, there are things to consider as I mentioned before. One of the things never taken into account by most owners are the current carrying capacity of stranded wire or wire rope. All of the tables using the American Wire Gauge (AWG) is done with solid wire. Stranded wire has more surface area and, in theory, can handle more current than solid wire. In a 12VDC system, this isn't as big a deal as an AC circuit since house wiring is done with solid wire thus the NEC standards for household wiring are derived.
This new harness uses 16AWG wire vs the stock 18AWG in my XJ. By reducing the load on the wiring harness I hope to extend the life of the headlamp wiring with the upgrade harness. How is this done?
First, reduce the current flowing through the headlamp switch by using it to control low current draw relays instead. Instead of drawing 5 or more amps through the switch to provide power for the headlamp directly, we are now using one or two amps at most to supply only one relay at a time. One for Low and one for High. The relay contacts route power from the battery directly to the headlamps instead. The power for the headlamps has a much shorter path from the battery. Power comes from the battery, through the relay contacts to the headlamps. The passenger's side is less than three feet away from the battery instead of being 18 feet away electrically. The driver's side is less than six feet away. More power will get to the headlamps.
These harnesses aren't just for newer headlamps. You can use this on your original headlamps as well. The whole idea is to reduce the current running through the headlamp switch to extend the life of the switch and stock wiring.
Now all of this doesn't factor in current draw of the parking lamps, also switch by the headlamp switch, so there's another subject for another time. The same principals can be applied and I may do that in the future and take most of the high current off the switch.
Sorry for the long post but it seemed important to offer this information to anyone looking to improve their headlight system for safety's sake.
Tomorrow's work session is hopefully rain free for most of the day so I can get the rest of the brakes done and checked out. The differential still needs to be drained, cleaned and refilled. I should be able to do that, weather permitting.
Have a good evening.
____________________________
August 12, 2018
Good evening. Today's events were hampered with high humidity and temps along with missing tools and forks in the road.The first task was to flush and bleed the brake system. But first, the calipers needed some attention. The bleeder screws were removed and cleared of blockages then reinstalled. Second, the pistons were pressed back into their bores. The passenger's side caliper didn't go in as smoothly as the driver's side but it did go in. I'm concerned about this so I'm having to consider purchasing two remanufactured units or repairing these. Either way the test to push the pistons to their limit of travel may have uncovered a problem.
The next test was the thickness of the brake rotor. The average measurements were about .010 under spec so these will have to be replaced. Because I don't have a micrometer, I used my digital caliper. this won't be as accurate since it is reading the highest point found in the jaws of the device. Still, the rotor failed.
So my second fork in the road was to decide to install the calipers anyway or wait and replace them. I will replace or repair them later. I tried to replace the brake hoses but the fittings were seized tight. I need to find my pen torch and try the heating method. For now, I just used the crush washers from the new hose kits.
My daughter came out to help me flush and bleed the system by pressing the brake pedal for me. I know I could do it by myself but I wouldn't be able to see the fluid coming out and evaluate when it was time to change corners. She liked helping dad anyway so it was fun for her.
With the brake system flushed and bled the rear wheels were put back on. That was a good feeling!
Next up was the finishing the front axle housing install. Jacking up the housing a few inches gave me some room beneath it so I could install the new shock absorbers. The lower fasteners are bolts with nuts instead of bolts into welded nuts. After shooting them with PB B'laster I cinched them down and installed the upper bushing half. I used Sil-Glyde on the rubber bushings rather than white lithium grease like I did for the rear shocks.
With the shocks installed I removed the jack stands that were supporting the Dana 30. At this point none of the control arm bolts have been tightened. The reason is that the bushings should not be under any pre-tension. To set the correct configuration, the vehicle needs to sit on a level surface with the full vehicle weight on the suspension to locate the neutral state of the suspension. This applies to stock bushings as most aftermarket bushings or suspension parts may not be self-centering. MetalCloak is the exception with their Duroflex bushings. The bushing self-centers with any rotational force along the length of the control arm. If the bushing is being twisted around the axis of the bolt, the whole bushing will rotate within the journal. See metalcloak.com for more information.
The Dana 30's cover was removed and the gear oil drained. Apparently it had been changed at some point in the last couple of years as the fluid was transparent and had no foul odor. The RTV on the cover was scraped off and cleaned up with Super Clean. I wasn't able to find my wire wheel for my drill (lost tools) so I couldn't strip the old paint and rust off to prepare it for painting. So I reinstalled the sway bar instead. The new AC Delco end links were installed first then the sway bar. I used Sil-Glyde on the rubber bushings here too. The ends of the sway bar had dirt and old rubber fused to them and had to get that taken care of.
The next work session will finish the Dana 30 cover with primer and paint. I haven't decided on the color so I'll leave that for later. The panhard bar and bracket need to be reinstalled before the tie rods. I couldn't get them apart while on the Jeep so I removed them as an assembly. I'll probably need to use the pickle fork and the big hammer. A new boot will need to be procured as this one will be torn up by the tool. I'll be reusing the panhard bar for now. The engine needed most of my budget so I'll be replacing parts as funds become available.
I am hopeful that on Friday the 17th, I'll be standing in line to transfer the plate on my TJ to my XJ and get a new plate for the TJ. Hard to figure out how much it will cost so I have $200 put aside for that. Whatever isn't used goes back into the XJ's account for parts. After that, the first road test can be done. The brakes are still the concern so I'm going to stress them while it's still up on the big jackstands.


Have a good night.
____________________
August 13, 2018
Good evening. A short post tonight. I took apart the passenger's side caliper and found all kinds of nasty in there. I will buy a pair of calipers to replace these originals. I will take them to the store tomorrow as cores for the new units. Not happy about having to give up original parts but I don't have the time to spend on repairing them. Feels like I'm giving up a little bit of the soul of my beloved Jeep. I made a promise to my daughter and I'll keep it. She's more important. I hope these can be rebuilt and continue to be useful on someone's Cherokee or Wrangler somewhere out there. I'm still trying to find my pen torch to see if I can break loose the hard line fitting so I don't have to use 25 year-old original hoses. If I can't find it I'll have to buy a cylinder for my blowtorch.As I may have mentioned before, the rotors are worn below spec. They are full of rust too but the thickness check is the deciding factor. I may get away with these for a while but I feel like they are on borrowed time. The brake pads are semi-metallic and are also very rusty. All of this was expected but not the calipers. Another thing to note are the knuckles have deep wear points where the inner pad has been riding on the integrated bracket. I found a pair of Crown Automotive steering knuckles for less than $200 at CarParts.com. I bought a pair for my TJ and they have done well in the last couple of years. I've been satisfied with Crown Automotive products as they have been supplying Jeep parts for a long time. Have a look at their website.
I bought a new wire wheel brush and some primer for the Dana 30 cover. After stripping the old paint and rust off I snapped a shot of the info Dana stamped into the cover for documentation purposes. Didn't know it was there until it was stripped clean.
 |
| Mostly stripped of paint and rust. |
 |
| Closeup of Dana's cover numbers. The first number I believe is the part number. I don't know what the second number is. It might be a manufacturing plant code to identify location or batch. The next item shows this to be revision P of the design. The last number is the date of manufacture: September 25, 1991. |
The next work session will see Desert Tan applied to the front diff cover instead of the OD Green used on the rear diff cover and valve cover.
All in all the coming weekend is my final weekend to get her back on the road. Four days off to make the final push and cross the finish line with a plate and insurance.
That's it for now. Good night all.
___________________________
August 15, 2018
Another rain-free evening with cooler temperatures than expected. If only we could stay like this for another two weeks. I could get my shed primed and painted and it will dry. The mosquito's are thick in the evening so I have to wear a repellent while working outside.But first...Yesterday I was able to get the old brake hoses off the hard lines. I have a pocket torch which is a fancy name for high powered cigarette lighter. It did the job well enough even though I still had to use vise grips. Those suckers were stuck on good. No penetrant was able to get through into the threads so brute force after heating was the only option. I didn't bugger up the flare nuts too badly as I was still able to get a wrench on it to tighten them onto the new hoses.
I did get the diff cover painted, albeit sloppily. While trying to get the cap off the paint can after the requisite two minute shake, the valve was torn away when the cap popped off at a bad angle. There wasn't a screw driver slot to lift it up so I tried to pull it off the old fashioned way. Well, lots of paint and propellant can shooting out so I just aimed the can at the cover and covered it with what came out in a less-than-controlled spray.
When I checked on it this evening, it seemed to come out pretty good considering. It now looks like it's been on a vehicle for years with layer after layer of paint applied over its lifetime without being stripped off first. So it has its "antiqued" looked, if you will.
So tonight's session was short. All I did was bleed the brake system again, with my daughter's help, due to the new calipers and brake hoses. All of the air is out and the pedal feels good. I'll check them again with the engine running later. For now, I'm happy the brake system is done.
The next work session will install the front diff cover and gasket then fill with Lucas 85-140 gear oil as in the rear differential. The panhard bar will be installed then the tie rods. That should be it for the suspension and steering.
I will disconnect the HOT line from the transmission and point it into a bucket. I found out that the AW4 pump runs in Park and Neutral so the new fluid has mixed with the old. I thought it only flowed in gear and neutral. Nope. I'm getting it mixed up with something else. Anyway, a fluid flush of 12 quarts should do it. One quart will be Lucas Stop Slip for the final charge of fluid. At this point I could go with Castrol Dex/Merc, Dexron VI, Valvoline Dex/Merc or CarQuest Dex/Merc. Even though the Castrol Dexron VI says on the bottle it is compatible with Dexron IIe specified for the AW4, I'm not sure it will work okay. Chrysler screwed up and specified ATF+4 for the AW4 transmission and just about every transmission failed. I don't know if it was because of the switch from conventional to synthetic fluid or something in the the ATF+4. Since the project no longer has any funds left, I can't take the chance and have to go with the closest thing to Dexron IIe I can find.
On top of this I'll install the auxiliary trans oil cooler inline with the original cooler in the radiator. I think I'll plumb it in after the factory cooler to bring the temps down further. Winter won't be a problem as I can place a cover over it to prevent air flow during winter. A trans oil temp gauge would be a nice Christmas present. Where to put it? TBD.
Lastly, I received my new headlamp upgrade harness. The old harness will stay put and the new one added in. The new harness plugs into the passenger's side headlamp connector. The Low and High beam circuits in the old harness from the headlamp switch will activate low power draw relays to switch the headlamps on and off instead of directly switching the high amperage headlamps. The relays route power directly from the battery to the headlamps. The most important feature, in my opinion, is that the shorter length of wire the power has to conduct through is much, much shorter. This means less wire, lower resistance and more power to the headlamp elements. This ultimately allows them to burn brighter than stock even without having to replace them with "brighter" bulbs. The headlamp switch will have less current passing through it which means it will operate cooler and not overheat from prolonged use which had been a problem for years on many vehicle wired directly to the headlamps. I hope to get many more years out of this switch.
 |
| K Suspension upgraded headlight harness for Cherokee XJ without fog lamps. |
That's it for tonight! Have a good night.
___________________________
August 20, 2018
Raleigh Base here. The Cherokee has landed! |
| Off the jack stands and on the ground! |
Before this event, my daughter installed the upgraded headlamps, new Export style front parking/turn signal lamps, the front side-marker/reflectors, and the grille.


I've always preferred amber lenses used on the '97-01 models. Mine are "Export" because only those countries that required them got them. The American market didn't either like them or were cheaper because they weren't required here. Export models also got the side mounted turn signal "repeater" lamp.
 |
| Note the "repeater" lamp just above the front fender flare. |
Let's see. I installed the cleaned up seat belt I bought from a salvage yard up in New York back in May. I gotta tell ya, their mechanics don't care about how clean it was before they took it off the vehicle. There are grease marks everywhere it was held. Fortunately some biodegradable cleaner, Simple Green, came to the rescue. After soaking for about an hour in hot water with Simple Green, it was scrubbed with a stiff nylon tire brush and it was coming clean quick! I hung it up outside to dry and was able to install it about two hours later. Installing the other half of the driver's seat belt was easy.
The bottom seat cushion from the passenger's side smelled of dog and urine so I pulled the cover off and threw it into the washing machine with a pair of old jeans for balance and a full dose of detergent. I know, I know. You aren't supposed to do that but I was in a hurry. I left it outside with the seat belt and it dried quickly. The cushion was the problem. I don't know what kind of foam it is but it has to handle all kinds of use, not the least of which is rain, and not break down. Since any spills or pet urine will be absorbed into the cover until saturation, I figured the tub-shower would be okay to at least simulate a long, water spill. The foam did allow the water through and it was nasty as it came out. When it began to flow clear, I stopped and let it drain for a bit before taking it outside. The sun was out and everything was going good so far.
Next, the oil filter was changed out since it was still on from the camshaft break in process. Filling it half full with oil due to it's horizontal installation keeps the Zero oil pressure time to a minimum. I added a full quart of oil to replace that and the oil level sits perfectly at Full. I use the same oil filter on the TJ so it's easy to know what it needs.
The transmission fluid was put in during last week and the Cold level that was stamped on the opposite side of the Hot level hash mark area was checked. I ran out of time to properly check it then. I only had the one gallon and discovered yesterday it was not enough. When I got home from the parts store I checked the fluid level in Neutral as it states on the dipstick and it was right at the ADD mark. I guessed the hash mark area was worth 1/2 quart and put that much in. I waited a few minutes to let the fluid run all the way down the tube to get an accurate reading. It registered on the Full mark. That makes 5.5 quarts of transmission fluid and one quart of Lucas Stop Slip fluid conditioner to replenish the transmission. Time will tell if there are any issues from the previous owner having run it 2.5 quarts low on fluid.
The last thing done was to remove and clean out the nasty in the coolant reservoir. I'm glad I didn't reconnect the overflow hose. After dumping out what was in there into the coolant drain pan, what was left in there was really black nasty stuff in the bottom. I poured Simple Green into it and swished it around for a bit then poured that into the drain pan. After rinsing it out, it was a lot cleaner. Not new clean but only a hint of the stuff that was in there. Reinstalling it now I poured fresh mixed IOAT coolant (green engine coolant) to top of the system.
After a full check of the remaining fluid levels including the rear axle, front axle, and transfer case it was time to put the driver's seat back together and install the seat belt.
I took her out to the parts store today to buy an air filter and four more quarts of Dex/Merc. She ran good. She didn't hesitate or bog. The transmission was smooth and solid shifting. The little 'bump' I felt on the test drive back in April and the lack of one today told me it was originally low on fluid and not a shift issue.
While on the way to the parts store I did notice a bit more slop in the rear gears than I was hoping for but it should be okay for now. The carrier and pinion bearings were not roaring so the axle bearing and shaft were the only failures back there. I want to upgrade to a 30 spline axle with a Detroit TrueTrac differential in the future. It's the best of what a locker and limited slip offer in one package. No clacking like the regular lockers and doesn't slip so much it makes 4WD useless in certain situations. Check out how it works at Eaton.
I didn't feel any shuddering or odd vibrations either. She seemed to drive really well. I wasn't able to get up to 55 or 65 MPH but I did a couple of hard accelerations and she pulled good. I don't hear any ticking, tacking, clicking (other than the fuel injectors) or knocking. The engine purrs to my ear. Seems now I should do this with the TJ's engine considering the difference in noise. The TJ will need a full rebuild since she suffers from a little piston slap now.
The only concern are the brakes. The rear brakes are, well, drum brakes. They'll last four hundred years but I bought a hardware kit anyway. The mechanism seems stiff and seems to bind up a little. Rather than disassemble and repair I will replace the whole mechanism and shoes. I'll get around to converting to rear disc brakes from the ZJ D44 rear end. For now, drum brakes are sufficient.
I'm quite pleased with the performance of the Cherokee thus far and will take her to work in the morning where I can get her up to 55 MPH traffic flow permitting.
Lots had to happen in a short amount of time so I didn't take many photos. The ones above are the only ones I took (except for the Export Cherokee). Sorry about that. Things were getting a bit hectic and I needed to complete the project while I had the time. Also, the weather held out long enough. It was hot and humid out there but I did enjoy working on this. The project isn't over by any stretch but the majority of the work has been completed. I can hand over the keys for the TJ over to my daughter knowing I'm on a new journey of challenges and fun.
I was so elated and happy I had reached this point my daughter shot video for me to edit and make a short video. I used a portion of the "Leaving Space Dock" music from Star Trek - The Motion Picture. It felt that good to be able to drive it out of the repair space next to my shed. I'll end tonight's posting with this video. Back in the wagon again!
https://www.youtube.com/watch?v=ilyBjF2ZhPU
Good night all!
_______________________
August 21, 2018
Oh yeah! The end of the beginning was a great success! I drove the XJ to work today for a shakedown cruise to see if anything would fall off or strand me on the side of the road. A resounding NO was the answer when I got home again. Thus ends the first road trials.I am confident that she'll perform well and now am looking to improve the handling. First up, front upper control arms with bushings. Seeing as how it will be a while before I can afford a lift kit or even piece one together, I do need to fix the odd, less-than-confident steering response I'm getting. The track bar looks to have been replaced not so long ago but the upper control arms and the associated bushings are original equipment. These need to go. I could spend as much on just the bushings as I would on premium upper control arms with bushings so I'll get new arms with bushings and a pair of bushings to replace the two in the upper bushing mounts on the Dana 30.
With those on the way tomorrow I look forward to a few days of rest while I wait for the new brake rotors and pads along with the rear axle bump stops and the Export style side markers.
Interesting observation is that the engine temps while driving to work were barely above 170F. This is a concern as the engine was designed and the computer's fuel delivery was set for about 208F. The reason I need it to operate at designed temperatures is due to the fact there is no EGR to reduce emissions. The engine was designed to run at the higher temps to meet emissions requirements at the time. If it runs too much cooler, the computer will richen up the fuel mix to compensate and waste fuel as well as carbon foul the plugs. It may be the heavy duty clutch fan from the Grand Cherokee is pulling too much air through the radiator. Buuuuuut the thermostat is supposed to begin to open at 195F. So either I have a defective thermostat or the fan clutch needs to break in for proper operation. Most thermostatic fan clutches will run a bit fully engaged when cold. The friction in the mechanism heats up the fluid inside and disengages the fan from the shaft. The heavy duty model does not completely disengage nor does the standard fan clutch. They simply turn at a reduced percentage of the shaft speed. Heavy duty fan clutches can have as high as 60% disengaged fan speed to shaft speed while the standard fan clutch runs at only 40% at minimum. I'll keep an eye on this as average temps begin to fall with the season change in September. I'll have the new radiator by the middle of September so I can check this out. For now the XJ is only in test and evaluate service until 9/01/18. On the 1st she will become my daily driver when I hand the keys to the TJ over to my daughter.
I'll wash down the XJ this week to get as much of the tree crud off then take her to the self serve car wash to work on the underside cleaning. I'll wash the TJ then take her to get some detailing done too after I remove my radio equipment. At my daughter's request I've agreed to remove the mechanical oil pressure gauge.
That's it for now!
______________________________
August 26, 2018
It ain't over 'til it's over.
Good evening. Christmas came again on Friday the 24th and 25th. The Centric brake rotors and ceramic pads arrived as did the Moog upper control arms. Saturday saw the arrival of the Crown Automotive rear bump stops and the Export side marker Repeater lamps. Before all this, the alternator in the TJ decided it had had enough and retired from its duties after more than 236K miles on the clock. Now I know rotating electrical isn't really measured in miles and should be measured in hours but there isn't an hour clock on this or any Jeep besides a military version. However, I checked the date code and it was made in September of 1999 which is the same month the TJ was built. Talk about "just in time" inventory control! They must have had the truck deliver them the night before!It was the original alternator anyway and hopefully it will be remanufactured to give someone else's vehicle an extended life like a transplant recipient. The tester showed it wouldn't even energize so something gave out completely. Might have been the brushes or maybe an internal connection. Either way, it's gone and a remanufactured unit installed. I also noticed the engine temps were getting a bit high when the A/C chose to work so I replaced the thermostatic fan clutch as well. Seems the fan wouldn't turn any faster with the old clutch no matter the engine RPM. The new clutch engages much better when the temps come up and I can hear the fan. Guess that should be a lesson.
After taking care of daughter's TJ I went to work on my XJ's front brakes. Pulling the calipers off was easy, of course, as they are reman units. I might have been able to rebuild the original calipers but the time I would have needed exceeded my deadline by a week or more. The old semi-metallic brake pads snapped out just fine and had plenty of meat on them. I wouldn't use them on the new rotors since the old rotors had several fine grooves in them.
I test fitted the pads to the knuckle after putting the rotors on and cinching them down with a coule of lug nuts to hold it in the correct position. The pads were able to be fitted without the caliper since the knuckle has the integrated caliper bracket and pads rail guides the pads slide against. I wound up installing .020 inch shims on the bottom edge of each of the pads that ride on the bracket to close up the gap and prevent that annoying clunking noise when I step on the brakes. That clunk indicates excessive movement and allows the pads to slam the lower edge like a hammer. It can also cause the caliper piston to get cocked in its bore and fail to function properly. It also causes excessive wear on the pad rails the knuckle is cast with to support the pads. The upper pad rail on each side had pretty deep wear grooves at the inner pad on both sides. The shim won't stop the wear but will tighten up the gap to prevent excessive wear until I can purchase new knuckles at around $200 for a pair by Crown Automotive from carparts.com. I bought these for the TJ two years ago to eliminate the egg-shaped lower ball joint taper that I discovered was still causing bad vibration leading up to the infamous "death wobble". I chased that problem for two years prior with replacement of every front suspension component and some done two or three times. It wasn't until I had the passenger's side knuckle off to see about re-tapping the Steering Stop Bolt hole that I thought the taper looked a bit strange. Sure enough, it had wallowed out and not matter how tight I got the lower ball joint it still had play in it. I could have bought a taper shaper to make it round again. According to my machinist I would have taken out so much material that the stud end of a 1 Ton tie rod end would have fit too deep into the knuckle to fit properly. He also said the metal had been hammered so much from the ovaloid hole that the metal most likely suffered fatigue and micro fractures. That could be a major failure waiting to happen. So I picked up two and haven't had a problem since.
Back to the XJ...So the pads were shimmed at the bottom, installed onto the caliper and with tongue in cheek, proceeded to install the assembly with the anti-rattle clips. These weren't installed on any Jeep I ever owned but knew this one was supposed to have them according to my research. They probably were on there from the factory and at the first brake job, was simply deleted. Now the vehicle was in West Virginia for a long time and the first two owner's garaged and took care of her. It's still possible one or more rusted off and the remnants removed never to have them installed again for that very reason. Speculation really.

After getting it back together the wheels were put on and the lug nuts torqued to 75 lbs-ft. It feels odd it's this low since the TJ is ranged between 80-120 lbs-ft. I set mine to 100 lbs-ft on the TJ. I don't know if the metallurgy of the wheel studs or steel wheels determined that. My wife's '97 Camry lug nuts are 74 lbs-ft and her wheels are also steel. It could be the wheels on the TJ are that high because they are aluminum and the expansion and contraction of the material is what determined it. The service manual does not differentiate between steel and aluminum wheels. Go figure.
The test drive went fine. I performed a break-in on the brakes using the following procedure:
http://brakeperformance.com/bedding-in-rotors.php
There is no pull to one side or vibration from the front. The rear brakes did vibrate and confirmed by using only the parking brake to slow down. I do not have ABS so I'm a bit concerned I was not able to lock up the rear brakes with a full-on hard stop. The fluid levels were good so I might still have air in the rear system.
The last thing I did today was to reset the transmission's Throttle Valve Cable. Yep. That's what it is really called. It's not a "kick down" cable like we are used to from the governor pressure shifted automatics. This has a simple adjustment that is almost fool proof. Watch Cherokee Ronnie's YouTube video as he does the adjustment the right way, by the book. One thing to note is if the cable has any kinks or damage, even this won't fix the AW4's shifting issues because it will fail to adjust properly. After this adjustment has been successfully made, the transmission shifting should improve. If not, you can then pursue internal transmission issues.
I did not install the new upper control arms yet. I am still waiting on Energy Suspension control arm bushings to arrive. Since I do not have a CAD type Dana 30, the upper bushing mount on the passenger's side axle tube is made of stamped steel and welded to the axle tube. I could use a portable press and get it out but without the half-moon piece of steel to insert into the gap, it would deform the mount. Next best thing is to drill out the rubber, scour the remaining rubber out of the outer shell then install a greased polyurethane bushing into the shell. I won't do that on the control arm itself as I do believe too much vibration would be transmitted to the "frame" bracket and cause it to crack. Maybe I'm being paranoid but I also don't want more road noise transmitted into the cab either. So the axle end gets the poly's and the "frame" end gets the Clevite's. Eventually I would install a lift kit by MetalCloak and still leave the poly bushings installed or replace them with the other two I didn't use since there are four in a package.
That's it for this post. Bye for now!
_____________________________
September 1, 2018
I was able to get one upper control arm replaced and one axle-side bushing on the passenger's side. It was unbearably hot and humid and my blood sugar was getting out of hand. I jacked the front up and supported the unibody on the tall 6-ton stands while supporting the Dana 30 on shorter 2-ton stands to allow me to disconnect the shocks and upper control arms.Following other's leads on YouTube, I had to put the full weight of the vehicle back on the front suspension to get it to sit at its neutral position as I wasn't able to pull the bolts out of either end of the upper control arm (UCA). After some jockeying of the floor jack and the stands, I was finally able to get both of UCA bolts out on the passenger's side and the spring. I also removed the bolt for the UCA on the axle end of the driver's side. This was done after the sway bar end links and shocks were removed. Both bushings were deformed pretty bad. So all of them will need to be dealt with. I regret not doing this while the axle was out from under the vehicle. The process would have taken far less time and effort.
I then took a 1/4in bit in the drill and drilled about seven holes into the rubber in a kind of revolver pattern. Many seemed to prefer to drill the rubber out from the center bushing for the bolt. I tried to keep the bit close to the outer shell as I believed it would be easier to get the remnants of the bushing off the inside of the shell. The new bushings from Energy Suspension did not come with outer shells.
Once the holes were drilled I used a Bernz-O-Matic pen torch to apply heat to the shell. I applied the torch to the shell for several minutes to get the rubber to release. Once smoke started to appear from the bushing I used a ball joint press to push a socket through the shell. I probably could have just hammered the socket through on an extension. It seemed the cheap, crappy Harbor Freight special, Chicago Electric impact gun, didn't have to work hard at all. The socket went in and the rubber popped out the other side. Pretty nifty. I wonder if I can use a hotter heat source and just press out the bushing once the vulcanizing of the rubber has been released? It should be doable but with that kind of heat around fuel lines, I would have to come up with a way to shield them before I attempt this on the driver's side. Did I mention I'm regretting not having done this before I reinstalled the axle?

I cleaned up the shell, as it sat installed in the bracket on the axle, with a curved rasp and wire brush on the drill. The rasp took the larger chunks of rubber down to something the brush could clean up. After returning from an hour long break from the heat I finished the clean up of the bushing shell. The new poly bushings came with their own special grease. It was clear and very, very sticky. Once it was inserted into the shell with the center DOM inner shell, I greased up the inside surfaces of the UCA that contacted the bushing assembly and went inside to wash the stuff off. Guess what? It doesn't wash off. Well, not easily. I suspect it's a type of marine grease that won't wash off with water. I used Goop hand cleaner and a brush it wouldn't come off. It took brake cleaner to get it off then I went back inside to clean up with hand cleaner again. Man, what a pain. But at least I know the bushing will be good for a while. If it needs greasing again, just remove the bolt, lift the arm up, pull the bushing out, grease it, pop it back in, drop the arm back down and insert the bolt to tighten. All with the vehicle on level ground to put the suspension in it neutral position. Sorry but I don't have any more pics of the work.
That was the good. Now for the bad. I lost one of the nuts to the UCA bolts. I tried to use a magnet to locate it but nothing came out of the grass or the dirt. So I had to borrow Casey's Jeep to go get a new bolt and nut. Turns out nobody carried the 10mm bolt in the length needed. Many were shorter but none were longer. I don't remember the length off the top of my head but the only one I could find that was a Grade 8 in the correct length was a 3/8in bolt and nut. So that's what is installed now. I'll order something online once I get the chance. 10mm is just a hair larger than 3/8in. Try to put a new 3/8in wrench on a true 10mm hex head and you'll know they are not the same.
I received a new drive belt today from RockAuto. I wanted a Continental belt as I believe they are a better quality. They also have never chirped or squealed when I have used them versus the Dayco belts. Gates belts don't squeak either but they do seem to come apart rather soon. The belt on there now was new from the dealer when the second owner had it replaced. It's only now starting to chirp. I've ordered a Krikit II serpentine belt tension gauge so I can set the tension correctly. Setting the tension on a serpentine belt is not the same as the V-belt. There is no belt deflection measurement via a ruler that can be performed. Instead, it is measured in a scale of tension. Most vehicles with serpentine belts have an automatic tensioner, like the 2000 TJ 4.0L. This 1993 XJ 4.0L is a traditional manual tension adjustment using the power steering pump as the tensioner. It's a pain to set the tension but worth the effort. Some will tell you to just crank the heck out of the tension adjustment and forget it. Sure, you can do that and replace your water pump twice as often because your causing too much side load on the bearing and the seal. Or you can ruin your main bearings and seals for the same reason. $14 for a tension gauge or up to hundreds more because of misinformation or just plain laziness. It's your money. You can choose how to use it. But choose wisely.
I also noticed something else this last week. I was idling in traffic trying to get lunch on a hot day and when I got back to the store and saw coolant was dripping. When I got off work, I checked the level and it was okay but the reservoir was empty and had to refill it. I sure do hope my new, old school brass and copper radiator I've been waiting on for the last month gets here soon.
That's it for this report.
____________________________
September 9, 2018
I had written up events up to the 8th and just before I hit the Publish button, the system crashed and rebooted resulting in a complete loss of the material. I won't try to rewrite it word for word. So here's attempt #2...I had a kind of dual reality check recently. It was about headlamps and wipers. First, the headlamps.
I bought a pair of upgraded headlamps to the original 6054 sealed beam type headlamps that came on the vehicle originally. They are 7x6 oblong style headlamps with a glass cover but inside contains a projector lens and uses replaceable 9003 (H4) bulbs. This was a kind of whimsical decision since I can get the halogen version of the sealed beams for around $8 (US). Most Jeep owners want to do something to make their's a tad more unique. To make it "theirs" so to speak. I wanted something a with a bit of a contemporary look without converting to it to look like a Mars rover. Pics below show the different types of headlamps I had looked at. I had a little fun with their captions so please click the captions to visit the page that has them.
 |
| Olympus Mons Base here! The Cherokee XJ5000 has landed. |
 |
| Uh. Houston? We might have a problem. |
 |
| Which way did they go George? |
 | ||
| Surprise! There ARE zombies! |
 |
| Seein' red yet? |
 |
| Terminate 'em! |
 | ||
| ...and be ready to fire! |
But instead I decided on these. A combination of looks that say, well.....you be the judge.


With the look of the amber 'export' turn signal/parking lamps, I think the package goes well together with the Hunter Green exterior. Now if I can just fix that clearcoat....
Okay then. Here's the low-down on the headlamps I installed:
Pro's
- Came with replaceable 9003/H4 bulbs with the same plug style as stock
- Cost $40 +S/H
- Good fit without the miniature bulb socket installed*
- Uses the stock retainer rings perfectly
Con's
- Came with 9003/H4 bulbs. These things were so cheaply made and the blue coating so thick that hardly any useful light reached the ground in front on the road. The coating was supposed to be a thin film to help make the yellow light of the halogen bulb filament make it whiter. The coating blistered and charred and I had to clean up the passenger's side assembly out with soap and water and a flexible bottle brush to clean it. Xtralights wanted 15% restock fee on a defective unit and I have to pay shipping for their return and then they would evaluate if I get a replacement or not! No way! That's how you get single-sale customers, not repeat customers. I will never buy from Xtralites again. I've since replaced those cheap crappy bulbs with new Sylvania 9003 Xtra-Vision bulbs. Though these will probably burn out in a year, I'll have Wagner or GE's ready to install before then. For now, I just need to see the road before Winter arrives and I'm going to work and home again in the dark.
- Has the most unGodly chemical odor you can imagine! Whatever you do, DO NOT OPEN THE PACKAGE INDOORS! The smell will burn your nose hairs out and maybe make you go blind! Wear Nitrile gloves too. I wouldn't recommend handling them with your bare hands. Don't try to wash them either. Getting all of the moisture out of them is damn near impossible.
Now for the second reality check. It rained and I needed my wipers. They worked but I heard the dreaded Clack-clunk-clack-clunk-clack-clunk. At first I thought the wipers were too long, which I believe they were. But watching them I saw one strike the windshield trim when up and the other land too low in the 'park' position. Figured I would adjust the arm and install 16in wiper blades. Naw. Didn't work. Still got the clunking and one wiper was moving slightly delayed from the other. So the wiper linkage had to be the culprit.
A quick scan of the service manual gave me a diagram of the linkage parts but little info about it beyond removal and installation. All linkages have some kind of bushing at the pivoting point and I was sure one of them was bad. Historically it's the one at the wiper motor that drives the assembly. But the delayed wiping action of one of the wipers said another was bad too.
Finding several videos on how these are removed I wasn't able to find out on how the bushings are replaced. I did find an article in the Comanche Club website that described how it's done. I much prefer to find this information to help in the repair rather than invent my own version of the wheel.
https://comancheclub.com/topic/18239-mjxj-wiper-bushing-install/
So having pulled the assembly out, I proceeded to replace the bushings. It was easy to do and in less than 45 minutes the unit was back in and running smoothly. To get there, I cleaned up the balls of the joints. Brake cleaner works wonders. Next I dried them off then injected some white lithium grease into the ball sockets of the bushings. Snapping the arms back together went quickly with a pair of channel locks.
The next item was to fix the loose motor on the bracket. I removed one of two screws at a time and put green thread locker on them to keep them in place after tightening. Green is a light thread locker where as blue is medium and red is permanent. That done, I reinstalled the assembly back into the cowl. After reconnecting the harness and install the arms, I tested the new wipers with a garden hose to keep from scratching the windshield. Everything is now smoooooooth. All I hear is Hummmmmm-hummmmmm-hummmmmm-hummmmmm-hummmm. The fuel pump is now louder than the wiper motor! Yay! I think.
This morning I made time to replace the drive belt. It was mimicking chirping birds. Very loud chirping birds. They quieted down after a few miles but still annoying. So the Continental made-for-Goodyear belt was installed. I didn't have to remove the air box but it would have made it easier to get to the lower adjustment bolt on the back of the power steering pump. I removed the auxiliary fan as it's held in with two bolts and pops out. All the work was done from above.
I was surprised to find the old belt was an inch longer than the new one. I know belts stretch but this belt hadn't stretched that much. I compared it to another size belt and that made only a 1/4in difference. So I had to run the adjuster screw out further to get the power steering pump to shorten the distance needed to fit the new belt.
The new belt I bought was labeled Goodyear Gatorback 6PK2475 (4060975). When Goodyear spun off Veyance Technologies, Continental bought it up quick. So if you want the same quiet Gatorback belt, look to Continental's Elite belt line. These run so much quieter than standard micro-ribbed belts do. I bought this one from Rock Auto. Most of the stock parts were purchased through Rock Auto for this project.
The belt now runs quiet and the birds have flown the coup. What's next? The upper driver's side, axle-end control arm bushing still requires replacing. I think that will be next weekend's work session.
If you are interested in my radio project with the XJ, you can see updates at
https://heathkit-interests.blogspot.com/2018/07/project-xj-7100.html
as they come available.
That's it for this evening!
_________________________
September 19, 2018
Today, I woke up having replace the radiator and discovered, much to my dismay, the lower transmission cooling line from the factory does not lock onto the new tube flange clip on the radiator. After trying several times I decided to remove the radiator and attempt to figure out why.
Once out I realized the tube was a tad too long making the quick connect fitting bottom out before the clips could engage. I pulled out the Dremel and proceeded to cut 1/8in off, file a bevel on the edge and try it again. Still wouldn't lock in. I measured the depth of the fitting again and where it should engage the clips and it would not engage. It should have but I've read several posts that many aftermarket radiators do not connect properly to the factory fitting.
So I cut another 1/8in off the tube and tried again. Now it wasn't engaging for some other reason. I moved the plastic clip back to the old radiator and it would cinch up perfectly. Put it back on the new one and I get a big FAIL. Thanks to inept designers or parts buyers at CSF Imports, who seem to suffer the same brain damage as most other aftermarket radiators, I now have to engineer a fix to make something claimed to be "direct fit" actually work.
The tube was the fourth problem. The first were two mounting tabs that were never used on early to mid-90's model Cherokees to secure the A/C condenser with. I already had the mounting tabs to secure the condenser to the radiator on the condenser! Trying to remove them only had the rubber nutsert spin in the hole thus not allowing me to remove the bolt. The nuts are encased in a rubber bushing that slips into a hole in a bracket mounted on the condenser. They wouldn't fit the holes int he tabs on the new radiator so couldn't use that method. Since using them with the stock condenser-mounted brackets causes them to spin, using CSF's tabs would never work as you couldn't tighten the bolts. Strike 1.
The second issue that came up was the fact there are two threaded studs spot welded to the radiator's main support rail along the top. What those were for I haven't found out yet so I bent them up slightly so they wouldn't interfere with the condenser. Maybe they are for some kind of auxiliary cooler for a tow package or meant for another style of condenser with extra mounting points. Foul Ball!
The third issue came to light when I dropped the mechanical fan shroud into the lower support plates. There are matching mounting slots for the electric auxiliary fan as well with the same result. These plates are spot welded to the main support rail along the bottom of the radiator. I noticed a large gap of more than 1/4in and knew the fan could draw air through that which lowers the amount of air flowing through the radiator fins as the fan is works. I won't 'fix' this as I think I can work around having to cut the slots out correctly with something to fill that gap. I have to engineer another fix. Strike Two!
And we're back to the fourth issue I spoke of earlier. Strike three! Yer out! CSF!
It seems that nobody can design parts that fit AND work properly any more let alone parts for older vehicles.
Now in all fairness to CSF, I have one of their brass and copper radiators in my daughter's TJ I installed four years ago. The only complaint I have is how thin the brass hose fittings are. Mine were bent and out of round when I received it. The box had no damage so I knew it was damaged while still at the factory and nobody cared. They just boxed it and sent it. "Got another stinkin sale Joe! Throw another one down here! Oops. Oh well. Gotta get 'em outta here." And he boxes it anyway knowing the customer will have to pay shipping twice more for the return and resending with a restocking fee for the defective unit.
This radiator has done very well considering it was damaged out of the factory. I had to use a small exhaust pipe expander to make the fitting round again.
If I had to buy another radiator again, I'll go cheap and plastic. Since there's only one location in this town that services radiators anymore, it'll cost as much to fix a brass and copper one as buy new. So I guess I can live with replacing a plastic-tank radiator every couple of years for $60-$70 vs. $225+ to gain only a few years more. We'll see how long they last and see how much they cost per year at the point of failure. If the one in the TJ lasts 4.5 years, it will have cost me $68 per year to own it. I hope the Cherokee gets as long.
On the way home yesterday I felt a kind of binding and clunk when turning the steering wheel from left to right across the center position. I need another pair of hands to work the steering wheel so I can see the whole mechanism's movement. It might be a loose panhard bar at the axle end too. I may not have gotten the torque right as I was exhausted from the heat and might have used the wrong setting.
So without a transmission cooler connected, I will borrow my daughter's TJ for a couple of days.
I installed another antenna for my radio gear today. If you'd like to see how that project is coming along, please click here.
_________________________
October 3, 2018
Best Efforts Don't Go Unpunished
It would seem the Jeep Gods are not happy about my work and decided to toss in an extra issue. Piston slap. Now it was nice and quiet for the last month or so until a couple of days ago. The engine started, rattled a little and went away as it warmed up. Almost. When I got to work I could still hear it slightly at idle but went away above idle. Drove it the next day and it was louder. Drove it today and it didn't go away completely even at speed. So it's possible a rod bearing has gone out (doubtful). The other two possibilities are excessive clearance in one or more wrist pins (likely) or I broke the tip off a skirt (big question mark) both of which will make piston slap. The fourth item to consider is cylinder geometry. Is the cylinder round or somewhat oval? Is the cylinder tapered beyond spec? Both of these are typically the result of oil starvation that has gone on. So my initial evaluation of the cylinder walls and the piston skirts that I could see with piston all the way at the bottom and via the bore scope may not have revealed all I needed to know. One final thought would be the possibility of broken rings, ring land or cracking of the piston(s). There was plenty of piston cracking going on from 1996 to 2002 due to inferior piston design and metallurgy. So I'm hoping I'm wrong here and its a tapered bore issue. Unfortunately this requires more money and more work with a trip to the shop for cleaning, checking for cracks, boring and honing if it passes muster. Then new cam bearings and expansion plugs go in along with balancing the pistons and pressing them onto the connecting rods before it comes home. In short, the short block work has to be done regardless. I have a second set of main and rod bearings standing by if the crank is not requiring grinding. If it does, well, I have a set for another 4.0L needing standard and .001` undersize rod bearing halves and standard main bearings. There's going to be a lot of work that will have to happen as the engine reaches each waypoint in the process.So the 'Ol girl won't be my daily driver just yet. My daughter has graciously offered me her Jeep to get to work and back until she needs it then offered to take me to work on those rare occasions. So the first thing to do is begin the tear down of the front of the vehicle and the top end and begin the evaluation. Wish me luck.
___________________________
October 7, 2018
The Headless XJIt was a dark and stormy Halloween night....no wait, wrong blog.
Getting to the bottom of the knocking noises requires the head to be removed. Since this noise reared up in the last week, I don't feel that doing just the bearing refresh earlier in the year was a wasted effort. Would I have found something wrong beyond the pistons? Perhaps. Perhaps not. Now that the head has to be removed, I'll get a look at the other end of things which make things a little more difficult than before now that the Dana 30 is in place.
First, I took a short video of the engine running to make sure oil was getting to the rocker arms back on Wednesday the 3rd. It hasn't been restarted since.
Now that that was done and it's Sunday, I say, "Off with her head!" And so I apologized to ol' girl and went to work.

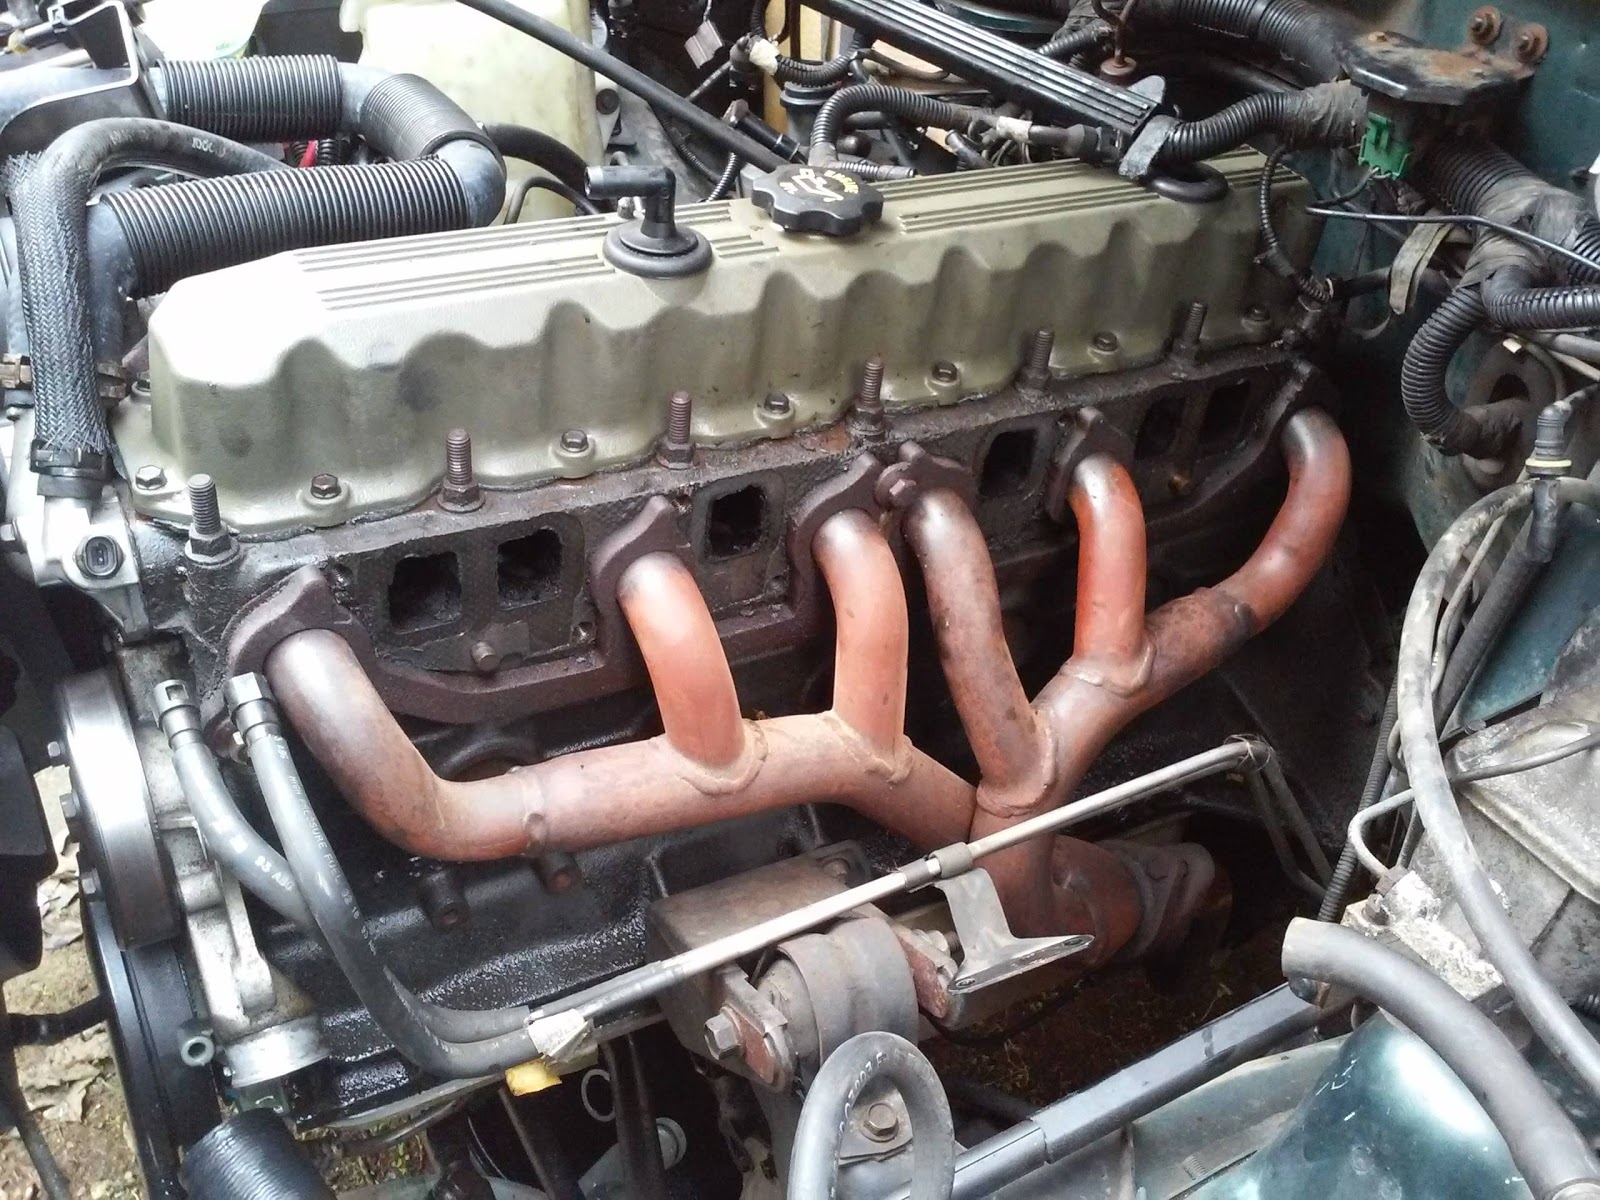


The evaluation of the cylinders require a dial bore gauge to take measurements for roundness (circular conformity) and taper (cylinder parallelism). If these are within tolerance, then the bottom end will be opened up again and the pistons will be removed. These and the bearings will be inspected. I am hoping to find a problem with the pistons. Why? Simple. I can leave the block in place and replace pistons and rings with minimal shop work. If the bearings are worn out already, the crankshaft will have to be removed and checked for journal conformity. If I have oval rod bearing journals, new bearings will be destroyed in less than a month based on this last month and a half.
Here are pics of the combustion chambers.

 | |
| 1 and 2 |
 | |
| 3 and 4 |
 | |
| 5 and 6 |
The white exhaust valves on an unleaded gasoline engine may indicate a lean burn condition. The spark plugs should have a slightly reddish brown tint on the insulator as the unleaded fuel uses different compounds for valve seat protection since the removal of tetraethyl lead. "Lean Burn" engines have been around since, forever, I'm not surprised to see this on my AMC 241 (4.0L). Now I admit I don't know if the injectors spray a good pattern or not but it is possible a combination of things are going on from normal to abnormal. Pretty broad spectrum I know but since I don't have an OBD-I real-time data reader, I can't say what the oxygen sensor is sending to the computer for the fuel/air ratio data.
Here are pictures of the cylinder walls.
 |
| Driver's side of cylinder 1 |
 |
| Passenger's side of cylinder 1 |
 |
| Cylinder 2 |
 |
| Cylinder 2 |
 |
| Cylinder 3 |
 | |
| Cylinder 3 |
 |
| Cylinder 4 |
 | |
| Cylinder 4 |
 |
| Cylinder 5 |
 |
| Cylinder 5 |
 |
| Cylinder 6 |
 | |
| Cylinder 6 |
These aren't the best photos of the cylinder walls but it's the best I can do with what I have. I tried putting the camera in the cylinder but it wouldn't focus that close.
Clicking on the second photo for each cylinder you can see the cross hatch marks are not nearly as prevalent as they are on the driver's side (minor thrust side). This is because this side of the cylinder is the thrust side thus having more wear due the forces involved during the power stroke. The 4.0L crankshaft is driven clockwise as viewed from the front. The force of combustion pushes the piston against the passenger's side of the cylinder. To help explain this, click here for an article about it.
The reason for not pulling the head when I rolled in new bearings was the fact there were no leaks. Cylinder compression tests were in the low-normal range, which was expected for an engine with this many miles but nothing to require head removal. Why break something to fix something else and risk having more issues? So I did it the hard way to remove the lifters and camshaft in order to replace them. Now I can get to the lifters easily and inspect them to see how they fared during the break-in.
Oil starvation can cause many wear issues both obvious and not so obvious and while I still have access to my daughter's Jeep, I can continue to work on this if the block doesn't need to be machined. If the block has to come out for any reason, I'll buy a temporary engine to drop in and rebuild this one over time. I don't want to borrow my daughter's Jeep any longer than I have too.
That's it for this update.
____________________________
October 8, 2018
Planning for a headache
I want to detail my plan to prepare the Jeep for the oil pan removal. There is no lift to help me out here so I'm dealing with a stock height Jeep. I know what you're thinking and I don't relish the idea of removing the oil pan with the Dana 30 in place any more than you do. Ideally, the axle will be removed for unobstructed access to the oil pan. But it is what it is. I've given this a lot of thought and haven't found a better way to remove the oil pan without removing the axle. Just for grins and giggles, I gleened from so many other's that put up videos their adventures and discovered two things that stuck out in my mind. Many either avoided the problem with a stock suspension and cut to the "It's finally out!" scene without ever saying how they did it or, say something about it and did everything to short cut the work involved in doing it so it won't be a as big a problem. Either way, more work was needed than if the time was spent on just preparing the vehicle for the job to be done. So I've put this procedure in place based on my experience with my TJ.Here's the plan for the XJ:
- Set the emergency brake and chock the front and rear of one of the rear tires (You don't want this able to roll one way regardless of the slight slope you might be on. Use a second pair of chocks if needed)
- Remove the front shock lower bolts on both sides
- Disconnect both sway bar end links
- Disconnect the panhard bar at the axle
- Disconnect the upper tie rod at the pitman arm (You might be able to do this job if the tie rod at the passenger's side steering knuckle is disconnected)
- Loosen the lug nuts on both front wheels
- Jack up the XJ/MJ/TJ under the axle to raise the vehicle up (how high is determined by sighting it yourself
- place jackstands under the uni-frame at the lowest point just behind the lower control arm mounts at the frame
- Remove the front wheels
- Remove the calipers from the knuckles and secure them on the top of the springs with something to prevent damage to the hoses
- Lower the axle as far as it will go
- Place jack stands to support the axle from falling further for safety (You will be underneath so safety first)
- If you can, leave the floor jack in place to assist the jack stands supporting the axle
- Optionally you can disconnect the front drive shaft at the pinion and move it further out of the way
- The exhaust pipe is not required to be removed
Things of note: If the bearings are already worn out, I will assume oval shaped rod bearing journals and the engine will come out. If the bores are tapered or out of round more than .001" (.025mm), the engine will come out.
So I already have two possibilities that requires pulling the engine. I had an estimate done to perform a basic block prep which included cleaning, checking for cracks, decking, boring .020" (.508mm) overbore and finish honing. $370US. I haven't estimated the crankshaft or piston work. Cylinder head rework is estimated at a high of $800 if not cracked. If it is, I'll consider a Clearwater head although I do not like the smaller exhaust ports of the 0331 TUPY casting. I much prefer my 7120 casting. 0331 casting requires the camshaft profile of the 96-'06 engines that used it for it to work well. Actually, my camshaft is a balanced cam profile with .424" lift on both lobes and 197 degrees @.050" lift (270 degrees total). In 96-'04 engines, the profile became a dual profile with .408" Int/.414" Exh at 188 degrees @.050" (253.3) intake and 190 degrees @ .050" (259). In 2005 and 2006 the cam profile again changed to a balanced profile with .397" lift with 264 degrees total duration on both valves. I don't have the .050" numbers at hand. So they really had to pull back the cam lobe profiles to make the 0331 heads really work. The end result was a better top end with some loss at the bottom end. This might be a response to many states having upped their state speed limits above 55 MPH and people wanted better fuel mileages at those higher speeds. Also by then, most of the sales were by mall walkers, soccer moms and overall pavement pounding. The off-road appeal moved on to other vehicles. The Liberty didn't instill any confidence in off-road capability and looked mostly like a fat tick. That's my take on the Liberty anyway.
So back to the XJ. I prefer the old 7120 head and will pull as many from the salvage yards from the years used as I need to find a good one if need be.
___________________________
October 13, 2018
As the crankshaft turns
In this episode...popping her pistons.It's the weekend and time for some fun. For most, it's a trip to the beach, the lake, the girlfriend's, you know the drill. Me? I have fun working on engines. Jeep engines specifically. I enjoy doing the tear down more than the reassembly as I like to discover things about the engine. Out-of-frame work is easier than in-frame by an order of magnitude but sometimes the challenge of an in-frame tear down can teach things that pulling the engine can't. How you approach disassembly between the two conditions changes as you dig into them.
To recap: The purpose of this disassembly is to diagnose, locate, and if possible, perform repairs to eliminate a suspected Piston Slap/Rod Knock sound during warm up and idle events after warm up.
If you are interested in the science of piston slap events and want to know more about how it occurs, here's an article for you. https://www.sciencedirect.com/science/article/pii/S0888327014004610
The cylinder head was removed to begin the process of locating the source of the noise. Prior to head removal an technician's stethoscope was used in an attempt to localize the noise. The sound seemed to be equally dispersing throughout the engine. The next item was to remove the head to establish valve and spring operation as well as spring tension values later in the disassembly. With the head removed, each cylinder's walls could then be visually inspected for severe wear patterns. The bore-scope used while the head was installed during the bearing replacement project over the summer proved inconclusive due to poor imaging and lack of control over the direction the camera was pointing.
The cylinders do look great after 227k miles (unknown number of hours) (see previous post from the 7th for cylinder wall photos). Now it was time to pop her pistons and check for abnormal wear.
I began with the lowering of the Dana 30 by disco'ing the front shocks, sway bar, panhard bar, and tie rod to the pitman arm. Removal of only two calipers and four bolts are needed to remove the axle completely but I'm trying my best not to do that if I can at all help it. The reason for doing this procedure is to allow the oil pan to clear the axle housing without removing the oil pump. The oil sump pick up is the primary culprit but is press fit into the oil pump body and secured with a bracket by one of the mounting pump bolts. With the baffle in the oil pan, it's not possible to remove the pan with the axle at stock height. A six inch lift might be enough to clear it without doing anything with the axle but I don't have one of those. This Jeep isn't slated for rock crawling duty. It's purpose is to provide me with a mobile amateur radio communications, grocery getter, camper and all around daily driver. If the need arises, the local SkyWarn group can contact me for use as an emergency radio communications wagon. It will also serve as my Field Day and/or Winter Field Day comms wagon when it's finished.
Pulling piston 1 revealed some minor scuffing on the minor-thrust side skirt just below the oil control rings. The scuff narrows significantly toward the end of the skirt. What really caught my attention, however was the fact that the compression ring gaps were nearly lined up. Knowing the rings migrate around in their ring lands, I thought it interesting I was able to see this. The oil control rings look pretty bad and viewing up the piston's skirts revealed lots of build up where the oil slots are located. Closer inspection shows the ring lands of the oil control ring is clogged up with varnish and build up. Below are photos of the first piston. Remember to click on any of the photos to enlarge them.

 | |
| Piston 1 - Forward facing toward front of engine |
 |
| Piston 1 - Major-thrust side (Passenger's side of block) |
 |
| Piston 1 - Minor thrust side (Driver's Side of block) |
 |
| Piston 1 - Rearward toward rear of engine. |
 |
| Piston 1 - Top face |
The rest of the pistons are shown below.
 |
| Piston 2 - Rearward |
 |
| Piston 2 - Minor-thrust side (Driver's) |
 |
| Piston 2 - Forward |
 |
| Piston 2 - Major-thrust side (Passenger's) |
 |
| Piston 3 - Minor-thrust side |
 |
| Piston 3 - Rearward |
 |
| Piston 3 -Forward |
 |
| Piston 3 - Major-thrust side |
 |
| Piston 4 - Minor-thrust side |
 |
| Piston 4 - Rearward |
 |
| Piston 4 - Minor-thrust side |
 |
| Piston 4 Forward |
 |
| Piston 5 - Minor-thrust side |
 |
| Piston 5 - Rearward |
 |
| Piston 5 - Major-thrust side |
 |
| Piston 5 - Forward |
 |
| Piston 6 - Major-thrust side |
 |
| Piston 6 - Rearward |
 |
| Piston 6 - Major-thrust side |
 |
| Piston 6 - Forward |
One thing is for sure, piston 5 has the most scuffing of all of them. I suspect this piston is the one that is making the most noise. Now the reason for this scuffing has to be found before anything else can be done. Is it oil control? Was it from the oil starvation in the previous owner's care? Is the wrist pin binding or is there a problem with the rod bearing journal being out of round or tapered?
Join me next time for those answers and more on the next episode of As the Crankshaft Turns. Same slap time, same slap channel.
_______________________________
October 20, 2018
Finding Reamer
Welcome back! Work sometimes gets in the way of getting things done since the income from work paves the way to get things done. A friend quoted me: "He who is without oil, shall throw the first rod - Compressions 9.2:1".All kidding aside I asked my brother-in-law, whom works on small aircraft, to consider the evidence. One of the things he said is that unnecessary machine work makes for future unknown issues. In other words, if it doesn't look broken, don't try to fix what isn't there. I heard a noise that I believed uncommon to the Jeep 4.0L engine. After taking it all apart, I cannot find the evidence of the cause of the noise. The cylinders are in good condition with cross hatch marks still visible on both the minor and major thrust sides. The bearings don't show evidence of spinning, wiping or otherwise abnormal embedding of particles into the material. The rod journals measure straight and round. No taper and not oval shaped. Likewise the cylinders are within tolerance. The pistons, after seeing Letter "E" marked on them, are withing tolerances. (See Jeep Engines - Third Edition: Part Number P5007161; Page 159)
The last measurement I have to take is crankshaft end play. I don't trust my initial measurement and will do it again and compare with my first readings. If out of spec, I will replace the main bearings since I did not the first time as they had virtually no wear but did not check end play to see if the thrust bearing had wear. Once they are replaced, the end play will be checked again. If out of spec, the crankshaft will have to be replaced since grinding the journals to an undersize will not add metal to the thrust surfaces. If the crank has to be replaced, the cost of a good crankshaft, rebalancing the piston/rod assemblies with new pistons and rings may cost as much or more than a good used engine ($600).
So I am still not at the fork in the road to have to decide to buy a used engine versus overhauling. None of this takes into account the condition of the cylinder head. Does it have cracking, worn guides and such. I think not since she didn't burn oil at any engine speed or load. The ring end gaps range from .005-.015 more than tolerance but again, no oil burning. The oil control rings end gaps are ranging from .010-.025 more than tolerance and yet does not burn oil.
What I did find were the slots in the piston to channel the oil scraped off by the oil control rings to have a return path to the oil pan were gummed up pretty bad. Lots of build up. Tonight I poured Simple Green into a small container with the piston (head down) and filled it just to bring the level up to the oil control ring groove and left to soak for 30 minutes. Simple Green's web site FAQ says:
Is it safe to use Simple Green All-Purpose Cleaner on aluminum?
Simple Green Stainless Steel One Step Cleaner & Polish is another option for cleaning polished aluminum. This product is designed for light duty metal cleaning and polishing.
Now that's good know! Unfortunately it doesn't specify any alloys of aluminum in the statement above to take into account the alloy our pistons use. Our pistons contain about 12% silicon (eutectic point) to make them stronger and more durable than pure aluminum (aluminium). So it stands to reason the piston alloy can still be affected by Simple Green and care should still be taken. I don't want or need shiny like-new pistons with perfectly clean ring lands and grooves. Actually, the ring lands are fine but the bottom of the groove can use a little improving and scraping it clear will help the ring do its thing. When a ring binds to one side of the piston due to carbon build up in the groove, it may stop rotating around in the groove and wear unevenly. This can force the piston to move in closer to one thrust side or the other. In my engine's case, the majority of the visible wear was on the minor thrust side (driver's side of the block). So if carbon build up is excessive in the major thrust side of the piston ring grooves, the piston migrates to the opposite side.
The idea of not doing a ring job comes from the fact that cross hatch marks and not vertical scuffing/scoring on the cylinder walls is visible. The measurements taken show the cylinders are not oval shaped. The pistons, too show only minor scuffing on the minor thrust side except piston 5 which shows a little more but still within tolerances. The ring wear is consistent with a well maintained engine, even considering the previous owner's neglect. I admit it may not have been all that long the problem existed since a leak of that nature would coat the underside of the Jeep very quickly. Road grime build up would also be quick and look as though it had been there a while. If the oil ran out all the time and ran at 0-PSI until he got home, I can believe there should be more wear. This is one of the considerations for inspecting the valve stems.
Now the results of the Simple Green dip turned out pretty good. After rinsing off the stuff, the oil and varnish melted away leaving the carbon behind. I suppose Berryman's Carburetor and Parts Chem-Dip (P/N: 0996) would do more to attack the carbon deposits. However, I already had the Simple Green and chose to use it after viewing many a testimony and photos to its partial success. There are those that have left their piston(s) in the full strength solution over night and scrubbed away much of the carbon deposits with a stiff nylon brush. Other's used a brass brush on the top. Many seem to have used it on the grooves thus damaging the sealing surface for the rings without realizing it or they didn't care. "It'll still work fine." Not. They might work fine for a while but the damage is done and the life shortened before the next overhaul/rebuild.
Still, the ring grooves need to be cleaned carefully of the carbon though which is what I will do but I do not really care about the piston tops. Even with the application of the right fuel, carbon-topped pistons will still be carbon-topped. I would put my efforts into cleaning the intake manifold, valves, combustion chambers and injectors ahead of the piston tops. As told by my brother, an experiment was done with an engine to see how much ring gap would be needed to keep the engine from making rated HP and Torque. It took an increase of over .040in end gap over tolerance specs for the dyno to show it failed to meet rated power. Mine aren't that bad so I'm not too worried about it right now. I'd be more concerned with a cracked head.
A note on measuring taper. I've heard this done and will see if I get consistent numbers with what I measured already. First, insert your first compression ring into the cylinder and press it in so it is level to the surface of the block deck at .5in (12.7mm) below the block deck. Measure the end gap. Push the ring to the bottom of the ring's travel as if it were installed on the piston and measure the end gap again. Take the difference between the two measurements and multiply by 3.1415 and you will get the difference in bore diameter between the top and bottom of the bore, not the bore diameter measurement itself. It is said it works good if the ring is level within the bore. However, there is no substitute for actually using a dial bore gauge to within 1/10,000'ths to get that fourth digit accuracy most specs call for if you are building a high performance engine.
That's it for my ramblings tonight. I hope to finish cleaning the rest of the pistons tomorrow with photos.
See ya later!
________________________________
October 21, 2018
Today started at 49 degrees when I woke up. I wanted to make some chili today anyway so things worked out. By the time I had it going in the crock pot it warmed up enough to go outside. The work area was a bit too cluttered so I spent some time doing a little organization for today's work.As posted in the previous post I needed to clean off the varnish build up and carbon from the ring grooves and skirts. I settled on Simple Green at full strength and submerge each one until the bottom of the main piston body is covered. This takes a while and I did experiment with a thirty minute soaking. I cleaned the ring grooves of piston 5 and rinsed it off in another small tub of Simple Green. A stiff nylon brush did do a good job to get the more stubborn varnish deposits. The ring grooves can be cleaned with the machined end of an old and/or broken compression ring. The best way is to use a piston groove cleaner. Lisle makes one (PN: 24000) I use and believe me, the difference is real and don't cost much. As of this post, Rockauto has it for$15.99.
Once the groove is cleaned, the piston should be cleaned so the debris left can be rinsed off in your choice of cleaning solution with a final clean off with brake cleaner or water. Simple Green is deactivated through dilution so a thorough flushing with water is necessary. The Piston should then be sprayed with brake cleaner or WD40 to displace the water. Use a quality lubricating oil or motor oil to inject into the wrist pin lubrication holes to keep the pin lubed and rust free. I used PB Blaster the first time and decided against it. The penetrating ingredients of PB Blaster are not needed as only oil should be in the oil clearance so I used Liquid Wrench Lubricating Oil after shooting it with WD40 to displace the PB Blaster. The heavier oil in Liquid Wrench will displace the WD40 without evaporating.
The rings then can be cleaned and wiped down with a light oil to prevent rust (if you are simply checking out the condition of the pistons like I am). I found the oil control rings to be carboned up from stagnant oil trapped by the expander ring. These needed a dulled edge to scrape the carbon off of the thin steel rings. The expander ring needed a little more TLC to get the carbon build up off. Yep, you guessed it, brake cleaner. In yet another small container, I put the expander ring in it and emptied the whole can of brake cleaner into the container. CRC is the brand I prefer and it works fantastic. After 10 minutes soak time, the nylon detail brush was used very carefully to scrub off the deposits. This can deform very easily so be careful if you do this.
NOTE: Never dip your piston/ring assemblies into motor oil. The oil around the compression rings will not migrate out completely. Oil is not meant to lube the compression rings in their grooves and after a thousand miles from first start up, there will be bad carbon build up because the oil could not migrate out. You'll have something of the equivalent of Coking like what happens to some turbocharger shaft bearings when the oil stops flowing and the hot turbo shaft is still spinning down. The oil cooks and creates the varnish build up. With rings, they will start to seized and fail to rotate in their groove during operation like they are supposed to. Oil the cylinder, not the piston rings when installing pistons.
You might be wondering why I'm going to all this trouble. "Just hone the block and do a ring job and get it over with!" some might say. That's fine. Whatever floats your boat doesn't necessarily float mine. I'm not into shotgun style repairs. That tends to cause more trouble than it fixes. My intention for doing it this way lessens the things done that will disturb the engine in its current state. All I'm trying to determine is what the root cause of the abnormal knocking sounds are that it never made before. Let me explain...
If I opt to do the ring job, I must hone the cylinders with a glaze breaker or the new rings will not seat. Honing the cylinders then has the problem of protecting the crankshaft below from being contaminated. Honing, washing and rinsing isn't practical because the crankshaft is in place. Using paper towels, blue, white, yellow or whatever, isn't a good idea as the fibers left behind from getting caught by the honed surface act as an abrasive and contaminant. The cylinders need to be washed.
The crank is in place because the block is still in-frame. The block is still in-frame because I don't have a way to remove it, store it, work on it, throw money I don't need to at it, assemble it, reinstall it, hook everything back up and hope I didn't miss anything. The more that is done increases the likelihood of a mistake or risk of damage that would otherwise not have been. It strikes me as strange that many have the idea that every engine taken apart has to be shopped, machined, bored to maximum allowable tolerances out. The excuse that it's because the engine is this far, why not go all the way is costly. I believe that machine work is needed only when there is something wrong and then only enough the correct the problem. To do only the machining work that truly needs to be done requires a known set of boundries. For instance, if you see an oil seepage and dig into it because you don' t like it is a personal preference and may not be a real problem. You can wind up throwing money at it as you dig deeper and discover more and more things you don't like that become issues that weren't before. Accepting the seeping is probably a minor inconvenience and not a real problem. I'm keeping the engine as close to it's current state trying to find the cause of the odd knocking sounds it hadn't made before. In the attempt to find it and understand the root cause, I have disassembled the engine down to the crank and camshaft. Measurements have been taken and parts inspected.
Conclusion: It is my belief, given the evidence, the odd noise the engine never made before, known as piston slap, is due to the carbon build up behind the rings limiting their normal movement in their respective grooves. The ring lands are good but the ring clearances seem a bit tight. The carbon build up in the ring grooves on the major thrust side appears to have pushed the pistons toward the minor thrust side thus making the piston-to-bore clearance lopsided. This also appears to have preloaded the piston toward this tendancy.
Cylinder 5 showed the worst of the problem and had the most carbon build up around the second compression ring and the oil control rings on the major thrust side. A high amount of carbon build up on the surface on the piston's major thrust side versus very little carbon build up on the minor thrust side above the first compression ring supports this theory. The result is the piston being preloaded to one side causing an excessive piston-to-bore clearance on one side of the piston. During operation, the piston cannot center in the bore and a harder piston slap ocurrs.
Solution: Check ring side clearances. Remove the rings to inspect them. Inspect the piston for cracks, broken or damaged ring lands, excessive wrist pin wear or binding, out of round or excessive oil clearances, or excessive piston wear on skirts. Inspect the connecting rod for out of tolerance specs such as twisting, bending, out of round or tapered large end. If within spec, clean and reuse.
The rings now move freely as they should. Their side clearances are within tolerance as are the condition of the rods and ready to be re-installed into the block.

I'll have my brother's ring installer set by next weekend and begin to reassemble the engine. For now, I'll focus on the cylinder head cleaning and valve check.
______________________________
October 27, 2018
Getting it back together
Continuing from last post, the ring side clearances checked out good after the grooves were cleaned. The Simple Green soak period was thirty minutes per piston with the rings on. When removed from the concentrated solution brake cleaner was used to spray the oil slots in the piston from behind to clear out any build up. The rings were removed and the grooves cleaned out without taking any metal off. The oil rings had much build-up on them and were kept in their original orientation as was the expander rings. The carbon and burnt on oil were carefully scraped off to facilitate ring travel while in operation. The expander rings were soaked in Simple Green and brushed with a stiff nylon brush to get the carbon from between the wavey ridges.After the pistons were cleaned they were sprayed with WD40 and the rings reinstalled and set according to the Jeep Engines book.
I read in the Jeep Engines 3rd Edition book the 4.0L engine from the factory used high strength aluminum alloy pistons with an anodized top ring groove and crown. Piston skirts were coated with a solid lubricant (Molykote) to reduce friction and provide scuff resistance.
With the exception of piston 5, my pistons had a hint of scuffing and know the Molykote is gone after 227,000 miles. The anodizing of the piston crown and top ring groove should still be intact. For piston 5, I used a 3000 grit polishing cloth over the worst scuffed skirt in the direction of the existing machining marks to knock down and smooth the scuffing over. I rinsed the piston off with brake cleaner then installed the rings and lubricated it like the others described below. Hopefully this will help.
The Lisle brand ridge reamer I purchased uses rollers on the the outriggers to help keep the unit centered in the bore. However, it is difficult to keep downward pressure to keep the cutter level since the cutter's outrigger does not use a guide that rides on top of the cylinder's deck face. If I get a chance to rebuild another engine, I'll buy the other style of ridge reamer that locks in the bore. With multiple adjustments it cuts the ridge in a spiral up toward the deck with a reverse thread screw action. This one has three different cutter depth settings so as you cut the first pass, you do not have to adjust the cutter until you return it to the bottom of the ridge again. Sounds more complicated but it isn't.
 | |
| Lisle Ridge Reamer - 36500 |
 |
| Lathe Type |
With the carbon ridges cut down, the cylinders were washed with Simple Green and wiped several times each with low-lint towels. Once done they were oiled by soaking a lint-free cloth (microfiber) in motor oil and wiping the cylinders with it. By the way, shop rags were used to cover the rod journals on the crankshaft to keep the metal shavings from contaminating them or getting into the oil passages of the crankshaft.
The spent rags were trashed and copious amounts of WD40 were used to rinse everything down below. I now have a large drain catch pan with a stew of different chemicals I will pour into an extra bottle and take to the hazardous materials disposal site. I have a few gallons of engine coolant and oils that need to make the trip too.
With everything as clean as can be made it was finally time to install the pistons. Each piston would be installed according to where the crankshaft's rod journals were in their rotation. I had cylinder one at BDC which also puts cylinder 6 in the same position. From there, pistons 3 and 4 were next in the rotation then 2 and 5.
To prepare a piston, I used the oiled cloth and swiped oil all around the ring area and the skirts. I also injected oil into the wrist pin oiling holes to make sure there was plenty where there should be. The rod bearing caps remained installed and the bearings liberally wiped with oil. The caps were then removed and the piston mounted in the ring compressor. Two short pieces of masking tape were wrapped around the rod bolt threads to protect the crankshaft rod journal before the piston was inserted into the bore. The ring compressor was made to sit level against the deck before anything else was done. My plastic mallet has a wooden handle and using that, tapped the piston down into the cylinder. Placing the handle of the mallet to the piston face, I used my hand in a gentle hammering action against the head of the mallet to push the piston down most of the way. From there, I moved underneath the engine to make sure the bearing half hadn't dislodged or otherwise sit crooked in the big rod end. When it was safe to do so, I pulled the piston assembly down onto the crankshaft.
That last things to do for this cylinder was install the oiled cap with centered bearing half and install it on the rod. I say centered since these bearing have a 'crush' factor and the bearing halves should be centered on the journal and rotationally in the rod. The nuts were then evenly snugged down before being torqued to 27 lbs/ft (324 lbs/in or 36.607Nm). The reason for the lower-than-book-value torque is because the threads were oiled. Lubricated threads torqued to spec can cause overstretch in a bolt even if the threads are lubricated. If a fastener is not specified a lubricated torque, either adjust the torque applied or clean the threads off and use the book value. According to fastener engineering references, a reduction of 20% is recommended for lubricated threads versus dry. Dry threads will have more friction and thus torque sooner thus meeting the expected torque value for that fastener. Torquing a fastener with lubricated threads means the higher friction expectation is not present and can cause the fastener to stretch beyond expected values. Many engines built nowadays are using torque-to-yield type fasteners. This is especially true with cylinder head fasteners. These fasteners are single use only and must be replaced after removal. The fastener has stretched beyond it's nominal elastic limit into what is called the "plastic" zone where it will not return back to it's original length when removed. Any further tightening will not yield any tighter clamping force or break but the fastener will remain at this stretched state until removed. It can no longer stretch and will fail when used again.
With all of the pistons now installed, I rotated the crankshaft to TDC of the power stroke and moved on to the cylinder head prep.
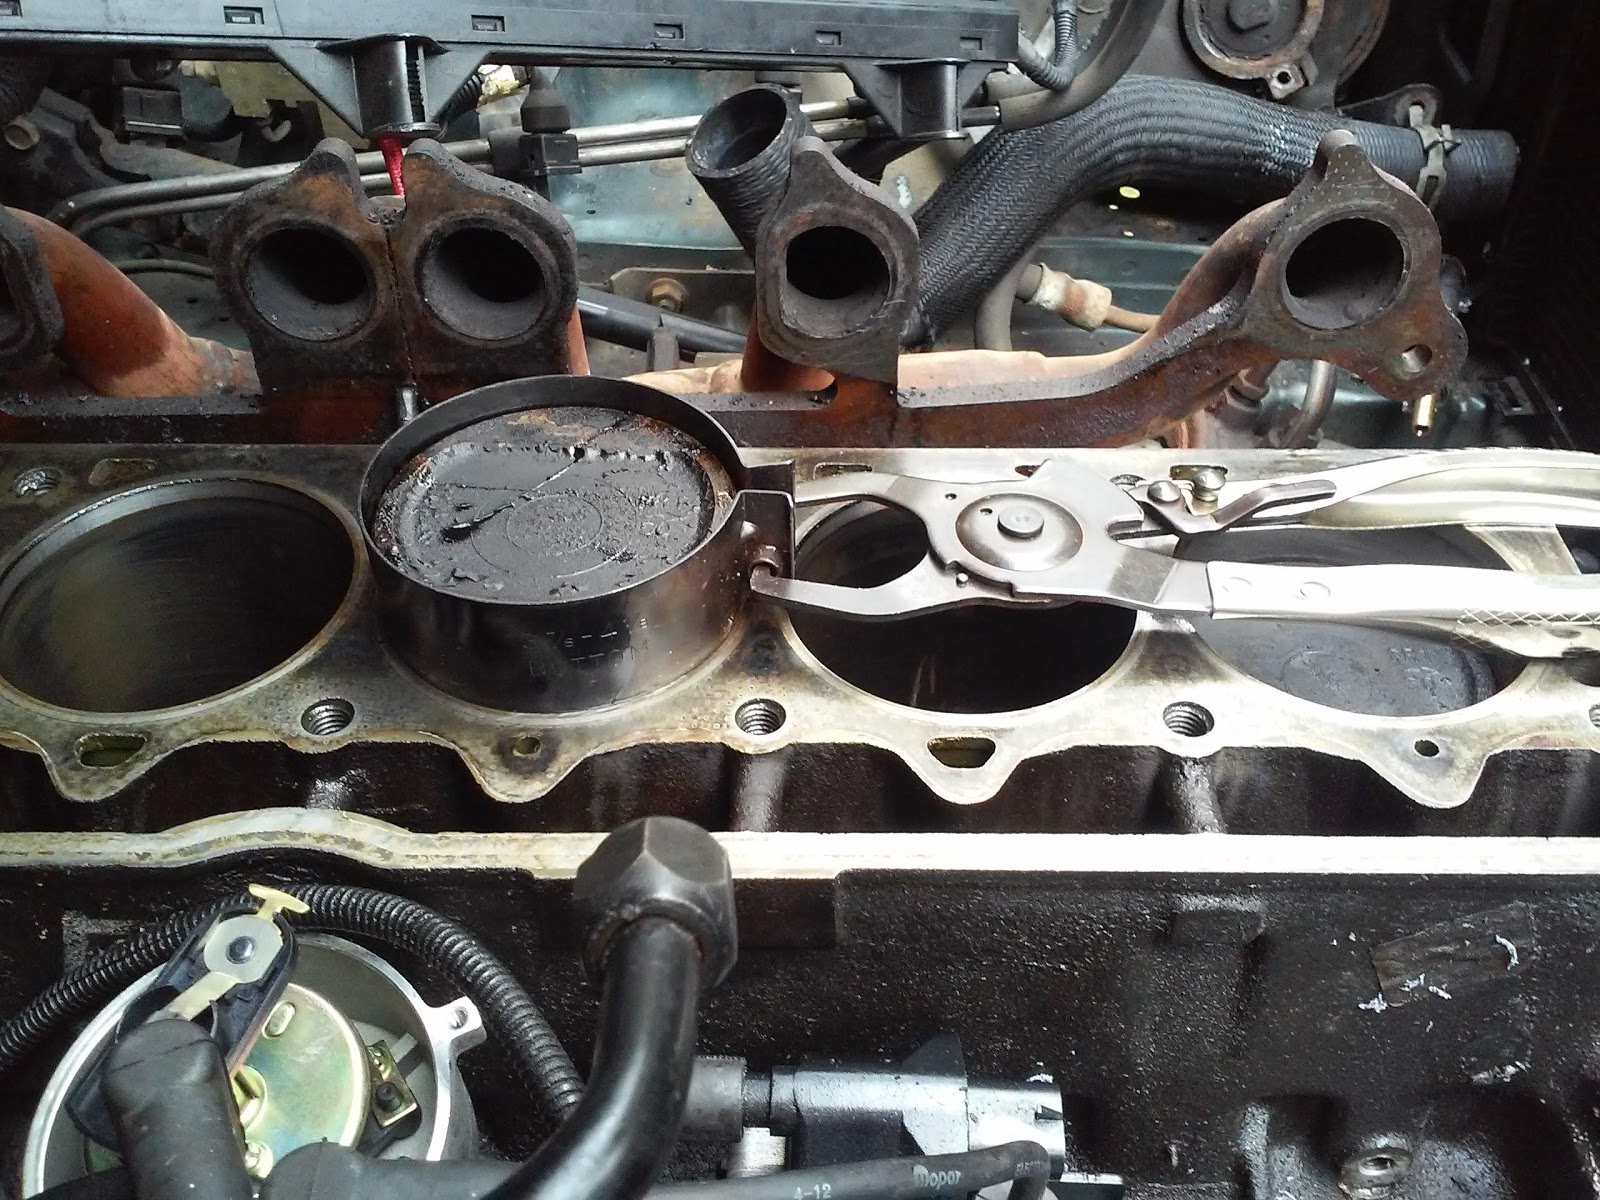 |
| Blue Line Ring Compressor About twenty plus years old. |
 |
| Another angle. There is a geared catch to hold the clamping force on the rings while installing the piston. |
 |
| Just need TDC of Power stroke and all done! |
This didn't take long since I had new razor blades to scrape with. I also cleaned out the intake ports of all the crusty crud build-up then used brake cleaner to wash them out with. No porting was done. The intake/exhaust manifold combination gasket had ports that were too large for any port matching to be done. The original gasket had been replaced and it too had larger openings. So for this engine, port matching would be a waste of time. If I were to ever drop in a more modern V6, well, that's another project to be honest.
 |
| Just after scraping old head gasket loose from the head in one piece. |
 |
| Chamber 1 |
I used 3000 grit polishing cloth with a block of wood to knock down any high spots the razor snagged on. The metal became less stained and more evenly clean. I did the same with the block deck. I didn't have a large fine grit sharpening stone to work with so this was the next best thing. I've done this procedure before with good results. Of course it was a long time ago so we'll see if these old engine work techniques still work.
The goal of the day was arriving and the temps were starting to drop again. I discovered I hadn't removed the fluids trapped in the cylinder head bolt threads in the block and needed to find a way to get it all out. Well, I thought about using the computer duster cans and spend the money. I realized the Rainbow vacuum was in the house as my wife hadn't taken it to her sister's to help clean up with. So I grabbed that instead. Putting the hose into the exhaust port of the vacuum cleaner and attached the crevice too to narrow the stream and raise the velocity. Well, it worked good. A bit slower than 90psi of compressed air but it got the job done and she doesn't have to know I used it for that purpose. ;-)
So with that out of the way I moved the cylinder head over to a piece of cardboard between the fender and grille header to install and retrieved the bolts that had been sitting in the Simple Green to soak. I blasted them off with brake cleaner (wonderful stuff) and used my Dremel to cut off one of the bolts with a threaded stud on it. I don't know what engineer Johnny was thinking but you can't get the head bolt at the back of the head out on the driver's side. So you have to take the head off with it still in the head. I had to use a piece of hose to hold the bolt up about an inch so it wouldn't catch on the block to remove and again to install the head.
I placed the new head gasket on the deck and used a couple of short steel rods to keep the gasket in place. This engine is one prior to having the centering dowel pins in the block to locate the gasket and head. There is one bolt that extends into the water jacket next to the water pump. It got a coating of PTFE thread sealant brushed on after using a thread chaser to clean the threads of the old sealant. none of the other bolts needed cleaning but I did chase the threads in the block before the pistons were installed. So with all the bolts clean and ready, I climbed up and sat on the header to prepare the to install the 75 pound loaf.


First I moved the head over to my lap. This is a heavy and awkward handling object and I knew I was going to be sore from performing this one action. As I write this, I don't relish the idea of having to get up for anything. Next was the bolt in the back, or number 14 if you look at the torque sequence diagram. I put in in the head with the hose wrapped around it and made sure it didn't stick out the bottom before lifting it up and out over the block. Getting a firm grip on the back end of the head where the expansion plug is located, I had just enough to lift and move it in the right direction. I found the steel rods in bolt 13's hole and bolt 12's hole and gently let the head down on the gasket.
The hose was pulled off the modified number 14 bolt. It dropped in and threaded perfectly. I used my telescoping magnet to retrieve the two rods and installed all the other bolts without issue. If you do use a steel rod as a locating dowel in a head bolt hole, use a 12mm diameter rod at most or it won't drop in. Make sure you have a magnet that will fit in the bolt hole of the cylinder head to retrieve them. Mine were 2.75in (69.85mm) long. Another idea might be to cut the head off of an old 'long' head bolt for the same engine and use that on the passenger's side of the block to located the gasket and head. With this type of dowel-less block, head gasket can be so uncentered that it will cause issues so be careful and locate the gasket properly for a good combustion chamber seal.
 |
| Modified number 14 bolt. The braided ground strap that was attached here will be moved. |
 |
| All torqued down and nowhere to run...yet. |
More on fasteners:
AMC's 258ci, 2.5L, and 4.0L engines never used T-T-Y fasteners. The factory head bolts were standard thread type bolts and could be reused once. The practice of reusing a factory installed head bolt has been lost for the most part. Most mechanics either don't know they should paint the tops of each bolt to signify they have been reused once already and must be replaced or simply don't care. In today's engines, T-T-Y fasteners are single-use only. In my engine, I found no indication through visual inspection or the service paperwork that came with the vehicle that the cylinder head has ever been removed. So I reused the head bolts knowing this is the last time I can reuse these bolts..
Hemmings Motor News has this article about fasteners. If you want to skip to fastener failure, go half way down the page and look for the Fastener failure section. Read that first so you can lead into the Engine fasteners section.
I hope to make progress tomorrow but with the aches and soreness I'm feeling now I might not be able to. We'll see.
________________________________
October 31, 2018
Just a short update tonight. The oil pan was cleaned up and reinstalled. The transmission cooling lines were crushed by the UCA and the crushed part cut off. Reinstalled the two pieces from the transmission and bracketed them to the bellhousing where the first bracket was located. Right now they are pointing up at a 45 degree angle. The next step is to cut the crushed portion from the other half of the lines. I"m not sure if I'll use compression fittings to tie them in and use hose from the cooler or interconnect the forward hard lines to the rear lines with short pieces of hose. Where they were crushed by the upper control arm leaves no room for the compression fittings unless I can route the a little lower down and tucked up to the oil pan. I think my mistake before was they were hanging too far out from the pan on the wrong side of the bracket. But the lip of the pan was tagged so I will replace the engine mounts and the transmission mount. Might as well get all three for $26 at rockauto.com.Up top, before the sun went down, I installed the pushrods and rocker arms. They were centered over the valve stem and torqued to 33 lbs/ft with dry threads. The valve cover was just laid over them but not bolted down as I will pour oil over the whole valve train to coat everything first.
Other than that, things are progressing pretty well.
Bye for now!
____________________________
November 2, 2018
I finally decided on how to partially solve the transmission cooling line issue. Previously I mentioned that the lines were crushed and the bracket mangled when the upper control arm (UCA) on the passenger's side snagged them and bent the lip of the oil pan. Many have had this problem on stock XJ's as the factory clearances are close to begin with due to the fact the vehicle was NOT orginally designed for a straight six engine. The original six cylinder was to be a V6 for its compact size. AMC bought GM's troublesome 60 degree, 171ci (2.8L) V6 engine to drop into the early XJ series. It was anemic for a V6 and did nothing to make the little XJ perform any better than AMC's own 2.5L. By 1986 the 2.5L was producing 2 hp more than the V6 and in 1987 was bumped up to 121 hp. January, 1987 saw the demise of AMC as Chrysler signed the deal to purchase the independant car maker and the Jeep brand with it. But it wasn't without AMC engineering's final and greatest achievement that would span twenty years beyond the buyout. AMC designed the new engine based on the original Typhoon from 1964 and went on to production in just 26 months. Just in time for release in 1986 for the 1987 model year, much to chagrin of Chrysler. Chrysler wanted nothing more than to nix the straight six and put their own engines in but AMC had already spent the money, time and initial production costs to get the first model year produced. It is said that Jeep buyers wanted a more powerful six cylinder. So AMC provided them one. Since it did share many similar parts to the 258ci of the day, tooling and production costs were reduced and by the end of the 2006 model year, over 2.5 million AMC 4.0L engines had been produced.To read more about this engine series, please go to allpar.com/mopar/40.html or click here.
Returning to the problem at hand, just add deteriorated control arm bushings, broken down engine mounts, crushed or missing bump stops, while throwing in a slightly bent frame-side panhard bar bracket and you have the perfect recipe for UCA contact with the oil pan and anything else that might get in the way. I believe mine has all of these. That or the replaced panhard bar is really too short.
The transmission cooling lines will be cut back and offset so I can use compression unions to attach the new 3/8" NiCop tubing. Since there's no real way to get around the UCA, I'll have to route them in the stock position but tighter the oil pan. Getting around the oil filter adapter and distributor are more difficult if I were to run alongside the block to get over and past the UCA without any chance of interference. I'll look at it on Saturday after work, if it's not raining and take another look.
After the trans lines go in and before I put the axle up, I'm going to drill out and replace the UCA bushing and arm on the driver's side while it's easy to get at in the fully dropped position. Then I can put the axle up and reconnect the panhard bar, shocks, anti-sway bar and steering link to the pitman arm. I'll check the side to side measurement and see how centered the Dana 30 is.
My new, albeit stock replacement, motor and transmission mounts arrived today to solve the broken mounts issue. Funds are a bit tight but should have a pair of Brown Dog mounts before the Summer next year.
So I am hopeful to get this portion of the fixes done on Sunday. I'll have Saturday and Sunday of the following weekend to finish up and road test it.
Bye for now.
___________________________
November 5, 2018
Sunday had good weather to work on the XJ after about 11AM due to the 40 degree morning taking so long to warm up. I cleaned up the oil pan and the mating surface on the block then buttoned up the bottom end. I also cleaned up the mating surface for the valve cover and just set the cover with the gasket in place to keep trash out.
The motor mounts were tired and in need of replacement so I got some cheap ones from RockAuto to tie me over until later for the Brown Dog units. I used the slots in the mount and frame side to 'push' the engine toward the driver's side. I think I might have gotten 1/4in if that much. Still am looking at the control arm bushing and seeing a large amount of space between the bushing and the arm to think there's too much slop. Have to see a diagram to make sure the bushing was installed correctly.
I also got a transmission mount but did not install it. I spent too much time on bending/forming some 3/8in NiCop line into a shape that mimicked the original steel line. it looks like crap but it's done and needs transmission hose to finish the installation. Having to route them the same way makes me nervous and I'm afraid the control arm will walk and tag them again with the sloppiness. Trying to figure out how to prevent that. Synergy says there are supposed to be thrust washers in my package and I told them that neither of the two sizes fit in the space. So do I use grade 8 fender washers or go back to stock? Now's the time to decide while the axle is drooped all the way and access is easy.
After fighting with the cooling lines I decided to install the intake and exhaust manifolds to button up the engine. Finding the bolts to take it off went a lot better than finding them to tighten them back down. Miserable job. Not sure how I was able to get the wrench in there so easily to remove them. Anyway, hope the bolts are tight enough and nothing leaks. I did replace all the bolts and the two studs with new parts. The only thing I needed to keep were the hardened clamping washers.

My hands suffered several nicks and minor cuts from the fuel line support bracket. Had to be real careful not to flex them or the nylon lines that join the two metal lines together will snap. Not sure if they hadn't broken already until I put pressure to them on the first test. Otherwise, it'll have been a costly mistake many others have made.
While working on the passenger side motor mount I happened to look down an the alternator and thought about replacing it at some point with the 120 amp from a mid-90's Dodge RAM truck with a 318 or 360 engine. That's when I noticed a crack in the housing. I think what happened was I had sprayed down the block with WD40 while the cylinder head was off to keep the deck, cylinders, and mounting bosses from rusting. I think there was plenty of overspray that fell onto the alternator doing that. I've heard that pretty much any petroleum based products can melt the enamel coating on the windings. This includes degreasers and brake cleaners. The alternator was working just fine when I parked it and began the teardown. I also know it's possible I over-tightened the mounting bolts which can warp the mounting ears enough to put a lot of stress on the case. I need to get this thing up and running and don't have time to grind the bracket to make the higher amp alternator fit right or upgrade the wiring to handle the higher amperages. So I'm going to go to LKQ to find a replacement from any number of Chrysler sources on the cheap.


I did not replace the driver's side UCA bushing since I discovered the larger-than-I-think-it-should-be gap in the passenger's side.
I did try my hand at seeing if the right-front leaf spring bolt will budge with just a long soak in ATF+Acetone. So far, no good. I don't want to snap the welded nut loose and become stranded so I'll get some replacement hardware and new leaf springs by Spring and take it to a shop. That way, if it does break, it'll already be in a place for the repair.
That's it for now. Next work session will be the 9th and 10th.
_____________________________
November 8, 2018
Almost there! Again.
Just when I thought it was safe to start work on it this weekend, I realized I had not a drop of Dex-III ATF to refill what I lost out of the transmission after disconnecting the cooler lines. Glad I caught it now but then, I would have on the way home from a trip to LKQ. I need an alternator, as mentioned previously, and figured I'd see what other vehicles would have used the one the Jeep has. Well, Dodge RAM with the 318ci (5.2L) or 360ci (5.9L) also used this alternator from NipponDenso as well as a 120 amp version. Upgrading the fusible link in the main wiring harness will be mandatory should the 120 amp alternator be used and rise above the current fusible link's specs. The alternators in the Dakota's seem to vary between a V-Belt or Serpentine so that will be considered as a source as needed. The pulleys should swap out okay. I would prefer locating a ZJ with a 4.0L but will see. I hope there will alternators left on any of these vehicles.
It will be cool Saturday with a high of 53 so I'm going to get my old green Wrangler jacket out of the closet and wool socks as the winds are expected to be about 10 MPH. Gotta see what's there even though salvage yards a depressing place. The bright side is these vehicles are donors willing to give their parts to save others in that they may live on. Ok, Ok. It sounds like a plug to become an organ donor which it isn't but vehicles run with useable used parts just like humans can. I hope my 25 year old Cherokee XJ will still be doing her thing years and years from now. After all, we gear heads and hot rodders may be the first true post industial mass-market recyclers.
________________________
November 12, 2018
Another Roadblock?! Dang!
A cool and windy day Saturday was. Started out at 39F and by the time I was ready to venture out after dressing up as Nanook of the North, it got up to about 47F. Getting started with finding an alternator since the old one cracked. Read the previous two posts about that. I arrived fashionably late at LKQ so as to miss the entrance croud and yet still have a wheel barrow available to carry my tools and parts.I tried to use my Free Admission ticket but for some reason it wouldn't work and my phone number wasn't in their system. Not knowing what number I might have typed in several months back, I paid the admission fee and went happily on my way through the depressing sights and sounds of a salvage yard. Soon my mood became somber then melancholy as row upon row of "dead" vehicles passed my vision. I shook off the hypnotizing effects and began to look for Cherokee XJ's. Only five were located, their alternators stripped out. I found a couple of rear sway bar end link brackets as spares or to use as bar pin eliminators for the rear shocks. I could have gotten another pair but I was getting cold already from the wind so I was in a bit of a hurry. Autumn and Winter are my favorite seasons but the body doesn't like the cold much any more and my tolerance isn't what it used to be.
So I started looking at Dodge RAM's with 318ci or 360ci engines. The alternators were there but they all seemed to have that grinding noise of bad bearings or brushes or the wrong field connector. I did find a 1996 Dodge Dakota with a V6 and the alternator was still in it. It also had the correct terminals on the back. So I uninstalled it and gave it a good spin. I sounded pretty good and apart from the surface corrosion, spun freely. I put that in the barrow and proceeded to look for a couple of things I thought I might want to have extras for. I came across a '96 Cherokee with the infamous fan and A/C bracket. I also found another from a '97. The '97 felt better but still had everything but the alternator attached and figured it was too much trouble to retrieve. So I went for the '96 XJ bracket and removed only four bolts to get it off. The A/C compressor was already removed. How convenient.
I wanted to see if a Grand Cherokee ZJ with a 4.0L might have had a bracket I could use but the mounting bosses were different on those engine blocks. Besides, the fan was attached to the water pump like it's supposed to be. The XJ uses the offset fan due to the fact the XJ was not designed for the 4.0L. Refer to November 2, 2018 posting on this.
So, not finding an A/C delete bracket, I purused a section of the yard where the newer recruits lie in wait to be moved elsewhere. Nothing found there either. Just a few WJ's. I may consider installing front seats using the front mounting bracket used in '95 and newer XJ's so I can get a longer list of available seat choices to swap in. Dont want power/heated/vibrating/massaging/etc type seats. I just want a pair of good seats that will be comfortable for long drives and some offroading fun. Too many are hard like a race seat. No. I don't want that. If I want a military ride, I'll buy a military Jeep. Comfort has a bit higher priority these days.
Now on to the rest of the story.....
I left LKQ and headed for a parts store to get the alternator tested. The first one didn't have a tester so I know not to go back to them for anything else. The next stop was Advance Auto Parts. Okay, it a chain store but they do free testing. Wonder of wonders, the guy behind the counter figured out how to operate the tester. Awesome! Even better, the alternator tested good. I got home with the treasure and isntalled it knowing the Dakota's used a pulley with 7 ribs instead of the 6 the Jeep's used. No problem. The belt would still line up. I just had to make sure I chose the correct grooves.
On to some prep work. I scraped the water pump mounting surface and the thermostat mounting surfaces on the block clean. I searched for quite a while but could not find the little bag of gaskets I didn't use from the Engine Tech gasket set I bought when I did the bearing job during the Summer. Frustrated at not finding them I moved on to the transmission cooling lines and installed the rubber lines to the fabricated 3/8in NiCop lines I put in. I used fuel injector clamps instead of the regular wormgear type. I should borrow a flare kit to put a little bit of a flare on the end before I start driving it around. Everyone says to use two clamps if there's no flare. We'll see. 60psi is pretty good pressure from the AW4's pump.
So now that was done, it was time to clean up the water pump. As I cleaned it, I noticed some of the familiar green oxidation of copper in a very small area of the heater pipe extending from the pump. After rubbing it off I got a magnifying glass to see what there was to see. No good. I used my phone and a magnifying app. I was able to see a trace of a pin hole. I don't have a gas torch or I'd have brazed/soldered it closed. Considering it is probably the original judging my the copper coating under the paint the aftermarket replacements don't use, it was time to replace it. I wrenched it off with a crescent wrench (aka: knuckle buster) and a 3/4in open end wrench. It was stuck on there good and after figuring the best way to get leverage on it, finally got it to break loose. After I got it unscrewed from the pump, I took a look just inside the tube where I saw the pinhole and sure enough, it was flaking from the inside. Glad I didn't try to use this again. I started cleaning the pump and noticed something I didn't expect to see. A crack where the tube screwed into the pump. I was fit to be tied. Now I needed a new pump. By the logo on the pump, this one was an Airtex/Wells water pump. The paperwork showed the water pump being replaced before and it did look newer than any of the other parts on the engine when I bought the Jeep back in April.
After that I tried to install the temp gauge sender and broke the connector from the base. Figuring I wasn't going to get any further without destroying something I packed everything up and went inside to get cleaned up and chill with a movie and some price watching for the parts needed.
Sunday came and it was colder but not windy. I continued my research on finding parts I needed and watched some YouTube videos on various other whims of change I wanted to do with the XJ. My daughter and I went grocery shopping and after returning home I decided I should work on the old girl. I donned my grunge and went out to try to do some work. I first checked the water pump again and cleaned it up to make sure it was cracked. I screwed the pipe back in and the crack didn't widen. I brushed off the area with some brake cleaner and the line that looked like crack disappeared. Turned out to be a parting line or seam of the mould that trapped the dirt that gave the illusion of a crack. With a revived spirit I desperately tried to find that little bag of extra gaskets I didn't use but to no avail. I went to a couple of auto parts stores and found the new heater pipe at one and the water pump gasket at the other. I found my thermostat housing gasket and figured I could at least close up the engine and fill it with oil and coolant. The temp sender is now nothing more than a plug.
I filled the engine crankcase with oil and pulled the distributor out. Inserting the old distributor housing without the drive gear I used my drill to run the pump and prime the oiling system. Main bearings, rod bearing, cam and lifters as well as the top end. I could hear the oil dripping back into the pan so I knew the system was pressurized and flowing. I reinstalled the distributor and locked in down before installing the plug wires. 1-5-3-6-2-4. Remember that firing order. It's important. If you can't remember it, locate it on the intake manifold, unless you're using an aftermarket piece.
With all the wiring and vacuum lines now reconnected all I needed to do was to purge the air from the fuel system. This took longer than I thought but it was done. The pressure I attached to the fuel rail read 45psi. Now it was time for truth. I turned the key on then to START and.....
Click-ratatatatatata-tttttttttttttttttttttttttttttttpt. Then nothing. I tried again and it clicked and clacked but no engine turning over sounds. Hmmm. Checked the battery connections, starter motor connections, alternator and ignition coil connections and nothing. I brought out my remote start switch trigger and connected it to the starter solenoid and pulled the trigger. Same ratatatat clicking noises. Next the screwdriver test. Short the screwdriver across the battery cable terminal on the solenoid to the motor directly and a big spark. Scared the crap outta me! Thought the screwdriver might weld itself to the terminals but luckily I jerked hard and pulled it free. So the starter is bad.
I removed it and took it apart. It was the nastiest I've ever seen inside one. It was full of all kinds of....goo. So the oil leak the previous owner neglected to fix contaminated the starter. All it took was a bit of sitting long enough to cause a lot of nothing going on inside. I knew the starter would go having been constantly exposed to the leaking oil. I just couldn't predict when. I might have taken it apart back in the Summer and clean it out but it probably would have done the same thing. I did use a whole can of CRC Quick Dry Electronic Cleaner to clean the brushes, brush box, commutator and magnet housing. The brushes looked like they were ground down pretty good anyway but thought I might be able to get a few cranks out of it after putting it back together. The motor didn't turn very well during the test but I installed it anyway. Hooked it all back up and it did the same thing. Frustrated now I removed it and put in the back of my daughter's TJ with the battery to take with me to the parts store. The battery checked out good but the starter failed.
Today was a new day. I bought a remanufactured unit as opposed to a rebuilt unit as I trust the remanufactured more than the rebuilt ones. It only cost $10 more but still much less than a new starter. At least I'll know the condition of this starter is.
So I have a starter and hopefully, good enough weather on Wednesday to install it and try to start the engine. If it fires up, I'll go to work on the problem UCA on the passenger's side to keep it from snagging the new trans cooler lines.
Speaking of cooler lines, I did think to look for them at the LKQ. They either didn't exist or were bent all around by greedy asses who don't give a damn about the parts they destroy the next person might need. This is another reason why going to the salvage yard is depressing. All those would-have-been-good-parts-if-the-assholes-hadn't-screwed-them-up, angry feelings.

Just makes you want to grab the guy by the neck and shake him until his eyes bug out before throwing him two rows over into the mud.
Bye for now.
_______________________
November 14, 2018
It is running....isn't it? I can't hardly hear it.
Today was a triumphant day. I got the new starter motor in and the new temp gauge sender installed and topped off the coolant. Put the key in, turned it and she started right up. I revved the engine at 1500-2000RPM for about a minute after the oil pressure came up to ensure the cylinder walls and pistons were getting oil from the sling effect and the camshaft via the squirt holes in the connecting rods.
After that I let her run at idle for a bit with changes in RPM now and then. No knocking or piston slap noises were heard. Oil pressure is normal. Vacuum seems a tad low but I would expect that from a 227K mile vehicle. It reads like it did before at between 15 and 16 in/Hg (508-542mb) indicating the usual valve and piston ring wear.
She runs really quiet now. Cleaning the ring grooves in the pistons and putting them back in without glaze breaking and installing new rings and such, I'm happy with the results. Most of the noise I hear now is ticking injectors and an obnoxious fan. Now I wished I hadn't bought the heavy duty ZJ fan clutch. Oh well. I can still put some cardboard over the grill if the engine won't heat up this winter.
She got up to operating temperature fine and I watched the gauge closely. It got to maybe 211-212F and fell back to maybe 200 without the auxiliary fan so I know the thermostat is working now. The one I installed before (SuperStant) was stuck open and wouldn't let the engine get up above 170-180ish during the Summer. Without a working A/C system I doubt the auxiliary fan will ever come on. I bought a Carquest thermostat that's made my MotoRad. Never used a MotoRad before so this is a new experience. It's a high-flow design unit similar in appearance to the AC-Delco version and a lot less expensive than the Robert-Shaw piece from FlowKooler.
The next thing to focus on are the transmission cooling lines and a good route to prevent them from being anywhere near the upper control arm. I might be able to bend the ones I made to work but I may have to move to transmission hose if it becomes a problem.
After that I have an errant control arm to control. After getting a good look at it and compared it to the installation sheet, it seems that I'm missing the thrust washer included with the poly bushing kit. If Sunday is a good weather day, I will get the cooler lines redone first then tackle the control arm bushing problem.
The air temperature wasn't ideal for working outside today and the rain had been starting and stopping so I had to quit the work session. At least I know she's running now. Time for some radio stuff.
________________________
November 16, 2018
The Bump Stops Here --^
Having really looked at the suspension and articulation and how it works, I noticed something odd. The bump stops are missing. Something I saw when I had the axle housing out this Summer but never "saw" what was wrong. I was too focused on the engine and cooling system to realize something else was amiss. So I now know what caused the un-controlled arm to crush my trans lines and catch the lip of the oil pan. No up-travel limits were placed on the axle.After some research I came to an ambiguous conclusion that I can't come to a finite conclusion about the bump stop types on the XJ's. Sources conflict between and screwed in bump stop cup and a welded one and a "narrow" or "2 inch diameter" bump stop. Nobody seems to really know and none of the manufacturers have measurements to give. So I called one of my buds at a 4x4 shop to get his opinion. He agreed the manufacturers list theirs as a universal fit and thus offer a confusing number as to some kind of measurement everyone is supposed to know, except that nobody does. He said the cups that hold the upper bump stop is the same size on the XJ. He recommended the Daystar extended bump stop so I can cut it down if I want to fit my stock suspension. I can always add the hockey pucks to the bottom spring mount to close up the distance later if I want but will require removing the spring to drill and tap a larger hole than the one in there now for the hold down bolt.

So I bought the pair and will attempt to install them on Sunday. It's quite dark now when I get home from work so I will have to wait. If I only had a garage.

_______________________
November 18, 2018
The Home Stretch isn't much of a stretch now.
Today started out at 7AM EST and a very cold morning here at 33F. After seeing that I put the phone down and buried myself under the covers again and dozed off until 7:20AM. Knowing I wasn't going to get to sleep in, it was decided to get dressed and go to work....on the XJ. I had a hearty breakfast of coffee and was bundled up and ready to finish the Jeep.My first item on the list was to get the new Daystar polyurethane bump stops installed. I looked inside the welded cups to pick out any debris left behind from the old ones. Next was to guess how long the original bump stops were as none of the vendors have that information. I don't expect to hear back from Crown Automotive or Omix-Ada.
To get a Daystar bump stop inside the center of the coil spring, it took a little manipulating of the suspension to get the springs to open up enough to allow one to pass through to the center. After getting it inside the center of the coil, I propped it up on a 21mm deep socket and jacked up the axle to push it into the cup. After getting the second one in I took the Jeep off the jackstands and set her on the ground to see where they actually sat. I was surprised to see barely an inch of space between the tip and the landing pad they contact. Guessing where to cut the bump stops I got my reciprocating saw out and sliced about 1.5in off. I will probably have to fine tune this as I drive it around.
Next up on the list was the missing thrust washer for the UCA on the passenger's side bushing. The driver's side UCA and bushing have not yet been replaced. The bushings on this and the two lower's are deformed so there is tension on the passenger's side control arm. This makes removing the bolt difficult at best. I wedged my breaker bar into a point on the axle and used the floor jack to lift it up and rotate the axle housing backwards to take the tension off the bolt. It took quite a bit of force to rotate the axle just enough, I thought my breaker bar would be a broken bar. It held and I was able to install the thrust washer, number 3128, as specified by the instructions this time. Since I'm not using the poly bushings on the rear of the control arm, I'll have extra parts. Everything went back together good and there's no more gap between the control arm and the bushing flange.
 |
| Thrust washer to the left of the bushing support. Note the trans cooler lines to the right up against the oil pan. Lots of room now. |
 |
| Another view of the thrust washer. See how it deforms behind the control arm while the exposed portion expands out? It would have been better if Energy Suspension included something to even out the thrust surface. I expect this to be cut up, shaved or other damage before long. If this does happen, I will be going to an adjustable aftermarket UCA. |
Personally I don't see how the thrust washer will last all that long given the fact the control arm does not press against the entire surface. The edge of the control arm looks like it will dig or scrape the washer down. Others have had reservations as well so I guess time will tell.
It seems like it's coming together pretty good now. I needed to tighten the compression unions I used splice the original steel trans cooler lines to the NiCop lines to stop a leak. I am using fuel injector clamps rather than regular worm gear clamps on the hoses used to link the lines to the cooler in the radiator. I think I'll borrow a flaring tool to make a slight flare on the end instead of trusting even two clamps. I don't believe the cooling lines see much pressure since the purpose of these is to flow the fluid through a cooler, not drive a hydraulic device like a clutch pack or servo. The pump can provide 300psi plus for operations but the pump bleeds off some of the fluid out to the cooler at a lower pressure.
With that done I reconnected the shocks and steering linkage. Then moved on to reinstall the steering damper and the anti-sway bar before letting the XJ back down on the ground for final check before the road test. The oil level was good but the ATF was low. While the original lines were off the transmission, much had leaked out of the return line fitting into the drain pan. It turns out there was about 1.5-2 quarts of fluid loss. I decided to add 1/2qt of Lucas Stop Slip at this point and then fill. Since the pump in the transmission runs in Park or Neutral, I really don't have to drive the vehicle to get the temps up. There's enough friction in the torque converter that cause the generation of heat to get up to temp in about 20-30 minutes. Driving makes it heat up faster but I didn't want to until I knew I had enough fluid in the pan. I also confirmed the HOT line from the pump went to the top fitting of the cooler as it got warm first. So far, no other leaks.
With a quick check of the lights and lots of parts and tools laying in the back, it was time to take it around the block. I adjusted the TV (Throttle Valve) cable for the transmission using the technique in the book and now felt ready to drive it.
The brakes are a tad rusty having sat so long and she did not want to stop very well. I did stop and check the brake fluid and found it was OK. Getting on down the street the ride was stiff as the shocks have no real weight on the them. The shifting seemed a bit off and would look at it later. When I returned to the house I checked the ATF again and it was another quart low. I topped it off and decided to take her out of the subdivision and take a quick trip to Walmart. Actually, that's an oxymoron since there's nothing quick about Walmart. It doesn't matter what time you go there, there are never enough check out lanes open so everyone with 100 items or more use the self-service check out. Self-service checkout should limit it to 12 items.
Anyway, the shift points are waaaaay too high so another adjustment of the TV cable is required. This cable is also called, erroneously, a kick-down cable. In the old days of mechanically controlled automatic transmissions, a lever, and later a cable, was used to force the transmission into the next lower gear based on the governor pressure. Automatics controlled by a microcontroller don't use a governor. Rather, they are given the throttle's position via the cable to determine if a gear change is being requested based on vehicle speed and/or load demand.
So far there are absolutely no knocking noises at all. The valve train is quiet and the loudest clicks I hear are the injectors firing. I think my daughter's TJ may get a similar treatment. That or I can buy her engine to work on as a possible candidate for the XJ and she can buy another engine and drop it in her Jeep in less time.
The adjustment is quite simple but can be in error if the adjuster is malfunctioning. Mine may be as the shift points never seemed to be quite right to me. Maybe I'm so used to the TJ I don't comprehend how the AW4 is supposed to feel. Click the video below from BleepinJeep to see how the adjust the TV cable.
Tomorrow (Monday) will be a gutsy test. I work 18 miles from home across town. These are 18 street miles, not highway miles. My top speed zone is 45 MPH. I have access to a couple of highway routes but I'm not taking those yet. There are a couple of rough places where the suspension will be jolted into articulation from poorly designed driveway gutters. In one place the street level is about eight inches below the bottom of the gutter before rising suddenly to meet the parking lot surface. This is where I felt the impact of the control arm clip the edge of the oil pan as it crushed the cooler lines.
Wish me luck.
_____________________________
November 19, 2018
Today's trip to work and back was a success. I reset the Throttle Valve cable (TV) at lunch and took her out and noticed a big difference. Apparently using the pedal to set the cable adjustment may not be the best way if you can't get the throttle body to open up to WOT. Manually running the throttle to WOT seems to have adjusted the TV correctly as my shift points have dropped down to streetable use. No longer does she rev high just to get to third gear or my foot have to feather the throttle to get it to shift. I might make a minor adjustment manually by one notch in the adjustment to bump the shift point up if she feels a bit sluggish. I dont want to fry the clutch packs with slippage.The engine is running well and I'm happy with the result. Time will tell if this is a lasting extension to the life of the engine. I'm hoping so.
The new bump stops did their job today as I was crossing some railroad tracks I usuall do every day. The suspension bottomed out and they stopped it, dead. They don't much give to them as they are polyurethane. The factory pieces were a progressive rubber material that, when compressed, became more solid. These 'polys' don't compress so I'll need to take a little more off of them to allow the suspension to flex a bit more normally. However, I'm pleased with the purchase thus far.
I also felt the steering feel a little more responsive too. Putting the thrust washer in on the right-upper control arm forward bushing seems to have corrected a wandering issue. It still wanders due to the worn out bushings in the other positions but I noticed it wasn't doing it as much with just a single bushing change. Nice! can't wait to get the other upper forward bushing replaced.
Mechanically the next thing to take care of is get the transmission mount replaced so I can stop feeling that little bump when I let my foot off the brake pedal and the transmission settles back down on the mount.
Bye for now!
__________________________
November 22, 2018
It's good to have some heat.
Happy Thanksgiving! Today was full of activity here at the QTH. Daughter was determined to cook a turkey this year after helping me with it last year. She did good! Came out great and we had a good meal. We have several leftovers which will last about two days, sandwiches not withstanding. LOL!I also had a chance to get the heater core replaced while in between kitchen duties. I pulled out the dash in preparation for the HVAC box install. I put the HVAC box on the bench and cut the strap wrapped around it to hold the two halves together. In 1997-01 models, the box is a single lower half and upper half. In the pre-97 models, the box was split between the A/C evaporator and heater core. This made removing the heater core just as difficult because you had to disconnect the A/C lines to do it. But, having the A/C system evactuated properly, you could go either way. Full box removal or part removal. I chose full removal as I was trying to pin down a water ingress problem that kept showing up on the floor. So far, I've not seen standing water on the passenger's side at all so I'm at a loss as to where it is coming from. It's clear water, not coolant.
Once I got the A/C half of the HVAC box split off and the old copper heater core came out simple enough. There are two screws holding the core in place and a fat gasket seal form-fitted around the ends and one side of the core. The fourth side sits against a foam strip pressed against the box. Since the old seal doesn't fit the new aluminum core from Spectrum, I removed the top section and reused the rest which covered the bottom and one side nicely. I then placed a strip of 3/4in wide, 5/16in thick rubber foam weather strip along the top. The bracket near the end of the tubes was in the correct location and screwed down fine. The tab wasn't so good. I had to bend it pretty good to get it to line up with the screw hole. Once I did that, it went in with some effort but did go in. Not happy about that. Unless you get one from the dealer or find the actual manufacturer that made them for Jeep, you will have fitment issues. I don't care how many people think the aftermarket has this great one or that awesome unit. The aftermarket is cheaper for a reason. Granted I've had some realy good third party parts and I've also had some real dogs by the same manufacturer.
I put the box back together but did not strap it because I didn't have any long zip ties. Much of the foam gaskets are intact but stiff and won't squish then return to shape very well so I had to be careful how I handled the unit. Next was to get it mounted back on the firewall.
The box is a bit awkward to handle and I was sure it wasn't going back in right until I did something and the studs slipped into the holes. I did not put the foam firewall mat back on. If and when I decide to rebuld the A/C system, the evaporator will be replaced and the box removed again anyhow. Then I'll reinstall the foam mat on that side.
After getting the box mounted and secured, the moulded defroster vent came next. Then the dashboard went on and screwed down. This was easier this second time and it's not much different than the TJ with the exception that the TJ steering column is removed rather than just lowered.
By this the time I got the box in and the instrument cluster reinstalled, it was dark and getting colder by the minute. I only have to work tomorrow then get the weekend off this weekend. I am going over to my brother-in-law's on Sunday for lunch and probably won't get anything done that day.
I ran new red firewall heater hoses straight to the heater core. The '97-01 XJ's do this and depend on the blend door completely to divert the inflow over the core or bypass it. The blend door on mine seems to perform exactly the same way so I'm not sure why there's a heater flow control valve under the hood unless it's simply to ensure there is absolutely no hot engine coolant running through the core so the A/C will work better. Chrysler used valves to bypass the heater core since time immemorial and '96 seemed to be the last year it was done on the Jeeps. My daughter's Y2K TJ doesn't have one either. So I'll try it and see what happens. I can always add it back in if needed. For now, I just need to block off the vaccum fitting that runs to the valve.
Now then, the box is in, the engine is running and getting up to operating temp. Nice hot coolant is running through the core now and I don't detect any leaks. I'm getting cold at this point even with my heavy work jacket and wool cap. I don't have time or the stamina to endure much more to install the blower motor. So I'll block off the hole with some cardboard and duct tape and see if the force air through the cowl will work. If not, I'll have some cold feets by the time I get to work.
Night for now!
_______________________
November 23, 2018
While on lunch break at work today I installed a new blower motor. I had to transfer the squirrel cage over to the new motor and it was a PITA. Motor cost about $30 versus $70 with the wheel already attached. Unfortunately I didn't bring my electrical repair kit so I didn't have my crimpers, heat shrink tubing or butt connectors to finish the job. Yeah, the new motor didn't come with the connector as it is designed as a Unimotor. Now I have to figure out which way it's supposed to turn. The wheel says CCW but is that looking toward the shaft on the front of the motor or from the back of the motor? I can never remember which perspective to use. So I will have to test the old motor to see which way it goes then wire the new one the same way before I cut the connector off the old one.I was planning on reassembling the dashboard but saw the blower motor switch connector on the HVAC control and don't like the looks of it. It looks a bit melted or baked or something that isn't normal to a good electrical connection. I hope I can get the individual wires out of the connector and plug them onto the spade terminals directly. If I cannot I'll have to cut them off, strip and crimp on a new set of spade terminals to do that. I'll use hooded female connectors to offer some protection from cross-connecting shorts just in case.

It is supposed to rain much of the day tomorrow so I will most likely not get to work on it until Sunday. I guess I'll have time to clean up my electronics workbench in the ham shack and get ready to work on my vintage radio and test equipment this winter.
You can follow my work on those items at my Heathkit Interests Welcome page
You can follow my mobile radio installation in the XJ at my XJ-7100 project page.
Cheers!
___________________________
November 26, 2018
The blower is installed and working! I used a unimotor and consulted the schematic to determine what color the motor leads were and where they went. As suspected, DG (Dark Green) went to the switch and Blk went to ground. Oddly, it didn't attached to the firewall ground. Both terminated in a weather sealed connector. I haven't found where the black lead goes yet.
So knowing the color coding, I wired up the blower motor the right way and got lots of air flow out of the vents. Next was to reinstall the controls. As I mentioned before, the switch connector didn't look good. I was about to snip it off when I decided to clean it up since the connector moulding didn't look burned. More like chipped. Care use of brake cleaner revealed a goopy mess. Old dielectric grease, to be precise. The stuff the factory used gets gummy as it ages. In fact, it is called "bulb grease" and it has a yellow-ish cream color to it. It's the same stuff used on the bulb bases before they insert the bulbs into their sockets. The purpose is to insulate the connections from air and reduce/prevent oxidation and moisture. Seems it did the job and the connector looks in good shape after the cleaning. The switch too, did not look burned so I only cleaned the blade terminals and buff them with the wire wheel on the Dremel. New dielectric grease was injected into the connector and plugged up. The blend door, which controls how much air passes over the heater core, was connected and adjusted. The vacuum block for the various doors in the HVAC box was attached making sure the pin was in the slider's lever. Last, I tried to install the panel lamp but realized the tabs were broken off and would not lock in. When I get a #74 bulb or LED, I will probably use clear RTV silicone to hold it in place until I can locate some replacements. I might be taking a trip to the salvage yard again this Sunday. There are a few little things I'd like to find so I don't have to buy them new. Seems the aftermarket only cares about making stuff, not making stuff fit well. Like headlight bezels and grill headers.

After I cranked up the engine to warm it up, I tested out the controls for functionality. Satisfied it was working, albeit with a slight vacuum leak I can hear but can't locate when I shut the engine off, I deemed it working and remounted it into the dash. The blower is more quiet at the two lowest speeds than the old one but moves a lot more air than old did at all speeds. At high speed, I feel like it could vent Moffat Tunnel back home in Colorado if needed. It's almost as loud too. I can live with Low and Medium 1. Medium 2 is strong but the noise is just at the threshold of intolerable.

Having completed the primary goal for the winter months, I installed the passenger's side vent cover and reconnected the defrost tube for the door window. Lastly I reinstalled the glove box door and put my cold weather driving gloves in it. It's a glove box after all.

I then took a break and grabbed the right rear inner quarter trim panel with the Icom IC-7100 main unit attached and the AH-4 antenna tuner to try out a dry fit. It didn't fit too well so I moved it around and had to remove the mounting brackets just like was done by another amateur radio operator had done back in 2004 to his Cherokee.


So either his panel is more shallow than mine or he just kind of forced it in there. He didn't attach his main unit in the same place as I did and I thought maybe the 1/4in plywood reinforcement plate I made was part of the problem. Nope. The brackets had to come off the tuner for sure and it still won't fit. Since getting home from work I cut about an inch of the plywood off from the bottom and will try a fit tomorrow. Visit HERE for more information about the radio installation.
That's it for today!
__________________________
December 14, 2018
A funny thing happened to me on the way home tonight. The muffler broke loose and leaned against the drive shaft ujoint scaring the crap outta me! Once I realized it wasn't dragging the ground I pulled into my neighborhood and off to the side by the mailboxes to have a look. The flashlight showed me the cause of the all the noise. It was raining and I'm laying on the ground getting soaked in my work clothes trying to tie up the front end of the muffler with a bungee cord. I happened to have one in the Jeep from when I needed to hold the injector wiring harness out of the way to remove the manifolds. I must have tossed it into the vehicle during cleanup where it slid under the seat only to be discoveredfor a need I did not know I would need.The catalytic converter is simply holding position from the bracket attached to the transmission mount and doesn't bounce around. The audio from it isn't too bad until I get on it to accelerate. It's not as bad as a Mustang that lives here and everyone has complained about him. I hope I'm not the next one. We've been told we can't work on our vehicles except to change/fix a flat or get a jump start now that we are in a Wetlands area. Since my Jeep is working, I can no longer claim a grandfather clause from work started over the Summer. I'm hoping a buddy of mine can just put it back together with an extension pipe between the Cat and the muffler.
I checked out Rockauto and for $142 plus S&H I can get a Front Pipe, Muffler, Tail Pipe, clamps and hangers plus the manifold-to-pipe seal. Sounds like a good deal but I may need the Cat and not a front pipe. To buy just a Cat, Muffler and Tail Pipe with one clamp I don't already have will cost $183 total. Getting just the Muffler and Tail Pipe will cost $80 total. I really hope I don't need the Cat or the Tail Pipe.
In an earlier "Oops! Better take care of that!" impromptu work session on December 9th, I discovered that the pressure side transmission cooling line was leaking at the rubber hose junction up front. I borrowed a tube flaring kit and put a slight flare on the end of the metal tube to give the clamp something to work against and the tube to seal against. So far, so good. I'm glad Home Depot's parking lot is so huge that I can do work on the Jeep waaaaaaay away from anyone. Just have to remember to bring all the parts and a drain pan when fluids are being worked with. The auto parts store is about 3/4 of a mile away.
Now besides the exhaust system work that needs to be done by January, I have yet to engage the 4WD Hi and Low modes. We just don't have bad winters here but I'm hoping we'll get a decent amount of snow over Christmas. We just had a Slush Storm that dumped wet snow and sleet in our area but the roads were only wet the day after. I already know the highway tires the Jeep has now are barely adequate for rain so extra care will have to be taken when the weather turns worse.
I also discovered where the water is entering the cabin. On the driver's side, there the main wiring harness block that feeds through the firewall next to the steering column. Water runs underneath the hood seal at the cowl and drains through two holes punched through the channel the gasket seal sits in. These holes are directly above the wiring harness block. I loved AMC but this was just plain negligence by the design department. The same situation occurs on the passenger's side directly above the blower motor. So either I plug those holes or divert the water runoff somewhere else like maybe the wheel wells? I'd have to see if the wheel wells above the inner fender liner is positive or negative pressure. If negative, this will work fine. If positive, air may blow up the tube and probably force the water somewhere else that won't work in my favor. Maybe I'll just lift the seal and run a bead of silicone sealant under it and plug the holes at the same time. I can get a new seal too.
I'm still getting water in the striker post well for the lift gate. I can't tell if it's coming through the wiper motor shaft sleeve or the lock gasket ring. Considering how old the Jeep is, I'll say it's both. I cannot find the one for the wiper motor but can get one for the lock. The plate on the bottom of the hatch that supports the latch mechanism is very rusted and now made of unobtainium. I may get a chance Sunday to check out a couple of XJ's at the bone yard for that and drill out the rivets if they are in any better shape.
I will also look for a seat cushion from the same XJ's to use as the base for my passenger's seat using my XJ's cleaned seat upholstery. We'll see.
Good night all!
_____________________
December 18, 2018
New muffler, clamps and a short pipe extension - $40. The sound of silence: Priceless.I located the cheapest muffler I could find and so far, so good. I can drive in peace and hear myself think. And I won't get a ticket for the worst sounding race car. ;-D
So with that, I can focus on this coming weekend's search for a new seat cushion. I'm likely not going to find one and the '96 and later XJ's used a different seat attachement method. I can use 2x2 inch square tubing and use the later style seat, which I may have to do anyway if I were to choose an aftermarket seat. I do prefer the separate head rest design rather than the high-backed race buckets the CJ/YJ/TJ use. I'm not keen on super modifying or fabricating a new mount to use a ZJ or WJ seat and totally not interested in electric seats. I've read on NAXJA I can use a '97-01 XJ seat base with a WJ seat to make it manually adjustable if I use the 2x2 inch square tubing to mimick the mount in the '96-01 XJ's. So with those qualifiers, my choices are limited.
Nothing else is going on. Just going to work on stripping the floor pans of paint, seam sealer and rust in preparation for the metal treatment. Eastwood makes products for treating rust. Their Internal Frame Coating is made specifically for the purpose of preserving the inside of the chassis/uni-frame where a spray gun can't shoot. Definitely worth a look.
Eastwood
That's it for tonight. Happy Holidays and Merry Christmas!______________________
December 22, 2018
A four door Sport that seats two.
My daughter said she wanted to go with me to the local LKQ and see what it was like. She owns a Jeep and should know about these things. Her's is only 19 years old. Mine's a little older at 25. So while I went back to a wagon, I knew getting some original parts were going to be hard, like front seats. Now I could weld in a 2x2 inch square tube on both sides and use the later '96-01 XJ's front seats but I didn't want to do that. My '93 still has the old two-piece seat design and all I really needed was the bottom cushion, as mentioned waaaaay back in previous postings.So off we went, in her's, to LKQ to get a gander at a '92 XJ that was posted just yesterday. Jumping ahead, this was the first time I've ever had the chance to see a whole vehicle before the parts start disappearing. Today's mission: Seek out new seats and new acquisitions. To boldly be the first to remove stuff, and get a seat cushion.
Arriving in the yard with a wheel barrow full of tools (you can never be too prepared), we wound our way through the muddy ways in search of the '92 2-Door XJ. Once the target was spotted, we made a beeline for it and discovered it hadn't been violated. It's wheels had been removed, typical, but all of the other stuff was still there. Including the seats. After I had a good look at everything I began to check the two seats for broken-ness and firmness. As usual the passenger's seat was the lesser of the two used.
If I had the time and a few extra bucks, I would have removed the manual transmission. I found the original owner's manual in the glove box in the sleeve a dealership in Maryland had put in. A lipstick cartridge was found on the floor and lots of plastic "jewels" from an outfit. The whole thing was factory including the spark plug wire loom used on the 4.0L. Even the serpentine belt was still installed. Had I even a few more dollars, I would have taken the steering knuckles as they didn't have the usual wear notch from the disc brake pads. There was a small 24x36in cargo net that I can make use of in mine. All I need is to install four D-rings or footman's loops into the floor and replace the plastic hooks with Night-Ize S-Biner's.
I got my daughter involved and had her remove the bolts to the seat cushion as I couldn't see under there. It was very dark and I didn't bring a flashlight. Did I say you can't be over-prepared? So the cushion came loose and I removed the factory seat cover. The foam looked to be in good shape and the pan had no cracks in it. After that, we were ready to explore the rest of the bone yard. The wind would whip up now and then and make it even colder for us but she toughed it out. She thought the place was pretty cool.
After check out and putting the tools and seat cushion in her TJ, I returned the wheel barrow and took a quick look in a section I've not visited before. It seemed to me they were in the process of rearranging the yard to house all trucks/SUV's in one section rather than by Make. It seemed really odd to see all kinds of bowties and blue-ovals in the Pentastar section. In the other section I went to I found a '96 I had pulled a couple of parts from a few weeks ago. Seems it hadn't had many takers since I last saw it. The knuckles were good on it too. I may go back next Sunday to get a pair. I really don't want to pay $200 for a new pair by Dorman. So without anything more to see I scurried back to her TJ and warmth.
After getting back home I immediately began to put the headliner back in with a few key interior pieces for support. The sun visors were reinstalled as was the non-working dome light housing in the middle. I haven't put the fuse back in yet. ;-p
Now the wind hadn't let up but the sun was out to help. I put my original seat cover on the newly acquired cushion, reinstalled the wire supports to support the hems and stitching, and screwed them in to place. Next, the main body of the seat came out of the shed into daylight for the first time since May and set it aside. The seat back fabric looked cleaner than the driver's seat back which told me I should do something about that since both seat cushion covers were cleaned.
The passenger's side seat belt was next to go in and after a bit of rummaging around, located it and the bolts to install with. Now the seat was reinstalled and secured to the floor. The spring to keep the adjuster engaged had been broken since before I bought the Jeep and I would up at the hardware store to find something that might work. I probably should try and find the original 8-10 pound pull force spring and might later. A two pounder was all I could find but an alternate placement gave it enough force to keep it in a locked position. The seat cushion was next. When all was complete it looks perfectly normal now. Well, in so far as the front seating arrangement anyway. Now I can bring along one passenger.
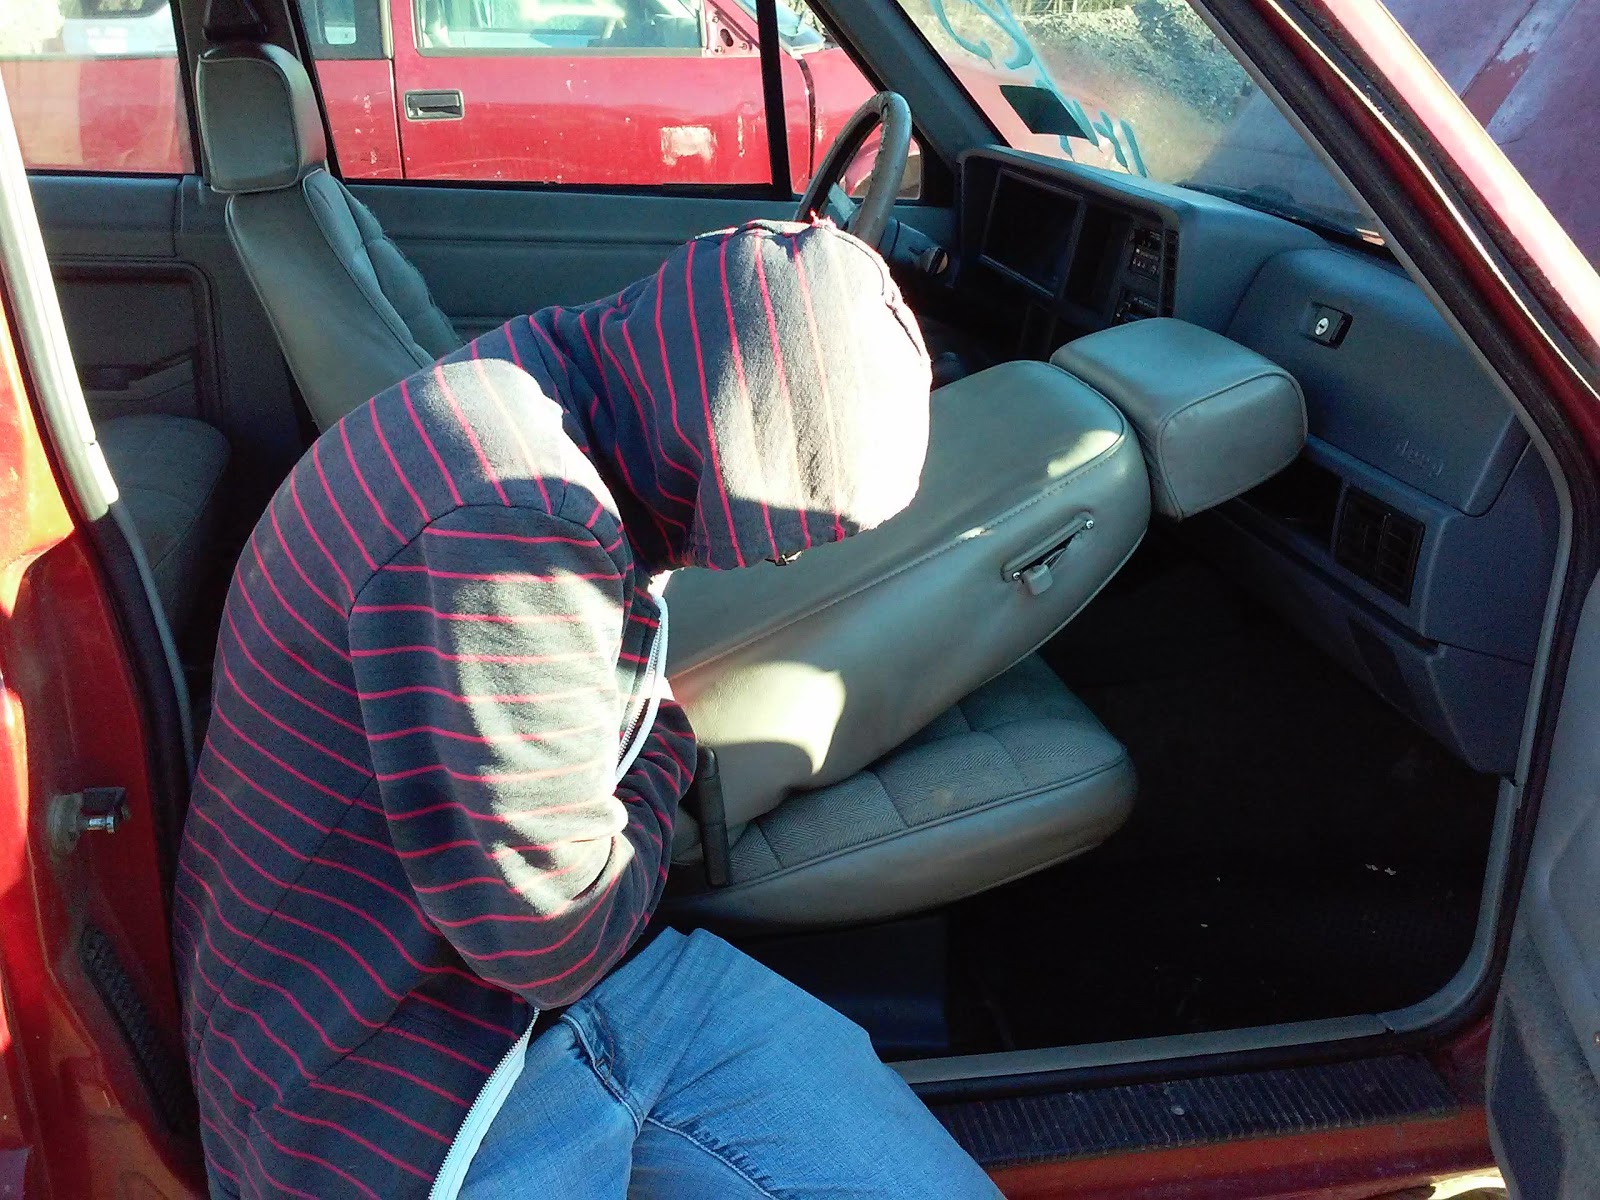 |
| Removing the cushion from the '92. She's having to reach back to get the socket wrench on the bolts at the rear of the cushion pan. |
 |
| My '93 with the main seat installed. |
 |
| I guess there's all those holes to allow the foam to fill the space and cure more quickly. |
 |
| A four door now seats two. |
Under the hood, I changed the oil filter, added 1.5 quarts of oil with a pint of Rislone ZDDP additive. I've mentioned before the fan clutch made the fan roar upon acceleration. It had finally worn on me to the point I installed a stock unit. I will probably use the heavy duty unit during the Summer if she's showing signs of overheating. I don' think she will with a 2 core (row) radiator. Most of the original radiators from Jeep were one wide core which has less surface area than two core units. It was done as a cost-saving measure.
The warm up is a tad quicker too since the fan isn't turning at such a high percentage of the shaft speed. I can hear everything else now. Actually, the addition of the headliner and passenger seat knocked down the noise quite a bit even though I didn't reinstall the interior foam and heat barrier on the passenger's side firewall. I placed a large piece of cardboard on the rear cargo space floor to help with keeping the ammo boxes from sliding around. The side affect is the fuel pump noise is reduced a little. With all the additional work, she's feeling a bit more civilized. Darn near Mall Rated. Wait, did I say that?
Dear Santa,
I want an angle grinder, flap wheels for grinding and cleaning up the floor rust and a GPS unit for my ham radio.
Thanks!
P.S. - We have a chimney but it's locked up so use the front door. Eggnog and cookies await!
Merry Christmas everyone!
____________________________
January 5, 2018
Happy New Year!
Just a short entry today. I started hearing some squeaking from the rear brakes and decided to check it out. The adjuster tabs weren't touching the star wheels and thus aren't keeping in adjustment. Looks like the elongated hole is worn so bad that there's nothing but slack. I checked the adjuster cable to make sure it's routed the correct way and it is. Looks like I'll need a hardware kit. I have brake shoes and one drum. I'll get the other drum with a hardware kit and do a brake job soon.Back when I replaced the right rear axle shaft, I found that the flange was too large and interferes with the drum's mating surface. I had to use five grade 8 washers to act as spacers so I could at least drive it around. I didn't intend for this to be a permanent fix but I didn't mean to leave it like that this long either. My Christmas present, a Makita angle grinder, came in handy and I was able to grind down the flange so the drum would fit properly.
Basically the XJ was jacked up, jack stands placed under the axle housing just inboard of the shock mounts then removed the wheels and drums. Once I got this far I fired up the engine and put the AW4 into 1 and let the engine turn the axle shaft at idle. Starting up the grinder I placed it onto the edge of the flange and let the tool do the work. After grinding down the flange some I put the drum on and with three of the grade 8 washers to give something the nuts to tighten against and tightened the nuts down snug. Since the differential is "open" I did not have to stop the AW4 or engine for this.
Visually, the drum still wobbled telling me it wasn't seated flat against the flange so using the impact gun, the nuts and drum were removed. Another couple of minutes of grinding and another test fit. This was done about a half dozen times until the wobble went away. I installed the wheel assembly and found a very slight wobble. I measured the runout and found it to be a little over .060in. I took it off and put it on the other side and measured the same amount of runout. Now I know the wheel is bent near the hub center but don't think it will be a problem for now. Maybe I'll check the others for teh same condition. I plan on getting NOS steel wheels the Police version used or maybe new wheels with the D style holes that is popular now. Either way they will remain 15in diameter with 8in + width with a 3.75in backspacing.
Now that it's done, I do not have to use those hardened washers as spacers anymore. Now the drum brakes are ready to be serviced.
Nothing else going on here.
____________________________
January 13, 2019
Steering me the right way.
So here I am driving along and enjoying the XJ as a daily driver then, WHUMPABADA DIDDLDIDDLDIDDLDIDDL! This as the steering wheel vibrates in hand. My first thought was that a tire might have equalized but the vibration went away. Kinda like when you get to a hardware store and your girlfriend wanders off to find some C cells and...never mind. Let's not go there.So I'm thinking to myself that my girlfriend, aka: Cherokee XJ is telling me she's tired and wants to rest a bit with the crappy roads around here in the capital city area. She's afraid of potholes, panholes and missing manhole covers. To tell the truth, so am I. So many manhole covers are installed anywhere from not-flush with the driving surface to a couple of inches below because the city won't spend the money to fix them. They don't even remove the old blacktop now until they've paved over the original at least three or four times. This makes the artificial potholes. As you drive and spot a perfectly round pothole, it's either a sunken manhole cover or a non-existent one. Either way, I avoid them like....well like anything you don't want to have to deal with later.
So after this particular set of negative vibes I decided it was time to retire the steering system, sans gearbox. Here are the first four parts that will be replaced.
Front Lower Ball Joints - Mevotech GK3161T - Standard
Unit Bearing & Hub Assembly - Mevotech - H513084 - Standard
Front Left Outer Tie Rod End (@knuckle) - Moog - ES3094L - Premium
Front Right Inner Tie Rod End (@drag link to tie rod) - Moog - ES3095R - Premium
I've added them to the parts list at the top of this blog. There are three more pieces I want to replace but will do so in the next round of purchases. Right now, these are the worst off and are requiring replacement right away. Wished I had checked these more closely before I reinstalled them. The management where I live got on my case about working on the Jeep in the driveway and I promised to get it back together just as soon as financial requirements were met. Haven't heard from them since.
The lower ball joints are wearing badly as I can now measure a full 5/32 inch (about 4mm) of telescopic movement that shouldn't be there. The upper ball joint only rotates and has a slight telescopic function but should not wobble off-axis, which it doesn't. Jacking up the Jeep at the uni-frame allows ball joint movement to be visible as the weight of the vehicle is lifted from the axle. This kind of slack movement is hard on the entire steering system as well as the track bar's "tie rod end" joint at the frame. If bad enough to allow the infamous Death Wobble to occur, the lower ball joint studs can actually wallow out the tapered hole it is bolted through in the knuckle while the pieces get hammered back and forth. This happened on the TJ and had to replace the knuckles. I had the old knuckles magna-fluxed and micro-fractures were present. Reaming the hole wasn't an option at that point. I won't test these knuckles but they will need replacing nonetheless due to the gouging of the brake pad guides by the tabs of inner pads. I might be able to have material welded on but that could change the temper of the metal and weaken them. I will go to LKQ again next weekend and see about the knuckles on the various candidates there. Just have to remember to bring a breaker bar and the BFH with me. Mevotech has been consistent and I haven't had a complaint yet. Their heavy duty lower ball joint looks good by their description and I'm satisfied with some of their other products.
The unit bearings aren't my favorite but right now things are a bit on the tight side and I need to keep the XJ safe. Mevotech has some good stuff I've used in the past at good prices. Over the years I've become a bit less impressed with Moog's parts probably because their parent, Federal Mogul, changes everything to be cheaper, in more ways than one. So far, I haven't seen an increase of defective returns on their tie rod ends so I'll stick with them this time. Next time I will replace them with Timken's tapered bearing version of the hub.
Anyway, the next order will consist of the ES3096L at the pitman arm and the DS1238 (Right Outer Tie Rod End) drag link to the right side knuckle as well as the steering damper. I have always used a Rancho RS5000 steering stabilizer. This time I'm considering either a KYB or Gabriel unit. This is a stock XJ at this point and cost is a major factor right now. Getting the rig set up correctly in stock form will reduce the effort needed to correct issues when lifts are installed because I'll know exactly where the system as a whole stands. I believe it's better to be sure than dead trying.
As for the rear end, I still have to install and trim the bump stops. Also need to fit new bushings into the leaf springs. The grinder did a fab job in grinding material off the wheel stud flange but I'm getting a bit of vibration that wasn't there before so that will need to be readdressed.
So far the transmission seems to be working fine but I think I detect a slight bit of slippage from 1-2 under hard acceleration or when it's cold. I mean cold as in temperature outside below 60F. So I've been letting the engine warm up in Drive to heat up the fluid quickly.
A sound I've been noticing might be nothing or it might be a transfer case output shaft bearing going bad. It sounds exactly like the transfer case in my daughter's TJ so I can't be sure yet. There are no leaks and fluid level is correct and the color is good.
That concludes this posting. I'm enjoying the Jeep and look forward to driving it every time. Brings back memories of my 3rd Gen XJ (a '99. 1st Gen - 84-90; 2nd Gen: 91-96; 3rd Gen: 97-01. My own interpretation)
Until next time!
______________________________
June 30, 2019
It's been six months since my last post. So far the Ol' Girl is working well. I took a day trip to Charlotte to visit with some relatives that moved there not long ago and with over 235,000 miles, she's still getting 21mpg. The tires that came with the Jeep have cupping and cause a horrible vibration over 68 MPH. So to keep that to a minimum I ran 65-66 MPH even if the speed limit was posted at 70. When I get new tires and new rear leaf springs, that shouldn't be a problem after that.The floor and the water leak still need to be addressed fully but I've figured out where the water is coming from. It also does this on the driver's side but only when the Jeep is sitting at certain angles. There is some seam sealer 'tape' that covers a pretty large gap at the top of the fender at the corner closest to the windshield. The driver's side still has it but the passenger's side didn't really cover it at all. I broke it completely off and waiting for something more to happen. It did, and more. Preventing the water from taking the route it does to enter the vehicle is a whole other matter. In trying to follow the path, it doesn't look like I can reach it from the outside even if I remove the fender. There's a kind of boxed section that extends forward out from the firewall below the blower motor for the HVAC system. If you recall, I drilled a pilot hole for the power cables for the ham radio in the rear in trying to find where that boxed in area was. Turned out I drilled into the boxed in area and then discovered water was getting inside that. Of course now it was able to run directly into the cabin and settle in the footwell. This led to tracing from there back outside and learning how the water was getting there. There is a seam, with a seam sealer in the pinch weld, that is probably where the leak is. The water seems to follow some contours I can't see and finally to the seam.
So with this knowledge, I should still be able to wire-brush the floor with the grinder and treat the floor with the Chassis Saver. I still need to get some Eastwood Internal Chassis spray frame coating. Check out this product here. That way I can protect the uni-frame channel from the inside and all the way back. My endoscope did not show much rust. Just a lot of dirt and junk so clearing that out before treatment is important. I want to install a hitch receiver so I can tow a small trailer in the future.
I think I found where the water is coming from at the striker post for the rear hatch. I believe it is the weather seal for the hatch glass. If it has shrunk as they all will, it will need to be replaced so it won't rust out the sheetmetal and further rusting the latch plate in the hatch itself.
So that pretty much sums up where I am at this point with the Jeep.
That's it for now!
_________________________
July 30, 2019
Good evening! I just wanted to share some pics tonight. Not much to tell but the two young fellas that have been working on this are excited to finally be able to drive it.


Now this next one came by a month ago and I finally found these photos. Thought I'd lost them. This is an M715 that has been converted to 12V from the standard military 24V system and an aftermarket steering wheel and addition of power steering, this truck is as it came out of the surplus auction.


That's about it! Sometimes my job does have a surprise or two once in a while.
___________________
August 4, 2019
We are finally into August! That means Summer's end is just around the corner. Can't wait for cooler Autumn weather! I will have A/C next summer.I lost a bid on an estate auction for a working Kenwood TS-830S radio. Figured I would be able to snag one but somebody else wants worse than me. So I now have some money for new tires for the XJ. Considering I need four, I have enough saved for 1.25 tires. Not even considered close so I'll be doing a bit more saving. Hoping I can get them by October 1st. I might have to go with a good set of used ones. I want 31's but may have to settle for 30's this time around as I don't have anything for a lift kit, bastard or otherwise.
Speaking of radios previously I have another antenna to install. This time on the driver's side. It will match the one on the passenger's side at 102 inch base length plus heavy duty coil and Hustler C35 mount. This one will be for the CB I want to install later. I have two antenna clips to tame the sometimes onerous beasties so they won't strike the lights in the drive throughs at Hardee's, Taco Bell, Wendy's, etc. Kinda embarrasing when you knock out the cover on the fixture and apologize to the manager for the trouble then offer to pay for it. I got lucky. He said don't worry about it, it's happened before when a lifted pickup truck came through and took out several of the ceiling tiles on the overhang then just drove off without saying a word. He thanked me for stopping and talking with him and we parted ways amiably.
Don't have anything else to impart except I'm consistantly running 16MPG during my commute to work and back. She now has almost 237,000 miles. She doesn't like the hot weather either and I think I'm starting to hear that fan mount bracket's bearing squeaking when she rises above 215F during long traffic light cycles. I might put the Grand Cherokee's fan clutch back in.
It's 2 AM so I'm heading off to get some sleep.
Jeep On!
________________________
August 30, 2019
It's been three weeks since my last post and today, Baby's got new shoes!


 | |
| Yeah. She's happy! |
More of the clearcoat on the hood, roof, and rear liftgate has come off. I can't sand it off without taking off the base coat so I have chipped as much as I can with a plastic pick prying against the sharp edge of the clearcoat to chip it away. I'm afraid the base coat will be worn through before I get all the clear crap off so I may remove the roof rack and sand down the rood panel first and get a primer coat on that. I might get the rest of the clear stuff off the hood and use rubbing compound on it to evaluate the base coat that is left. If there isn't enough left I'll sand the hood down and shoot it with primer and some military color like OD Green. I have considered getting Lizard Skin in some darke green color and paint the body with that instead of paint. I'll never need to wax it again as it will be textured and a really tough finish. We'll see. I'm starting to see rust at the front of the rocker panels so that will need to be addressed.
That's it for today. More to come!
_____________________________
August 31, 2019
Today started with quality time with the wife's 97 Camry charging problem. Well, to make a long story short, it ended up being the alternator after all. It tested fine on the bench but when the bolts were torqued down at installation, the case deformed enough that it wouldn't work indicating a problem with the wiring. Traced all the associated wires and found no problems. This time I took the alternator apart and found one of the contact rings the brush makes contact with was completely worn off leaving only the insulating sleeve on the shaft. So a visual check confirmed the problem. This was the original alternator, according to the date code. 22 years and 327K miles later, it was worn out. New one installed and the wife is happy again. So am I. I got to start work on my baby today after all. 😁I parked her beside the shed in back, propped her up on jack stands and removed the wheels. I got the passenger side steering link and damper unbolted, both sway bar end links, both shocks, pulled the calipers loose, and removed the brake rotors. I had to jack up and support the axle to get the panhard bar loose on the axle end. Forgot to do that while she was on the ground in her neutral suspension position. Now the only thing left is the upper control arms. I'm doing the uppers because I still need to change out the arm and bushing on the driver's side. I already replaced the passenger's side arm and bushing last September but got crunched for time. The bushing is a poly type that I had to reuse the shell to make work. So far no problems on that side.
I found out however the axle wants to rotate forward and that is making it hard to get the bolts on the axle end out. It was getting dark so I quite before I became too much of a buffet for the skeeters. I need to get some more Cutter or OFF!. I think I have a ratcheting strap to pull the axle rearward to get those bolts out more easily. It will also keep it from falling over once I pull the jack stands out from under the axle housing. 🙏
Sorry that I didn't get any photos this time. It doesn't look any different now than it did a year ago when I had the axle dropped to do the passenger's side bushing. The only difference is this year will include a 2 inch boost lift kit to offer more clearance for the new tires when I go to the beach. Last thing I need is to 'modify' my front fenders. I hope to put in adjustable lower arms in by next summer along with a new air conditioning system and new or bastard-pack rear leaf springs.
The brake lines technically won't need replacing as they will handle the 2 inch lift. I have YJ brake hoses for the front and rear just in case I really have to have them. Any higher lift and they will be required plus a longer rear drive shaft which precludes installation of a SYE. So axle pitch angles will have to be checked as well. Wedges for the rear or caster bolts up front will be ordered to correct the pinion angles.
I'll post my progress tomorrow. Hopefully I'll get this done and have Monday off to mow the lawn. NOT! 😆
__________________________
September 1, 2019
A most disappointing day today. I will be the first to admit I am an idiot. I installed the front spring spacers just fine. I even replaced the upper axle side control arm bushing and stock control arm on the driver's side. That went okay. Got everything back together and put her back on the ground.I started on the rear shackles and had sprayed Liquid Wrench Penetrating Oil on the left side and PB Blaster on the right just to see which might have worked better. That's when things started to not look so good. I got the bottom bolts out just fine. Some elbow grease was needed but they came out okay. The uppers however, well, let's just say the didn't feel right. I couldn't determine if the small amount of movement I did get was the bolt turning the sleeve in the bushing or not. I couldn't tell if the bolt would actually turn or snap off. It just didn't feel right to me.
I took a break since the area was back in the sunlight again. I burn easily and figured I already had been. Taking a break and cooling off made sense. So did finding videos on the tight bolt problem. There are surprisingly few of them. Many were focused on the front leaf spring eye bolt problem. I don't have that problem yet. I will once I decide to replace the springs.
I don't have the means to counter a broken bolt or a captured nut that had broken loose and spinning freely. So here I am with a lift kit up front and stock height in the rear. It almost looks level. Almost. The nose is pointing up just enough to notice the gap between the top of the tire and the fender flare. Out back, she's sitting on her haunches. Of course it doesn't help that I have all my tools back there making it look worse.
So here it is. A half-done lift I have to remove because I'm the idiot that didn't work on the rear shackles first to find out that the bolts will seemingly snap off. Had I done that first I would have stopped there instead of wasting my weekend on a dead-end project. Here's the insult to my injury: It began to rain as I was disassembling the front end again with two hours of daylight left. By the time I got the tools tossed into the back of the XJ, I was drenched and called it quits for the day even though the rain lasted about thirty minutes. Pretty frustrated and burnt out right now. I have to finish it tomorrow (Labor Day) before I get any rest this weekend. I am so freakin' sore. I'm getting too old to work on the ground anymore. Sure wish there was a rent-a-bay with a lift. It would have made this job much easier.
When I get some more saved up I'll take her down to the shop and have them break the bolts. That way they can fix it while she's there. 😓
_____________________________
September 2, 2019
Today ended with the XJ back on a stock height suspension. Very frustrating. So much so that I haven't bothered to sort and put away the tools. They are just sitting in the back and sliding around loose. I'm too tired and sore to care. Can't think of a better way to waste a three day weekend than to have a failed project. Now that I have transportation to work, I might spend some time at lunch tomorrow to sort and store them in the ammo cans.I will attempt the install the lift at some undetermined future date once the tires are paid off. It might be Spring before that happens. For now, many of my joints are inflamed and are very painful. It sucks to get older with decades old injuries working hard to make my life more miserable. It's called arthritis.
To add more insult to injury I think I have a vacuum leak at the intake manifold gasket. This might explain the odd exhaust smell. It smells like it's running rich but my fuel mileage has been in the high 15's to low 16's. I may pull the plugs on Thursday and check the vacuum readings to see how she's running. The integrated intake/exhaust single piece gasket sucks but it is what it is and I'll have to deal with it. I might even try to retorque the nuts to see if that helps. I may have not gotten all of them tight since I couldn't get a torque wrench in there to verify they were tight enough. I went by feel and it's kicking me back for it.
Lastly I will reinstall the ham radio back in the rear trim panel so I can resume my ham radio interests during lunch at work or while I'm out and about.
______________________________
September 22, 2019
New development! Cylinder 2 intake gasket section has been breached. It is loud. It is annoying and I don't have time to fix it right now. Maybe next weekend now that I have the replacement from Mahle (pron: Molly). Hope I don't burn the piston or valves.I'm thinking of using the High-Tack gasket sealant to ensure a positive seal with the imperfections in the mating surfaces. Many years ago I used to do this back when RTV was just becoming a thing. I liked the RTV but couldn't replace a gasket where the position of the part depended on the thickness of the gasket. I wonder sometimes how many drive belts or water pump bearings failed prematurely because RTV was used instead of a gasket to locate the pulley in the correct position. But I digress.
Today is the first day of Autumn and the first day of my favorite two seasons. The weather is starting to cool down too so work outside will become much more tolerable.
Tire Update:
So far the Hankook's are performing well. I've had the Jeep up to 70 and there's no vibrations from them. There were balanced well. These 30x9.50 tires handle very well. And as expected they do not hunt the lane grooves like the 31x10.50 tires would. The vehicle is just too light to really make use of the 10.5 inch wide tread. The wider tire also lowers the speed at which hydroplaning begins for the given vehicle weight and tire pressures. I'm very happy with these.
_____________________________
October 17, 2019
Good Evening. I've been busy with other things due to the hot temps and high humidity here. I went to AZ to visit family for a week on the 1st. Now I'm back and getting into the groove of things has been more difficult than usual.I did get the SB-301 from Heathkit aligned and working so stripping the cabinet of old paint and refinishing it is next. And that got me to thinking about the floors again on the XJ. I met up with Titus (of Unique Rides) and got a chance to pick his brain a bit. After talking with him I have a much better idea of the direction I want to take and how to go about it.
I have been reevaluating the lift. I wanted just enough to clear the 30x9.5's and still get me some articulation when I go to the beach. On-road the tires won't look too small either. Right now at stock height it looks darn good but the rear end sags, the right front sags and she bottoms out easily on the railroad tracks I cross every day. I'm hoping that first hard hit didn't bend anything making it sag up front on the passenger's side. So the suspension is tired.
To recap:
Getting by with stock front control arms, new bushings and new poly's on the upper axle side along with all new tire rod ends, brakes and calipers, she steers, rides, and stops much better. I'm running hyraulic heavy duty shocks from Gabriel all the way around and I'm happy with them. They aren't harsh like some of the gas shocks.
Now the rusting floors were treated with Rust Neutralizer. Next would be to get the SEM 360 degree spray hose/nozzle and some Evercoat or SEM rust neutralizer to spray into and througout the uniframes and rocker panels. I want the carpet back in up front as the heat coming through the floor has roasted my feet. I'll get the A/C ready for next Summer.
Titus told me what he would do to fix the small hole back in the rear corner of the passenger's side floor and said to bring the rig by when I was ready. Cool! But before that I need to seal up the pilot hole I drilled up front. I'm thinking of drilling it out larger to use a standard sized floor plug. It will also give me the opening to spray treatment into the unibody box to keep it from rusting out from the inside. The old seam sealer Jeep used in the joints of the pinch welds on the firewall is 25 years old and I'm sure isn't sealing out much anymore.
To clean out the uniframe where a chassis should be I will run a bristle brush through it from behind the rear bumper. The borescope was used with dissapointing results as it cannot focus on anything beyond 3cm. I need another solution to see the condition inside the rail. So the grinder will come out with the wire cup brush and some undercoating will be removed at the front of the rocker panels.
To the rear there is rust building up at the bottom of the wheel well quarters below the tail lights. I have been squirting transmission fluid to slow the progress but there's no standing water. A breach has ocurred and water does get in there somehow. I checked where the antennas were installed and there's not water marks up where the holes were drilled on both rear quarters. I'm guessing it's coming from the spray the tires kick up.
I'm going to take Titus' advice and get new leaf springs for the lift. It just makes more sense than a booster kit I already bought. I'm looking at either OME parts, front and rear, or a Trailmaster kit. The OME set up would cost a little more, around $850 in total. That's front and rear springs, leaf pack U-Bolts, and shocks. I can get away with a 3" lift and only BPE's but should get shocks. So about $480 without shocks and U-Bolts. ARB is the distributor of Old Man Emu and I can't find their U-Bolts for their MSRP found on their website. Everyone sells them for $26 each instead of the $18 each on ARB's own pages. But they don't sell direct. 4wd.com has them for $19ea. ARP bolts are the best. I could go cheaper but I don't know anything about the quality. Could be cheap Chinese slag for all I know and be dead before I figure out what happened during the wreck. Those who have OME kits love them. Like MetalCloak, I couldn't find anyone who had them that didn't love them.
The Trailmaster 3" kit has lower control arms, front springs, rear spring packs, U-Bolts, and shocks for $670 on 4wd.com, Amazon, and Liftkits4less.com. I've read that OR-Fab owns Trailmaster but I can't find any corroborating evidence. Many who have tried it do like the ride quality and flex for a daily driver. I've also heard the same thing of MetalCloak but their prices are high. I bought their trackbar thinking I would do a lift on the TJ but that never happened. Now I want to use a double-sheer mount on the frame side and need a clevite end to screw into the bar's threads. I found two sources of "loop ends" for the bar. I have to dig it out to see if the threads are left or right-hand.
So the focus this Autumn and Winter seasons will be the restoration of the interior. The front at least. I really want to get my HF radio installed permanently so the installation of the CB can work out. I have the Shelby Hamfest (amateur radio event) to attend Labor Day Weekend next year (2020) and meet up with some friends. I want my XJ to be ready so it's time to get busy!
__________________________
February 18, 2020
This is an over due posting so it's a little long.It's been a while since I posted anything. I've been busy with other things that suck away the XJ budget funds. Earlier this month my daughter and I went to the local pick a part because there was a chance that a '95 XJ still had the hitch receiver attached. When we got there with a wheel barrow full of tools we searched where it might be. I didn't check the location of the XJ on the website since all the Jeeps were in one section. At least they were when I was there a few months earlier. Things changed and we wound up on the opposite end/corner of the yard. Finding only a couple ZJ's and WJ's I looked up the XJ's location. Trudging back up the hill and around to the side of the entrance we found it. It was the only red vehicle in the immediate area so it was easy to spot down the row.
 |
| What we started with. Forgot to snap off my own photo first. |
Anyway, she asked a few questions about this and that before getting started on the hitch retrieval. Looking underneath I saw the bolts and nuts still in place. Thought it was a fluke that it was still attached actually. Well, when we started to wrench on it, the bolts just spun. Figuring there were nut strips in the uni-frame channel I feared this was a fruitless trip.
We aren't allowed at this yard to bring grinders, torches, cutting torches, jackstands, or jacks of any kind into the yard. Removing some of the heavier items like a transfer case or transmission require safe handling practices but the yard management says I can't use the jackstands or even a floor jack to do it safely. I see transfer cases that have been trashed because whoever pulled it off let it fall to the ground and cracked the case like an egg. Stupid rules and even more stupid parts removers. But I digress.
Hoping I could stick a wrench in the channel to stop the nuts from spinning I decided to remove the bumper. She did the wrenching while I directed how to go about the process. The hitch was made by Draw-Tite and installed by U-Haul with their name stickered to it. So it's a good hitch. This one is the Short Ear version so you don't have to remove the rear tail pipe hanger to install it. It saves the trouble of having to have bolts on hand when they break them and lowers the cost of the repair/workaround since there is none. Once the bumper was removed and set inside the Jeep for others in case someone needs it, I shown a light into the channel and found, carriage bolt heads. A smile crept across my face and realized why the hitch was still attached.
Carriage bolts, or bumper bolts as they are sometimes called if chromed, have an annoying habit of disengaging the square shank just under the mushroom bolt head. This happens because you push the bolt up with the wrenching action and as the square "key" comes out of its hole, the bolt spins. It can be maddening when you can't get the head and keep it pressed into the keyway. Had anyone who had tried to pull it realized this, they might have taken the time to remove the bumper and insert a pry bar to hold the bolts in place. Advantage: experience.
Daughter did the wrenching with a homemade ratcheting breaker bar made from a broken Craftsman torque wrench and a Husky 1/2 inch drive ratchet with the handle inserted into the tube of the torque wrench body. This makes a handy bolt breaker. By the way, don't ever use a torque wrench to loosen bolts or nuts. You can, and will, damage either the ratchets or the torque mechanism inside and throw off the calibration or break the parts inside, hence my homemade tool. If it's a "clicker" it won't click at the right torque spec and must be recalibrated. Dial types can just as prone to abuse.
So while I held the pry bar in place to hold the carriage bolts down, one by one, she was able to get all eight bolts loose. A couple were really tough as they were making the dreaded snapping noises as the nut jerked around the threads. I didn't bring any penetrating oil but did have a quart of ATF+4 handy. I squirted it into the channel and let it run down the bolt shanks. I had her tighten the nuts back up to get the fluid into the threads to lubricate them on both sides of the nuts. Then she backed them off with much less force now as the threads were washing out as the nut turned. By the time the last bolt was loose, her arms were tired as she isn't used to pulling on the breaker bar and putting her weight, petite as she is, into the effort. She was a real trooper and decided to rest after I lowered the receiver to the ground.
 |
| And ended up with this. |
 |
| Aaaaand this! Winner! Winner! Chicken dinner! |
After that we wandered about the yard with the barrow, tools, and our treasure to see some of the other Jeeps there. Some had some pretty good parts still left and others, not so much. After that, we decided to head home and begin the preparation work to strip the receiver, paint it and install it.
Two weeks later I had a day off during the week that was perfect so I finished cleaning the receiver and applied Rustoleum's Self-Etching Primer. I wanted this primer to grip the metal really good so the paint had a good surface to adhere to. The metal had been weathered and the powder coating didn't come completely off even with a high speed wire cup on the angle grinder.
Here's what it looked like during the refinish work.
 |
| I used Duplicolor Semi-Gloss Wheel Paint. This would help in blending it with the existing condition of the vehicle. It's till wet in this photo. |
 |
| The underside of the hitch is dry now. Time to flip it over and apply the finish coat. |
 |
| Last coat from the side that can be seen. Still wet at this point but will dry into a dulled finish. The original Draw-Tite weight chart is underneath some masking tape to the right of the receiver tube. |
 |
| Getting the interior panels back off after installing them only two weeks before. Ugh. At least it's only the rear quarters and the lower center cover across the back sill. |
 |
| Looking from the wheel well in front of the fuel filler housing toward the rear tail light panel. That rust just made my XJ holy. (Click to enlarge) |
 |
| Now from the opposite side of the fuel filler housing we're looking forward at the wheel well's lower rear cojoined panel junction. More holiness. |
 |
| After scraping the rust off from the inside I can now see how much was nothing more than the paint layers making the rear lower quarter look good. I chipped and scrapped as much as I could to get to some solid metal that wouldn't break off. |
What have I learned from this? Nothing new. All things must come to an eventual end. I want to keep this girl going for a long time. If you have a supposedly "good" XJ, check out the inside of the wells back there. Remove the fender flares, if equipped and check to make sure what you're seeing isn't just skin deep.
Back to the receiver install. Now here's what it looks like:


As you can see, it blends pretty good into the existing looking of the XJ. Also note the missing bumper endcaps. The bolts holding them on broke, one by one. So I should get new bolts to hold them on until I have the funds to get a new aftermarket bumper.
Sheesh! Look at that! Man, I hate clearcoats.
So today I received and installed the powered trailer light converter wiring harness during my lunch break. I was in a hurry so I didn't take any progressive photos. The wiring went well and I chose to use some special heat-shrink splicers. A captured section of the catalog page D9 I found online is shown below.

STP166H is the one I used. Two legs splice the original vehicle wiring back together. The third is what the trailer light converter is tied into.
Now some of you will no doubt shake your head or finger at me and say "You should have used the "suitcase" style wire taps. It would have been a lot easier!"
Sure. It would have been easier. But I'm about reliability and quality of the connection. Using the suitcase style (known as an Insulation Displacement Connector) would cut through the insulation, nick the conductor only marginally, or cut through a strand or two of a stranded wire and do the same to the trailer wire lead. This would make only a minimal contact point for several amps of current to flow through. If it cut through any of the strands, the wire's current carrying capacity would be compromised. This can lead to overheating of the connection to the point of failure, including fire.
Using this type of connection fully engages the wire strands as a group as part of the connection point. The large metal contact point with the wire would allow heat to wick away from the connection into the larger metal structure. The exposed joint between all three connections can be covered in heat shrink with two of the connections positioned closer together or insulated by the use of liquid electrical tape. The heat shrink tubing, already part of the connector is activated and seals the crimped connection provided the crimping tool does not pierce or cut the insulation. I chose liquid tape as I use it on my external antenna connections for my amateur radio equipment at home as they are constantly exposed to the elements. In the vehicle, it ensures the exposed junctions don't contact the chassis/body of the vehicle.

I think I got the last five out of the big store attached to the warehouse. These can be found online by other manufacturers I'm sure but the old Carquest connectors they used to carry were superior in every way to Advance Auto's Autocraft stuff. I noticed the other day Dorman brand electrical connectors filling up the hooks in their electrical section. Smart move. They are much better than Autocraft. We'll see if they are better than Carquest's.
Just a side note on the electrical wiring of this 1993 XJ Sport.
None of the wiring schematics in Haynes, Chilton's, or on xjjeeps.com are accurate. The site, xjjeeps lists "Factory Service Manual" but in reality is a Haynes or Chilton's manual. I have both and the real factory service manual looks nothing like those.
So I had to trace out each connection from the main wiring harness from the fuse block to the main rear tail light connector in the rear driver's side quarter well.

AMC, and then Chrysler did vary the wiring over the years so no one single manual will cover 84-86, 87-90, 91-95, 96, 97-01 years as such. You just have to get in there and take a look with your own eyes and verify their fucntion with a test lamp, a meter or an inductive (non-piercing) sensor to find the right wires. That is, unless you have an original factory service manual for your year and model XJ. :-p
Well, that's it for tonight. G'Night all!
_______________________________
February 22, 2020
Greetings! Been working on the Jeep XJ-7100 project lately so haven't been working on radios in the shack.
All the other projects I have waiting will be on hold for now. Just too much work and diverted funds for the Jeep right now. So far, the radio and AH-4 tuner are working very well. Just trying to get the sheet metal everywhere else taken care of before I put it all back in. All of the interior panels above the carpet are back in. The carpet seems to be a lost cause at the moment so I'm working on the rust issue.
My daughter and I pulled a hitch receiver from a salvage yard 1995 Jeep XJ, cleaned, stripped and painted it before installing on my XJ. I filled up with fuel the other morning and have smelled gasoline now and then when I go to the rear lift hatch. Found it last night (20th) and it seems a portion of the tank's pinch seam has rusted through or split. The leak is on the passenger's side by the exhaust pipe. So if I keep only half full it should be good until I get the new tank in and installed.
This isn't going to be a fun job as I won't be able to use any cutters due to the gas fumes present should either of the two hanger bolts seize up. I guess I can wet down some old towels to put over the tank at the strap bolts and use a fan to blow air to keep fumes from accumulating while I work with hand tools. Maybe could use the Dremel then. I will have to uninstall the hitch I just installed last weekend too. At least the fasteners are new and might give me an valid reason to make a heat shield. Some were and some weren't equipped with one. It appears mine wasn't.
To be replaced will be the fuel tank, fuel pump kit, and fuel filler and vent hoses are from Amazon. The roll-over vents and tank straps are from teamcherokee.com. The fuel filter and roll-over vent hoses are from Carquest/Advance Auto.
The tank will come from Dorman painted black but I'll spray a protective liner onto it for added protection anyway after I rough up the surface with sandpaper. Since the tank is out I can see the underside of the floor and do some quick work on it if needed. Time permitting I will also replace the tail pipe as it is rusted at the muffler and barely hanging on. I'll need an exhaust pipe expander to make the muffler's pipe round again I'm sure since it's clamped.
I found the two coax cables I was looking for to consider using for the CB that is yet to be installed. One is LMR 240 with a solid core for more permanent installations or the WireMan's loss cable with stranded core. Both have excellent shield coverage but the WireMan's cable is more flexible. I wouldn't worry about the center conductor breaking from vibration. With that in mind I routed the cable where I think I want it routed to get to the dashboard with some slack to go either to the left side or the right side. On the other end I need to cut to length I'll put on ring terminals for a solid connection to the other 102" whip antenna. The CB would be primarily for Jeep group trail outings or when highway travel requires info regarding traffic slow downs. Weather and travel conditions would be via the South CARS (Southern Coastal Amateur Radio Service) or East CARS net in my area.
I'm getting itchin' to install the control head of the IC-7100 in a more permanent fashion and might pull it out of the XJ to start working on that portion while the knee panel with ash tray mount is here in the shack. Makes it a tad easier to work with at least.
That's it for now.
73
_______________________________
February 23, 2020
Today I had to cut down the Daystar bump stops I installed another 1/2-9/16 inch. I cross railroad tracks every morning and evening and she's hitting them hard. I know I should do something other than that but funds are short now. The factory bump stops rotted out long ago and rather that install new ones I snagged the Daystar's cheap at an swap meet. As short as they are now it wasn't a bargain. Just don't want the upper control arm on the passenger's side to smack the transmission cooling lines like they did before. When I make new lines I will reroute them to avoid the control arm completely.

Enjoyed the short snow we had last week. It was a wet snow but snow it was and it was beautiful. I miss the Winters in Colorado some.

Hope she keeps on going, and going, and going....
I studied the pics I took of the fuel leak and looked up under there today. There is contact between the tank flange and the hitch receiver flange. It must have bent upward when I installed the hitch receiver even though there is a cutout for it in the receiver's flange. Damn frustrating to be honest. This wasn't expected nor wanted.
Since I have to do this I'm going full-tilt with it. Along with the new tank I'm getting a new fuel pump rebuild kit, fuel filter, rollover vents (2), new tank straps with J-bolts, and new fuel filler/vent hoses. Might as well. I don't want to have to do this again anytime soon.
Since I'm going all out on this project I also bought a DeWalt 3/8 drive impact wrench. Many times I had wished I had one because my 1/2 inch impact wrench was just too big to fit. It's also a bit heavier.
I am hopeful that all of the stuff will arrive by Friday so I have all weekend to work the problem.
That's all for tonight!
______________________
March 13, 2020
What a difference three weeks make! The fuel tank I supposed to get turned into an oil pan for a Cummins ISX engine out of a big truck. I could have used it as a bathtub it was so large! But, I was angry. After getting on the phone with customer support, they recalled the bathtub and sent out the right part. It arrived a week ago. While I waited I contacted Jeep Unlimited to see if they had the J-Bolts availble. Ray emailed me back and said he had two good ones with little rust and the nuts were freely turning. The bolts weren't twisted or bent. I received those yesterday. A good wire wheeling, some corrosion protection and they'll be ready to install.
The tank was safely at home. I took some time to sand down the paint with 100 grit foam sanding block and the paint came right off. The picture looked to be a black paint but it was a nice gray-ish silver metallic. Unfortunately it was painted with general paint and would have rubbed off at any contact points in a matter a days. So taking the paint mostly off and wiping it down with Acetone it was ready to paint with Truck Bed Armour from Duplicolor. I sprayed only the bottom half of the tank to start with. The plastic scuff plate makes several contact points that will rub through eventually establishing a kind of lock-in of the plastic to the tank.


Probably the first thing I'll do after draining the tank and removing the hoses is attempting to loosen the original j-bolts. Should they start to twist I'll try using a nut cracker first before I cut the old straps loose on the j-bolt end. If I can save the original j-bolts and the threads aren't galled, I will likely keep them as trail spares otherwise they were sacrificial parts to the greater cause.
Today I sanded, cleaned and sprayed the top half of the tank with the bed armour stuff. I used only one can, sprayed it on thick and still had some left over. Might do the bolts after they are installed and protect part of the threads with tape so I can cinch it up after a while while the straps settle in. Removal won't be hard with a wire wheel.
I am still debating on whether or not to add a vent extension inside the tank to increase the capacity a couple of gallons. Better than stock but what is the consequence of doing it? Will the fuel rush up the main fill tube and splash all over me? Hard to tell what will happen as I haven't found any posts that describe the pitfalls, only the benefit. I wish there was a reasonably priced extended range tank like the former Sunset Metal Fab tank was. They don't make tanks any longer. The Platinum-priced Genright tank would be a great tank but at double the cost of the Sunset Metal Fab tank, isn't a value worth it unless I build this XJ into a purpose-built overland or rock crawler rig. I can carry a Jerry can for the added range if needed.
My front driveshaft is just beginning to sound off like a bird so I know it's time to service it. I'll pull it out for now and rebuild it later. The '97 Camry is getting an engine and transmission and I need to spend time on it. Happy wife, happy life.
That's it for now!
_____________________________
March 15, 2020
Greetings! I was able to get two things done on Nanye-hi (Pronounced: nun-yeh-hee). First the fuel tank coating was completed and the fuel filler vent tube modified for a slight increase in fuel capacity. My arm is too big to fit through the fuel pump hole so I employed my wife to fit her, very slender arm through the hole. Okay. My fat arm wouldn't fit. There. I said it.
We went through a few test fittings and when I got the copper tubing the length I wanted, I soldered them together. Once cooled I mixed up some JB Weld and gooped it on the fitting. After one adjustment to get the angle I wanted, I let her go back to her playing in dirt...I mean gardening.
I installed the new rollover vent valve grommets and valves then attached a new piece of hose between them. I did that since I don't know how long each one was so I'll cut that once it's in place. After that I put it in the barn until called to be installed.
This is the link to the site I used for the mod info.
http://gojeep.willyshotrod.com/HowtoFuelTank.htm
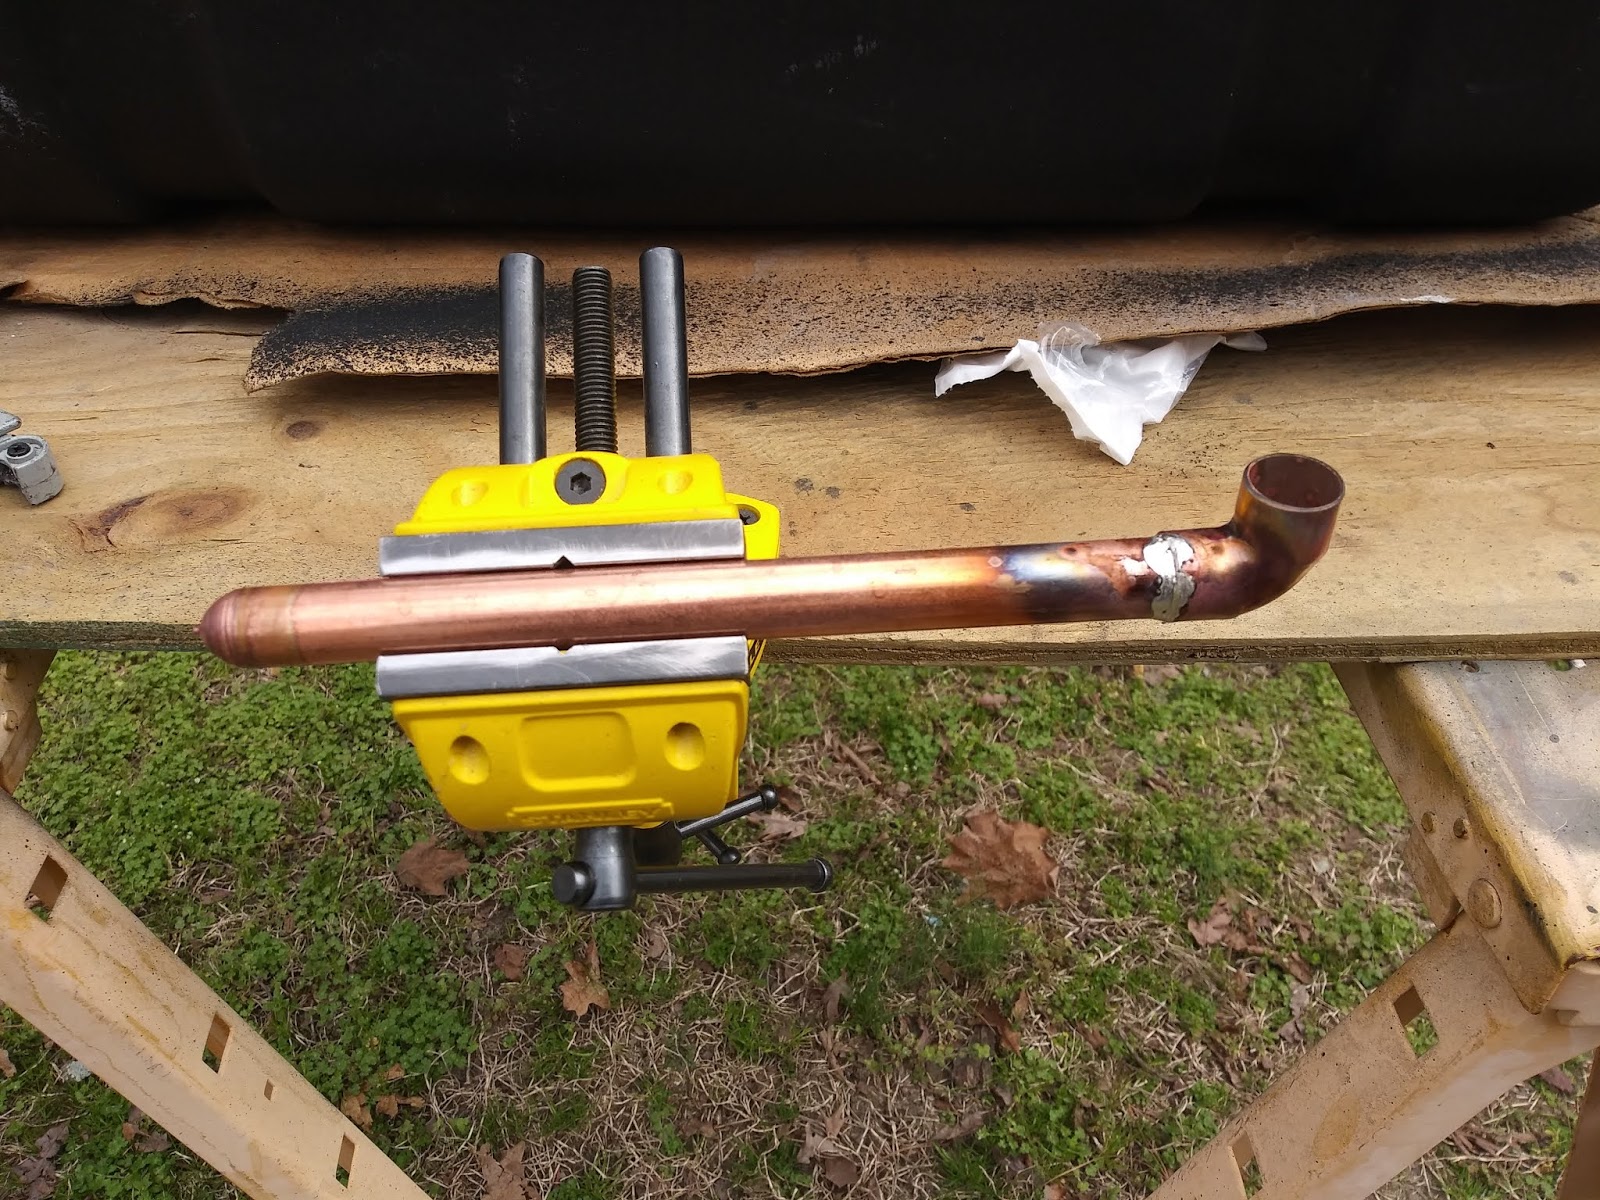 |
| Started with 1/2 inch copper tubing Stub End and an elbow. Once cooled after soldering them I cut the length down. |
 |
| Fill tube and vent tube extending into the tank. |
 |
| The mod installed. |
 |
| Ready for installation! |
The next thing I wanted to do was remove the front driveshaft. I bought the new5/16 inch, 6 point box end wrench and was able to get all the bolts out this time. The heads on two of them were rounded from a previous attempt and thought I should replace them. Maybe not since this wrench worked. 12 point wrenches don't work on these as well due to the chance of rounding off the corners so stick with a 6 point. Wobble socket would be better but I always wanted a 7.9mm wrench just to be different. ;-)
 |
| My 4WD to 2WD Mod. |
I'll probably work on the DS during lunch breaks this week. It will also give me an idea I've been thinking about on the groan she makes if I accelerate from a dead-stop quickly. I can't tell if it's transmission shudder or driveshaft or front output shaft bearings on the transfer case. When I do that tomorrow I'll know a little more.
Lastly I started working on some switch ideas for added accessories in the future. The IC-7100 radio is on a stick freeing up the center console space and I may leave it that way even though it's not my first choice. So I picked up some old Carquest lighted rocker switches from a former Carquest store that had been converted to an Advance. At least the Carquest people I know in there stayed. I like that. Carquest knew the commercial sector well and knew their parts. Most stores these days are populated with kids that don't know what a fuse is.
 |
| From the Driver's seat. |
 |
| Closer in. That change pocket sure can be used for a lot of stuff! |
 |
| Or I can mount them here on the face of the console. |
That's it for this session. Have a good week y'all!
_____________________________
April 4, 2020
I'm a bit behind in my updates. The new Dorman fuel tank (P/N: 576-656) is installed as of March 28th. The fuel pump rebuild kit was a bust as it is for a Walbro. I have a Bosch. So I had to use the old one again. I measured the Full and Empty reading on the fuel level sender. It read 107 ohms empty and 2.5 ohms full.
Next after reconneting all the new lines I discovered the main feed from the tank to the filter wasn't purchased so I reused it. The last thing to install was the tank vent lines to the Jeep before finishing up the fuel fill and vent hoses. Once done and the filler neck secured, I reconnected the battery and checked where the needle was on the fuel gauge with a dry tank. Dead on E. Right where it should be.
Next I emptied a 5 gallon gas can with 4.5 gallons in it, according to the Max Fill Line and what the pump told me was dispensed. The whole amount was put in and I checked the gauge again. The needle barely moved a half a needle's width. Thought that was weird since it's a 20 gallon tank and it should have read at least 1/8th. I remembered someone saying in a forum they thought their pump didn't seat into a hole on the bottom and made a ton of noise. This might have happened to me as the pump gets loud after a while but I didn't realize that until later this week.
I went to the gas station to finish filling up and left the key in the ON position to watch the fuel gauge. Now I had 4.5 gallons in a dry tank. At half on the gauge, I had just stopped at 13 gallons. Okay, not good. Means the level is sitting higher up than it should. I thought maybe I either disturbed the setting or bent it or something.
At the first pump cut off I had 21 gallons pumped. I'm sure the vent tube mod gave me a 5 gallon increase but the gauge isn't jiving with that.
So here I am now with the fuel light on at 1/8th tank. I have the 5 gallon fuel can full and sitting in the back waiting for me to run out of fuel. When that happens, I'll empty the fuel can then go get it filled up and add what I pump to the fuel can amount. Then I can take the number of miles on the trip meter and figure out my mileage and total range.
As of this moment I'm at 287 miles just going back and forth to work with very little other running around. I've only gotten this far with all highway miles. Never with city driving. Let's see how far I can go!
_______________________________
April 11, 2020
Getting the most out of my fuel tank.
I pulled into a gas station during lunch to grab a snack and a drink. As I turned into the driveway the engine stumbled and ran rough. I had finally found how far I can go. Diverting to the fuel island I wound up pumping 24.5 gallons into the tank. Knowing I had 26 in the tank when I started I figured about 1.5 gallons left in the tank the pump couldn't pick up. I went 387 miles on that fill up.
After filling up I parked, got my snack and checked underneath for any spillage, leaks or flowing rivers of fuel. There were none. The next true test of how well this works will be late this summer with the fuel expansion. My goal was to keep enough of an air pocket so as the keep one of the two fuel vent/rollover valves unsubmerged so fuel wouldn't be forced up the vent tube into the charcoal canister and contaminating it. So far, so good.
Meanwhile, I'm already thinking about my next project. The lift kit. My rear leaf springs are flat and the ride isn't so good. Add to that the bad bushing on the passenger's side front bushing and I'm starting to hear an ever so undesirable little clunk. I am still hoping I can get all the bolts out to install the new kit. Here's what I'm planning.
Iron Rock Offroad 3 or 4 inch 3-link long arm kit with new leaf packs. It comes with a new track bar, mount, and trans crossmember. I'm torn between 3" and 4" for two reasons. The 3" has the lower center of gravity and that 30 inch tires just barely make the look. A 4" lift would make the small tires look awfully goofy. The 4" on the other hand is already made for 32s and can run 33s but raise the center of gravity quite a bit more even with only 1 inch difference between them. I can keep my stock driveshaft with the 3" lift but need the SYE for the 4", etc.
My budget is $2500 but the Iron Rock Offroad will be the basis for the rest of this Jeep. I can go cheap and hope I get decent service from it or stick with this.
We'll see.
_____________________________
April 16, 2020
A secret that isn't so secret.
Good evening. I have been scheming, ahem, planning to get some work done on Nanye-hi. She's been getting a lot of attention lately and with the Stay at Home order, I haven't had any time to work on her. Yes. I'm still working because auto parts are essential for emergency agencies as well as utilities services. But I digress.
For a couple of years now, actually two years and 15 days to be exact, I've been planning on upgrading the XJ. She's been pretty good so far and I feel that after driving her for the last year and a half I think she's about as reliable as she's ever been. So I finally had enough saved up to purchase a 3" long arm lift kit and OTK steering kit from Iron Rock Offroad. I changed my mind on the shocks so I am getting the Rancho RS9000XLs. I'll be able to change how well they do their job based on my intended road or offroad paths. Softer for DD duties and more stiff for the offroad scene. Likely I'll set them between
I know what you're thinking...Why? Simple. I have not been able to this kind of thing on my own stuff. Always helped out my buddies but never got to do mine. One life altering event after another. I finally said, F it! I'm doing it this time! So I did.
The gas tank mod seems to be working okay as I'll need that extra fuel to haul the extra weight of the suspension, steering and, in the near future, front and rear bumpers from Affordable Offroad. The engine is tired but still runs well.
So that's the news for now. I'm going to chill watching Matt's Offroad Recovery channel on YT then maybe one from Justin King. And no, I'm not trying to make my build like theirs. I just enjoy Jeep videos.
Night!
_________________________
April 21, 2020
What began two years and twenty days ago on April 1, 2018 was a dream of mine. For many years I had been helping others work out problems with their Jeeps but now I have the chance to build up my own. I love the Jeep brand up to 2000. I haven't owned anything newer since things don't seem to be as well built these days. The JK had more plastic than any previous "J" series all the way back to the first CJ. The JL seems to be even worse and for what? Build it cheap and charge triple for the name. Hell, even Fiat took their 500 and slapped a Jeep badge on it with some cosmetic changes and suddenly it's a Jeep. Jeep was never about high profits and reduced capability until Chrysler got into bed. Since then some notable improvements were made to the XJ in '97 to the end in '01 with a tad stronger unibody construction, smoothed lines, and slightly updated interior design. But largely, everything else was the same as it had been since AMC (RIP) introduced the little boxy Jeeps back in 1984. The 4.0L had been constantly updated with improvements in cylinder head flow in 1991-1998 with the 7120 and 0630 heads. Larger exhaust ports allowed the torquey straight six to breath better until 1999 when the infamous 0331 head design showed its ugliness. Small exhaust ports to meet emission standards along with constant complaints and warranty claims for cracking between cylinders 3 and 4 exhaust port valves a new head was designed and foundried by TUPY to solve the problem. It was solved but not before the damage to the reputation of the square body had been done. Some say this was done on purpose to finally give Chrysler a reason to drop the last of AMC's creations from existence. In fact, the XJ was supposed to end production in 1999 but the execs were convinced it would last another year until the Liberty (KJ) was completed and ready for production. As it seems to have been written by Chrysler, the XJ ceased production in 2001 only because they ran out of parts. Long gone were the high pinion (HP) Dana 30 front axle shafts and only the inferior low pinion D30's from TJ production remained. The last XJ rolled off the assembly line in May of 2001 after a production run of 18 years and 2,884,172 vehicles in all. Chrysler wasted no time burying Jeep's past. The following month the portion of the assembly plant XJ production was housed would be torn down. This was the most popular, longest running single vehicle model Jeep had ever made and it was done by the little independant car maker, American Motors Corporation.
Article on the nation's longest-operating auto plant - here
The basic engine design, originally 172.6cu in tractor engine with a flathead design, was released by Nash in 1941 and introduced in the Ambassador 600 model. An overhead valve (OHV) option was available and only had four main bearings. Oddly, this replaced a 234cu in flathead engine with 7 main bearings.
As the engine was further developed it became the AMC 196 (3.2L) produced from 1952 through 1965 still with flathead or OHV designs. Fast forward to 1971 and the first 258cu in inline six was produced. It even was controlled with AMC's CEC engine management system with throttle body injection.
We reach the 4.0. An engine developed by AMC in only 26 months using most of the design parts off the shelf for the 258. It was introduced in September of 1986 for the 1987 model year, much the chagrin of the future Chrysler execs. The body was designed for a V6 but GM's 60-degree LR2 V6 proved to be a failure. With the eventual takeover on the horizon, AMC skipped designing a new V6 in favor of a new straight six. The 258 would fit but somebody at Chrysler prior to the takeover was making waves about how the engine would never be found in the engine bay of the XJ. So AMC engineers built the 4.0 effectively thumbing their noses at the future owners. They kept their promise not to put the 258 (4.2L) in the XJ platform.
Why all the history lesson? I'll tell you. I have never had so much pleasure driving a Jeep as I have with the XJ. I've owned a '77 Wagoneer SJ, a '99 Cherokee Sport XJ, a '00 Wrangler TJ, and my latest, the '93 Cherokee Sport XJ this blog has been featuring. It's fun to drive. Carries everything I want, so far, including all my tools when I need them, and has the style that carries it's AMC origins years after the takeover. I still get 14MPG just getting to work and back home without any highway miles. I've broken 21MPG on two round trips to Charlotte, and that was with over 200k miles. I have over 244K miles on her now. She has some piston slap, leaks a little oil even after seal replacment but she's reliable. I enjoy working on her because she can be worked on without a computer and with some knowledge, common sense and a smidge of finesse. She's a challenge to maintain as she ages and the cancer of rust is an ongoing battle. Many just give up and let them go to waste because to them, it's "just a car."
I've overheard some Jeep guy say to another fella one time at a car show. "It's not a car. It's not a truck. It's a Jeep. Call it a car again and I'll kick your ass!" I need to make that into a bumper sticker.
So where does that put us today? As mentioned before the history lesson I have the opportunity now to do my own build. What does that mean exactly? Well, it's a complete vehicle and is my daily driver or DD. I have a finished platform to build on and make this XJ my own with mods and parts from a large industry of parts suppliers. So here's my goal: Build a DD with overland, recovery, mobile communication platform and weekend offroad capabilities. Basically it's a near impossible goal with a small budget. But here's what I have so far...
Communication's platform, aka: Project XJ-7100. More info about this part of my goal is here .
Now come the Overland/Offroad/Recovery portion. The largest part of my goal but can still be broken into smaller projects. First, all three have one thing in common, a small lift. The whole offroad thing covers Overlanding as well without tents, built-in solar showers and such. This part of the project gets the vehicle up and off the paved path with an Iron Rock Offroad 3 inch Long Arm lift kit with full leaf packs. To direct the carriage is IRO's Over The Knuckle (OTK) steering kit. To control the up's and down's of rig are Old Man Emu (OME) NitroCharger shocks. Part numbers below and purchased direct from IRO. Each part linked to its respected page.
IRO 3" Long Arm Lift Kit - 13381 - with Chrysler 8.25 rear axle and shock absorber delete. $1429
IRO OTK Steering Kit - 10261 - 1/2 inch Heavy Duty bolt-on steering upgrade - $389
From 4wd.com
OME NitroCharger Shocks - Front: 60052L - $ 209.52/pr Rear: 60053L - $209.52/pr
The pictures on the website are the same front shock.
For the front brakes, the pads have worn a deep gouge where they have rubbed and worn down the ears on the steering knuckles. I have had them suddenly bind up without warning so I'm replacing them with new castings by Crown Automotive purchased from Carparts.com. I purchased these same knuckles from them a few years ago for the TJ my daughter now has and they have been good performers. Still, I'd like to see if I can make a shim to protect the casting face since they don't look to have been induction hardened.
Crown Automotive steering knuckles - Left: 52067577 - $ 93.73 Right: 52067576 - $92.40
I ordered the set with this part number: SET-52067576
For the recovery portion of my build, I chose a winch bumper and winch as my first purchase. Knowing which front bumper I'm going to get next, I decided on this one. Many good reviews for this 2nd generation unit by Smittybilt. I've read a lot of quality issues with the new Gen3 units. Since these Gen2 units have already been made and sit in storage, I'm reasonably sure these are a better quality. I probably can replace the motor with a newer version later.
4wd.com
Smittybilt XRC 9.5K Waterproof Gen2 Winch - 97495 - $301.99
Affordable Offroad
Plain Front Winch Modular Front Bumper / No 3/4" D-rings/With Bull Bar - RHXJmod - $535
Elite Rear Bumper / No 3/4" D-rings/No Tire Carrier - EXJrear - $345
I received the lift kit and steering kit today. The shocks are due in Friday this week or Monday next. The bumpers in two weeks as they are built to order. The knuckles are due in on Monday. The winch should be in this Friday.


It's late and I have work tomorrow. Until next time!
Love dirt!
_____________________________________
April 22, 2020
I got a neat looking crate today thanks to a coworker that knows a guy with a bunch of them. Below are the two logos imprinted on it. Will make a nice crate still or the panels can be hung as wall hangings.


I have been working on a way to add LED lamps to the under side of the hood and to the tailgate hatch when open. It's a pain to have to pull out and prop up a lantern or wear a head light sometimes when all you want to do is check the fluids or need to perform repairs and it's dark out. Many overlander's and enthusiasts have installed lamps for this reason but I've found many to be expensive for the simple task they perform. A home improvement center with under cabinet lighting using low voltage LED lamps might be an alternative for interior lighting but not in the harsh environment under the hood.
So with that in mind I purchased two KC HilLites Cyclone LED pieces for just such a use. Red and Amber were available too but I don't think I need those just yet. Maybe in a tactical sense though where night vision is to be preserved. I didn't pay the pricing listed on the web page as it changes. The neat thing about these is that I can mount them in place where an existing non-structural fastener is used with the hole in its center if needed. I will likely screw them into the hood bracing on either side of the engine. An under-hood multifunction switch can be mounted near the battery to turn them on/off or, with a tilt switch, make it automatic. There won't be a need to switch them from inside the vehicle.
As for the tailgate hatch, I may go get a set of cabinet lighting pucks if the power supply is 12V output. Many of the better ones are expensive too with some nice styling to them but none are worth the $30+ price tag. I'm going to check out Main Line Overland for more ideas. Might even look into some RV suppliers. I could go cheap and use the battery operated lamps but then I have to keep batteries handy, even if they are rechargable. A switch will be mounted at the rear openeing somewhere to control them individually. I will get red ones too as I would want to work my amateur radio equipment at night during field operations from a vehicle-mounted fold-out table top. Not sure how I'll integrate that feature but I might do a drawer with a top that folds out or is the desktop that can be removed to get to anything stored underneath it.
I don't know if I'll go as far as a roof tent. As I get older It's getting more difficult to climb with bad knees and hip joints. The original goal for this vehicle was to make it better-than-stock offroad performance doubling as my ham radio platform. So far it feels like I'm on the right trail. ;-)
I have not heard from Affordable Offroad yet about my bumper inquiry but I'm not worried too much. The shocks for the lift kit haven't arrived and that is holding up the install. I can deal with the bumpers another time if need be.
That's it for tonight!
__________________________________
April 25, 2020
Today felt more like early Spring than mid season weather. As the day progressed the cooler it got and the more windy it became.
First order of the day was to get down to Best Buy and pick up a Joby cell phone tripod with magnetic feet and a bluetooth shutter button. The BT button almost works with OpenCamera. It will start the video but doesn't stop it. It's worse on the Samsung Galaxy J7 Crown. It won't even start the video but at least will shoot a picture.
Next was to retrieve some stuff at HomeDepot to make a pair of 4' ramps for my yard barn. Originally I was going to pick out lumber for the workbench build this weekend but when I got to HD, there were long lines with others needing lumber. I'll wait and go on Thursday. Last was to visit the tax office and finish filing the paperwork and head home.
Daughter took me to her uncle's house to pick up her mom's car after I was lucky enough to get it reregistered and a plate put back on it Friday. Uncle had a lot of time off and was able to get most of the work done to swap the engine and transmission. The engine on it broke down on January 26th and was running again only two weeks ago.
I rolled into the driveway and went into the house to hand the wife the keys and told her she should check it out. She was very surprised we had it back and registered! So happy that she had to wash it before taking it out for a spin. She told me about some noise I already knew about that'll be taken care of tomorrow.
Now, on to the Jeep...
The latest stuff ordered:
- FRONT and REAR bumper from Affordable Offroad. I ordered the bolt-on Bull Bar and 3/4" D-ring shackles for the front and added the shackles to the rear.
- Adams Driveshaft is sending an SYE and driveshaft set. The SYE is from Rough Trail, a Crown Automotive brand, and Adams Driveshafts rear double-cardan shaft.
- Boostwerks will send one of their Ultimate XJ Steering Reinforcement braces once they receive their next batch from production.
- Iron Rock Offroad got another order as I decided the angle of the rear pinion wasn't going to work out with the new driveshaft. a pair of 2 and a pair of 4 degree shims were ordered as was a new steering gearbox spacer. The old, aluminium space the factory used may be broken. If not, it will be. the new spacer is all steel and with the bumper mounting plates, will reinforce the uni-frame on the driver's side.
- RockAuto has shipped my Bosch fuel pump kit. I decided it best to have it and not need it instead of needing it and not having it. If it goes, I hope I didn't just fill the tank. :-( I will go ahead and pull the old pump out and put a new strainer on the end of the pick up though.
Still waiting on the OME shocks and Smittybilt winch. 4 Wheel Parts is closed on Mondays now as either part of the COVID-19 event or because Polaris owns them and is excersizing the typical powersports weekend schedule of Sunday and Monday closings.
Now you might be wondering why I mentioned the Best Buy and Home Depot stuff in my Jeep blog. Well, it's part of my day as I get closer to the install. I wanted to build the workbench this weekend to have as a dedicated workspace if a workbench is really required for this. It's nice to have a workspace you can use and not have to make one from the cargo space in the back of the XJ. I'll have plenty of other uses for it in the future. Right now, the XJ cargo area will suffice. I did order a benchtop vise from HD but they couldn't find it so they ordered one from another store. I didn't know that until I came to pick up what I ordered last night (24th).
Until next time!
_____________________________
April 26, 2020
I got up thinking I would begin some of the sub-assembly work for the Jeep's lift kit but the wife's car had other plans and spent the better part of the morning taking care of it. By the time I was done I wasn't in the best of moods and lost much of the motivation to work on the XJ. After a short break, water and a snack I decided to do something else on the XJ. Under hood lighting and new speakers for the liftgate.
Speakers
I bought a couple of Kenwood 6 1/2 inch two-way speakers some time back and finally installed them today. Now the ones I removed were 4 inch and fit inside the slot as intended. These new ones don't sit in the slot but the holes lined up fine. These can be mounted flush or recessed. Since I haven't put the interior panel back on, I went with flush, for obvious reasons. After replacing the factory connectors with standard audio spade terminals, they sound much better than the tired old ones. With that done, it was time to put on some tunes from the phone through the factory stereo and cassette adapter and go to work under the hood.
Under Hood Lighting
So for a while now I've wanted to have a lamp under the hood like many Jeeps could be ordered with. I think it was a Light Group option and offered liftgate activated interior lighting as well.
I wanted a low current draw lamp and LED's are the way to go. They are bright and not power hungry. I'll take a measurement sometime to see.


I still need some of the corrugated conduit to make the wiring less ugly. So far these work well and I'm happy with the results. On to the next thing!
Bye for now!
_____________________________
From this point on, posts directly related to the build will be below the parts list after this.
_____________________________
Below is a parts list for Project Nanyeh-hi (pronounced Nun-yeh-hee). Nanyeh-hi is Cherokee for "goes about". The Cherokee have had a long tradition of women leaders and have even established a title for the position: Ghigau (or Agigau), the Beloved Woman, who regularly sat in council, had a vote and could pardon condemned prisoners. The honor was reserved for those women of exceptional ability who had made remarkable contributions to the well-being of the people. Nancy Ward, or Nanye-hi (1738-1824), was the first of record, but there have been several since.
I interpret her name to mean: "Beloved that goes about anywhere". She is special and likely my last project vehicle. I'm pouring every resource I can into this XJ and hope to enjoy years of good service and offroad fun while enjoying my ham radio hobby.
The Build
Project Nanye-hi
(pronounced: Nun-yeh-hey or Nun-yeh-hee. I use the latter pronounciation)
Here is my Manufacturer/Vendor parts list so far:
Fuel System
Dorman 20 Gallon Fuel Tank - PN: 576-656
Options: N/A
Thoughts: Modified the tank fill vent tube. This modification raises the end of the vent tube inside the tank to increase fuel capacity by making the air bubble in the tank smaller. Standard straight 1/2" copper tubing with about 1 inch extending beyond soldered seam into flared elbow for 1/2" tubing. JB-Weld the elbow to the vent tube inside and angled between 30 and 45 degrees. Approximate capacity gain is 4 to 5 gallons. Mine was at a steeper angle and wound up with a 26 gallon capacity making the air bubble a tad small for fuel expansion on hot days. This may allow fuel to flow/siphon through rollover vent valves and contaminate charcoal canister rendering it ineffective and very stinky. Don't ask me how I know.
 |
| Brand new Dorman fuel tank. No fill vent tube modification. (Before) |
 |
| With full vent tube mod. (After) Elbow is epoxied to vent tube on tank with JB Weld. If it needs to come off, it will be a harder than it looks. I couldn't get my arm through the fuel pump hole. Had to ask the wife for a hand....and arm. |
RoackAuto - Bosch Fuel Pump Kit - PN: 69302
Options: N/A
Thoughts: Kit comes with a Bosch Turbine impellor type pump for lower pulsation and higher reliability. Other parts included are clamps and a short piece of submersible fuel hose. My factory pump is the same brand and type with over 245K on the XJ. I will run it 'til it quits.
Lift Kit
3" Long Arm Rock Link Lift Kit - PN: 13381Options: Full leaf spring packs with military wrap front spring eye. Poly bushings supplied. No shocks ordered with kit.
In addition to the kit:
XJ Leaf Spring and Shackle Bolt Kit - PN: 14023
Heavy Duty Coil Spring Retainer Kit - PN: 10145
2 Degree Pinion Angle Plate - PN: 10491
4 Degree Pinion Angle Plate - PN: 11066
Thoughts: 4" lift kit only $40 more but for my needs, 3" is enough. Bilstein shocks are good but I have my mind set on OME NitroChargers. Standard Clevite bushings for XJ will not fit the front spring eye. These are smaller. I will find out what size rubber bushing it takes if the ride with the poly's is too rough, which is what I'm expecting.
Leaf Spring and Shackle Bolt Kit - Just because the factory stuff is rusty. IF they snap trying to remove them, I'm covered.
Heavy Duty Coil Spring Retainer Kit - Mine have stripped out and only the shocks keep the suspension from over extending allowing the spring to float in its seat. This is cheap insurance.
Steering Kit
1/2" Steering OTK Steering Upgrade - PN: 10261
Options:1/2" bolt hardware.
Separate steering damper clamp ordered from 4WP - PSC Steering PN: PSMTRCL08B
Thoughts: Went with 1/2" instead of 5/8" as I did not want to drill the tie rod taper on the knuckles or pitman arm out right now. I still have the option to up-rate the system with 5/8 hardware and new ends if I get into more extreme offroad situations with larger tires. Stock steering damper may be reused if tie rod clamp from PSC works out otherwise I'll order a new damper. At the time I was unaware the Iron Rock Offroad had the tie rod clamp let alone for less. Oh, well. Though it cost less than $20 more, it pays to really go through all the pages on the site.
Shocks
Old Man EMU Shocks from ARB USA - Front PN: 60052L Rear PN: 60053L
Options: N/A
Thoughts: These are hard to get. Some sites say for 2-3.5" lift. Other's say 0-3". OME from Australia offered only for 2" lift as their laws do not allow for more than 2" lifts. ARB offered a USA point of supply to offer more lift options. Ordered from Quadratec and 4 Wheel Parts. I already cancelled the Quadratec order due to backorder status. Hoping I can get them 4WP or I may have to spring for the Bilstein 5100 series after all.
Bumpers
Affordable OffroadPlain Front Winch Modular Bumper - PN: RHXJmod
Options: Added Bolt On Bull Bar and two 3/4" D-Ring Shackles
Elite Rear Bumper - PN: EXJrear
Options: Added 3.4" D-Ring Shackles
Thoughts: I really like the look of the front bumper with its integrated skid panel in the center section. Wings are removable as needed.
Frame Upgrades
Boostwerks Engineering Ultimate XJ Steering Brace - PN: The Ultimate XJ Steering BraceOptions: Added drop brackets for sway bar as I intend to keep stock sway bar for daily driver use. I do not know if this will work with the front bumper yet. I may get quick disconnects later.
Thoughts: I debated getting this but I have seen my gear box flex the uni-frame with factory ride height and stock suspension components just in my dirt driveway. I believe this would help keep the uni-frame from metal fatigue by distributing the torsional forces across to the other side. There are cheaper setups out there but I believe a true framed support will strengthen both the end of the uni-frame and the steering support.
Iron Rock Offroad XJ Steering Gearbox Spacer - PN: 10505
Options: N/A
Thoughts: Since I'm going to use the Boostwerks steering brace above, I went with a steel spacer and get rid of the aluminium factory unit. Between this piece and the front bumper mounting plate on the other side of the uni-frame, this will basically box in the uni-frame. Only thing that is needed for full-up strengthening of the uni-frame are the frame stiffeners.
Drivetrain
Adams Driveshaft & OffroadRough Trail SYE - PN: RT24005
Adams Driveshaft for XJ's - PN: ASDXJ-1310CVR-G - This driveshaft is a Double-Cardan type.
Options: No drop-down menu besides T-Shirt size
Thoughts: Driveshaft requires center-of-yoke-to-center-of-yoke application length with SYE installed. There were no "options" to choose from for the driveshaft. My assumption is they already know how long the new shaft needs to be if the SYE is ordered on the same invoice. But text below the order button states you need to send them the information anyway. Adams costs less than Tom Woods driveshafts but you don't get to pick a shaft with a boot to help protect and cover the splines.
RockAuto - Dana Spicer U-Joints - PN: Dana 51310X
Options: N/A
Thoughts: RockAuto has been a great source of parts. I keep going back to them again and again. I hope to send them a photo of my build and have it featured on a magnet!
Recovery
4WP - Smittybilt XRC 9.5K Waterproof Winch Gen2 - PN: S/B97495Options: Steel cable with hook
Thoughts: Here is some information regarding this winch. https://www.roundforge.com/articles/smittybilt-xrc-9500-winch/#Is_the_9500_XRC_enough_winch_for_your_4x4?_
After reading and reading and reading some more, I've found a trend in the Gen3 winches produced so far relating to initial quality. Reports of loose bolts, broken bolts, stripped bolts and such. I haven't seen the same trend in the Gen2 line of stuff so I opt'd for them. They have all been built and are sitting in warehouses. I don't anticipate much use until I start trail riding but it doesn't hurt to have some recovery equipment and gear to be ready. Accessories will come in time but a snatch block and soft shackles aren't far off. Once the cable becomes unusable I'll switch it to synthetic since improvements have been coming fairly regularly over the last few years. All it takes is for them to be in use in real-world situations so the Mfr can address the problems that arise from that use.
Niceties
Air Conditioning - Parts from R-134a systems for 1994-1996 XJ's.Liftgate lighting - Two 12V LED pucks will be installed into the interior panel of the liftgate to provide illumination with gate up. Various uses for overlanding/field radio stuff at the rear of the vehicle.
Rear Cargo Lighting - Haven't decided on how or what to use yet. LED's for sure but haven't decided on the type or shape. Mostly likely mounted to the cross members for the roof similar to how the factory did it. This XJ wasn't ordered with the lighting group so it gets dark back there.
_______________________________
May 4, 2020
Greetings! My build start time is ever closer thanks to a friend, Titus and friends. Today saw the last of the known hurdles before work will begin on the 8th. As we all know, Jeeps attract rust and mine is no different. I can say that only four fasteners have broken due to rust and all of them were on the front grill and headlight bezels. Getting those out won't be easy but the parts are still attached, somehow.
Tonight, Titus and two fellow car guys were able to get the four main leaf spring bolts loose and retightened without breakage, heating, or cutting. I had attempted this last summer and found that even after a couple of weeks of PB Blaster, they were very stubborn. One gave that "snap" sound as it jumped in the threads and I decided it wasn't worth a tow bill to go any further. So I waited until a suitable resolution could be found. Titus was the answer. The reason for this somewhat extreme measure was the fact that most of these bolts rust and fuse to the inner bushing sleeve. Secondly, the bolt itself could snap at the captured nut. Third the rear shackle bolt captured nut could break its weld loose and just spin. The right rear was the toughest one to get loose but with patience it was brought to submission. If any one of them broke while doing this in my yard, the Jeep would be towed to his and fixed. This way, it was already in a place that it could be fixed without a tow to the shop.
One of the problems with stubborn bolts is the thread locking agent the factory used. Using an impact gun would do two things. Stress the bolt in a violent twisting motion and could cause streass fractures. Add to that the friction of the threads causes heat. This kind of heat becomes a bad thing and makes bad things already in place, worse. Since the nuts are captured and inaccessible without cutting access to them, they could not be heated directly. So the process was done with hand tools and patience. Two full turns of the bolt and move on to another one to let it cool. They kept this up until all four of the main bolts (two front main and two rear top shackle bolts) were nearly fully pulled out. For the previous two months I had sprayed PB Blaster and a homemade mix of acetone and ATF in a 60/40 mix. I have found the homemade mix works better so I stick to that. Even so, it was a job. Now with all of them tightened back up I don't worry about snapping one offwhen I begin the work session.
That's it for tonight's update! Check back often once Friday's project begins!


 |
| She's always going downhill so she'll never run out of gas. For now at least. ;-) |
 |
| Mm-mm-mm-mm-mmm...Beefy! |
 |
| Look Ma! Only three arms! This lit kit by IRO is a Rock Link kit and features a 3-link configuration. I really wanted a four-link but did not find one to suit my taste. |
 |
| The installed long arms! |
May 16, 2020


___________________________
May 22, 2020
Evening All!
I really don't like the new update Blogger.com did. The editor is really kludgey and slow in responding to any keyboard input. And I don't like the fact I can't update the date of publish of the blog like I used to be able to do. Now it's stuck on 5/5/20 12:10PM. I should be able to change that date so it will move to the newest posting position in the list. I use Firefox 76.0.1 so it's not a browser issue. Blogger just isn't making work for me very well.
On to the build ...
So I got the new AR23 wheels on and balanced today. The guy said his balancer was glitchy today but managed to balance them. I also did some research after he asked me if my Jeep was hub centered or lug centered. I thought they were lug centered but found out otherwise. He also found nearly all cone or ball seat type lug nut aluminum wheels are hub centered. Since the AR23 has an 83mm hub hole, and the hubs are 71.5 I was able to find these pretty quick and get them ordered. I should have them Tuesday the 26th. I left the center caps off for now until I know I can use them with the hub centering rings. If I can't, no big deal.
So here's what she looks like since the lift was installed.


Next I have the front and rear bumpers to prep and cover with some bed liner. My steering and gframe brace from Boostwerks came in too so that'll help reduce the driver's side uniframe stress a bit.
That's it for tonight's update.
______________________________
June 25, 2020
It's been a while and several things have been done to the XJ in the last month. Let the pics tell the story.


The A/C isn't as good as I had hoped.
Still working to solve the problem.
|


         So this is what the cruise will look like when it's installed
and ready to go but...
|
 |
| There was a problem. |


So I have been a little busy with the Jeep lately. I also went to the bone yard a couple of times and grabbed the cruise control servo from a '96 XJ Country. Another '96 was there as well. An XJ fleet rig no less! And guess what? It had the Extended Idle switch and panel so I nabbed that too. The liquid hose I needed but nobody makes any longer was also on the fleet rig. I would have gotten the hood from the Country but some knucklehead let it drop on something that wasn't tucked under it and bent it. Perfectly good hood wasted by some idiot that didn't give a rats ass about keeping the parts he wasn't takin in good shape for others to get. I didn't want the white hood from the other one. Too much work to change the color.
Where am I now with this project? In a kinda sorta holding pattern. I'm aquiring parts to do my own Big 6 battery cable upgrade in preparation for the winch and a higher amp alternator from a Dakota.
The cruise control system is non-existent on my rig. There's no knobs, switches, or wiring harness connections that I could easily locate. So why would I do this? I want it. The easiest way is to grab the steering column from an XJ with the feature and splice in new wiring. Well, that's too much work and expense so I decided to get the servo and wire it from scratch. It is said that all ECU's had the cruise control. I guess we'll see if that's true. If it doesn't work then the software routines weren't burned to the ROM in mine and I'll have to try and find an ECU from one that did have it. It may even be possible to pull the ROM from an ECU with it and replace mine since mine is a pre-flashable version. I think the flashable ECU's came out in '94.
That's it for tonight! I'll be spending Sunday on the radio during the ham radio Field Day event.
_______________________________
July 2, 2020
Greetings All!Tonight I realized the link to jump to the last post wasn't working. That's been fixed now.
Sunday saw a trip to the local PYP boneyard for an ECU. The rig was a 1995 XJ 4dr with cruise control that had come into the yard a few days earlier. After pulling the ECU from it I revisited the two '96 XJ's from previous trips. The Fleet XJ had the A/C hose I took previously. When I started to remove the inner front passenger door panel to try and get the power window motor/regulator out, I happened to see the rear axle had 10 inch drum brakes. I almost grabbed them and the back plates. Probably should have. That axle might have had the LSD carrier in it. I will go back on Saturday to find out. I will also attempt to get the window motor again. Just have to remember to bring my battery tools to get the window down slightly.
I took another look at the Country and noticed it also has the NP242 transfer case. That would be cool to get since it has Full Time 4WD in addition to the others. It's practically on the ground and can't get under it. It might also have the LSD carrier in it. Looks like another trip is planned.
This week's progress has been focusing on the battery cables. There have been kits marketed to upgrade Jeep battery cables to 4AWG(American Wire Gauge) and 2AWG. I haven't found any kits that do 1AWG cables so I made my own. I purchased 10 feet of red and black 1AWG welding cable. "Why welding cable instead of battery cable?" You might ask. Welding has a high number of small strands of copper wires to make up the cable. Battery cable has fewer, thicker strands of copper wire to make up the cable and is much more rigid. It can hold it's shape better than welding cable but where the engine rocks side to side on it engine mounts form vibration and torsional loads, it may not be best suited when mechanical fatigue of the copper strands set in. Welding cable on the other hand, is very flexible for obvious reasons and cannot hold its shape well. However with the engine movement it's not likely any mechanical fatigue will set in and weaken the strands at the terminals reducing it current carrying capacity over time. In addition the welding cable can carry more current for the same gauge wire as battery cable.
I spent some time Sunday removing the main positive and negative cables from the XJ and get a measurement. With that done I soldered then crimped copper lugs to each end of the cables. Sealant coated heat-shrink tubing was shrunk in place to protect the cable from water intrusion at the ends. The ground cable from the negative terminal of the battery to the inner fender was also replaced as it was in an easy position. The alternator cable was another matter. What I thought was a cable that ran through a fusible link and to the battery wasn't present. Intead the cable disappeared into the harness. I decided to put the Jeep back together and research where it goes so I don't disable the Jeep.
Monday's lunch at work had me again looking for the alternator cable's terminating point. I found that it leads to a connector and that leads into the Power Distribution Center or PDC in Jeep terms. I pulled up a schematic and saw that it ends at a 60 amp Maxi fuse. So current from the alternator runs through the fuse to the battery side of the PDC so if the fuse blows it won't overload the vehicle's electrical system. But it's a 60 amp fuse. With a 90 amp alternator. What's wrong with this picture?
I'm guessing Jeep did that so that even if the alternator was pumping max output into the battery, the fuse won't blow unless the draw was over 60 amps. I still can't wrap my head around that logic. Pumping 90 amps through a 60 amp fuse should blow the fuse. That current is available to the whole electrical system, right? Yes. But it also means that the majority of that current is being taken up by the battery in the shortest distance. So why does the fuse blow? How does it work? A fuse is simply, a piece of soft metal that, when heated to a certain point, will melt. This melting point translates into an equivalent current load over time. Maxi fuses have wide and fairly thick fuse material by compaison to say, a glass fuse with equal amp rating like comparing two 30 amp fuses. Will one blow faster than another? Probably not as both are built to a 32V standard for automotive use. Will a 250V 30 amp fuse not blow at 30 amps at 32 volts? I don't know. I've not tried to experiment with it. I take the automotive standard and apply it. Substitutions may have undesirable consequences.
Tuesday after work I made up the upgraded cable from the battery + to the PDC supply terminal. It's a 1 foot piece of 2AWG welding cable. It didn't need to be 1AWG as it is so short it can handle at least double the current of the old 4AWG battery type cable did.
Now back to the problem at hand. This morning (Thursday) I took the info with me to work and snaked a piece of the cable around to mimic the old cable still in place complete with strain loop. Figuring where I want to place the Megafuse block I marked the point where it needed to be cut. So I was able to get a lug onto the end of the cable. I had to get more lugs as I was out of 1AWG lugs with a 5/16 inch (7.9mm) hole so I had to wait until lunch time. As luck would have it I wound up having to travel to another store for a pickup and was able to get the lugs there. Lunch time was very productive. I have the last two cables I need to complete the upgrade this weekend.
So why am I doing this? Simply because I overbuild where I can to get some scalability. I plan on installing either a 136 amp alternator from a WJ or a 160 from a 01-02 Dakota or Durango and will have at least 200 amps of current capacity. With the 90 amp I have now I need to install a 60 amp Mega fuse until that happens to keep within the alternator's specs.
That's it for now. I'll report back after my trip to the boneyard this weekend if anything fruitful came to pass.
_________________________
July 15, 2020
Since the last update I was able to figure out the double 60A fuse thing. I didn't see it in the schematic since the battery connects to one end of the PDC and the alternator connects to the other. It looks like a load balancing circuit. The storage source on one end and the live source on the other yet both supply the whole. It might have to do with the reduction of the gauge of the cabling needed to supply the PDC. Instead of two large cables, one from the battery to the PDC and one from the alternator to the battery, they use two smaller gauge cables for the supply. I have yet to disconnect the battery and see if the engine will still run. In a conventional natural induction system utilizing a carburetor and distributor ignition system the alternator really supplies all the power the engine needs and the battery simply charges until demand rises above supply. In many fuel injected engines with computers and other items that put a load on the system beyond the ignition system to run the engine, the control system is designed to shut down the engine in the event of a battery failure. So in the end two 60A fuses in parallel shouldn't blow at 70A as the draw is divided between them. The 90A alternator can supply 90A and really up to 120A before either fuse blows. BUT, when one fuse blows the other will follow almost immediately should the current draw remain above 60A.
So with that in mind I decided to reconnect the old alternator lead directly to B+ on the battery. The alternator runs through a 1AWG cable to a 125A Megafuse then to the battery B+. The PDC still connects to the B+ as before.
With that done it was time to install the winch. The winch is designed by Smittybilt and manufactured in China. It's the 2nd generation XRC 9.5K. I had done quite a bit of reading and looking into the various brands and models. It came down to the ones with the least reported problems. Warn, being the crowd favorite was 1st in both popularity and quality so it was ruled out as it was also the most expensive in the pull range I was looking. Its very popularity is pretty much what discqualified it as that specific characteristic artificially raises the price at Warn's descretion. Superwinch was another in the running but was dropped from consideration for its price point.
Many others were also dropped for poor(er) quality issues or simply a reputation for other undesirable products they made which is a personal choice. Thus in the end there were only two considerations. Smittybilt and Badlands.
Smittybilt article on Roundforge
https://www.roundforge.com/articles/smittybilt-xrc-9500-winch/#Is_the_9500_XRC_enough_winch_for_your_4x4?_
Badlands article on winchcentral
https://winchcentral.com/winches/badland/
Badlands had, at the time, a 9000 pound pull winch versus Smittybilt's 9500. Comparable to say the least. Features are similar and both are manufactured in China with different parts to achieve similar specifications. With very similar performance specs I had to srutinize which one would really perform. Badland is impressive for a first run winch offering. It seems Harbor Freight's "Junior" exec did a good job. So I delved into the forums and spent a lot of time reading about owner's experiences With so few using the Badland it was more difficult to get a "feel" for the product since so many thousands more comments were by non-owner's simply mouthing off just because it was a Harbor Freight item. Really wish those could have been filtered out. I wouldn't have wasted so much time searching for legitimate owner reviews. Everyone is entitled to their own opinion but those with zero experience with the actual product should waste their breath and everyone else's time with completely useless commentary.
As it was I found a few sources of Smittybilt XRC 9.5K winches to compare prices with. Badland was, well, a Harbor Freight exclusive so price comparisons weren't possible. Every coupon I had with Harbor Freight could not be applied to the winch so that was a fixed point. Smittybilt on the other hand wound up on sale the day after I bought it on 4WD.com. I had it shipped to the local 4 Wheel Parts store and they gave me the difference. My final cost on the Smittybilt winch was about $250.
With the bumper installed and the wiring upgraded I was finally ready to install it. It went smoothly. Although I question the clocking of the motor which put the three main lugs on the backside of the winch, I think I'll leave it there. The look is good and with the dielectric grease I put on the nuts before slipping the boots over, I'm confident they won't corrode even when water gets in them.Next piece of this part of the project is an in-cabin control panel for the winch. At this time the winch works fine with its wired remote so I'll focus on another part of my build. The Cruise Control system.


As mentioned in an earlier post I want to install cruise control on my XJ. She never had it and I had wondered if the ECU would still have the pins and if not, could I add them. I couldn't get a definitive answer on that or even if the program ROM had the code to support cruise control. You see, it would make sense to do it that way instead of having ECU's made specifically for vehicle options. All options would be present in the ECU coding and only the lack of hardware made it non-functional. Alas, the main harness of my '93 does not have any wires going to the pins for cruise control thus the wiring is not present anywhere else under the hood. I haven't looked to see if the interior harness had the connection and was simply unused. Since I'm not going to use the factory controls on the steering column, I will install a separate panel. I have two locations I'm working the details out on.
First, the rear wiper control to the right of the column is my primary location. I can cut the black cover in half and transfer it and the switch to the left side pod panel and install it next to the rear defrost switch. I'm not sure why they didn't put them together in the first place but it seems there had to be either a visual balance or use of the space to justify the existence of the panel.

If I cut the black plastic cover down the center vertically I can move the graphic and switch to the other pod. Each pod has the rectanglular cutout for the switch. The only other thing I need to do is to move the wiring bundle for this switch over to the other side. This is easier than moving the defrost switch and wire bundle to the right as all the wires will have to be extended. I sitll have to remove the dashboard assembly to get to the wiring and cut back the tape wrapped split loom behind it but I shouldn't have too much trouble doing that. While it's moved out of the way I can also install the new wire bundle I'll make and run it through the firewall to the ECU and the vacuum servo.


That is where I'm at right now. I still have the rear light pucks to mount on the inside of the rear hatch so when the hatch it open, the light is overhead to illuminate a table or something.


The first one is the coin tray panel. This one features the rectangular holes for the snap-in rocker switches. I won't be using this type but the idea is sound. This position will be for the in-cab winch control.
The second photo is where an optional clock would have gone for some kind of package you could order from '84-91. I haven't found any references to '92 and later models having the option since the AM/FM stereo had a clock included in it. Something like a convenience group option. I can use the original panel and mount a clock, three switches (rocker and two push buttons" and maybe a USB charge port and Aux port for an upgraded stereo if I ever want one. The Jeep AM/FM Stereo/Cassette work just fine when I want it otherwise I'm listening to my ham radio via an overhead speaker above the mirror.
The last photo is a panel made for the storage cubby in front of the gear selector. Now I would want to put a transmission temp gauge but I would want it within view instead of having to lean forward to see around the T-handle of the selector. I would then get one or make one with the gauge on the left side and blank to the right for future expansion.
That's it for tonight's update. Thanks for stopping by! Come back soon for more updates on Project Nanye-he: Beloved woman that travels about.
______________________________
July 23, 2020
- power brake booster, master cylinder, and proportioning valve as an assembly
- Interior harness for the cruise control controls
- High tone horn
- heater hose retaining clip
- Vacuum check valve
- Rear cargo lamp
- Liftgate interior trim panel (not shown)
- Lifgate hinge shims
- Liftgate latch for parts (not shown)
- Fog Lamp/Rear Defrost switch panel with switches and pigtails
- Rare digital clock module
- 8x12 aluminium diamond plate
- all screws/fasteners from removed items

All told I got everything for less than $100. I got tunnel vision bad and focused on the clock module I completely forgot about the switch panel on the right hand side of the steering column containing the transmission mode and rear wiper switches.


One switch is an ON-OFF switch for the fog lamps on the '88 and will serve perfectly as the power switch for the cruise control. The right is the rear defroster switch and is a momentary ON-OFF-ON configuration for the Set and Resume function with this one. At the moment I don't have a way to turn on the lamp in the SET/Resume switch when the cruise is set. If I find a way then I'll implement it. It's eye-candy really and serves no real function. Otherwise I'll need to find a regular rocker switch. I'm not interested in the new designs. They are too easy to bump and activate so I'm avoiding those.

That's it for this post. Thanks for stopping by.
___________________________
August 6, 2020
BLOGGER UPDATE STRIKES AGAIN!Again I have lost data. I would love to get rid of Blogger but I haven't found one that's as easy to use as this one. Wordpress is a joke for something quick and easy. You practically have to have a degree in software engineering to get it to work the way you want. So fine, let the elite's have it. I'll suffer the incompetancy of Blogger to keep it simple. I just have to remember to copy what I write here and paste it into Word for safe keeping.
Now I don't remember all what I did since July 25th other than I have the cruise controls installed, wired and troubleshooting the issue. I really need a DRB-II with the super card so I can see why it won't fully engage. For now I'm doing old-school diagnosis with a meter and wire tracing. The last two items on that list are VSS signal to the ECM and the TCM. If the signal doesn't exist, I'll have to verify my VSS I have now since the speedometer is working fine. It may be that the signal just isn't going to the ECM. So far I've found the signal line to the TCM so it has to be somewhere in the harness down below.
Other things accomplished were the digital volt meter. Today I connected it to the battery source on the fuse block to get a more accurate reading that at the cigar lighter B+. It's on all the time but uses so little power I'm not really worried about it. I can separate the meter's sense line from its supply line so it will only light up when the ignition is on. That will require a new connection later.

I had some refrigerant removed and the A/C is performing a little better confirming I overcharged it. Maybe I'll go back and have them take another 2oz out. By the time I get it working good it'll be Autumn. At least what I'm getting done is free.
I went to the boneyard a couple of times since the last haul posted above. I retrieved the hinges and shims from the '95. I finally installed one shim under the right hinge to level out the liftgate and what a difference! I moved the striker post over to match where the latch lines up now. It closes a bit better and I'll check after it rains whether or not the seal leaks.
On that same trip I got the hinges, I found a connector set from a '98 that goes to the airbag in the steering wheel that I can use for the cruise control switches. I got rid of the quick disconnects now that I know all the connections are correct and go where they should.
The high tone horn works and is installed now. Still can't figure out why it wouldn't have both horns. Maybe it was some kind of regional thing. The vehicle was sold from a dealership in Martinsville, VA. Dual tone horn configurations tend to sound more European like.
I found the battery stabilizer plate in a box with parts I wasn't using yet and installed it. It's a small plate that fastens between a bolt on the radiator top support plate and the battery hold-down bolt. The battery is actually held down to the plastic/nylon tray which is in turn bolted at the botton into a ledge on the inner fender. The support plate simply stabilizes side motion of the battery to help lower vibrational stress of the plastic tray. It also grounds the hold-down bracket which may not be such a good thing with non-stock batteries like the Optima 34/78.
The illumination ring around the cigar lighter is functional again. When I needed to plug in something in the dark, I had to turn on the interior light or a flashlight. The bulb, #1891, was available and is the only of its kind on the entire vehicle.
I have the in-cab winch plate installed as a test fit now. It fits quite well and am looking forward to begin that project.


Bye for now!
____________________________
August 10, 2020
Greetings!
Was pondering the suspension and that the lower control arms are adjusted too long. I was going to pull the upper control arm and adjust it first but really needed to shorten the lowers first and check the pinion angle. Well, I almost couldn't the driver's side lower control arm back in and when I did, I went inside to cool down and chill. It was hot again and I was too whipped to work the passenger's side arm. So she steers kinda weird but not unsafe. I turned the JohnnyJoint in three full turns and started to reinstall it when I realized, to my great disappointment, I had installed the left and right control arms on the wrong sides. I needed to get the torque of the set screws locking the threads and in the instructions said to install the control arms with "adjuster locks down". Yeah. They were "up" and couldn't tighten them while the arm was installed. Guess who's going to fix it this weekend?
Now an update on the cruise control. I have two more wire connections to check out. If they pan out I am going to start looking for a servo that works. Like a new one. The brake light switch did pass the tests according to the FSM troubleshooting procedure.
The digital volt meter was changed over to the battery source at the interior fuse panel. The reading is within .5 of a volt which is sufficient. The sense wire is tied to the meter's power supply wire so it runs all the time but its power draw is quite low. I will change this next time I have to open the dash.
That's it for this last weekend's work since I have to work Saturday. I sure hope Autumn gets here.
Bye for now!
______________________
August 20, 2020
Had the day off today and while listening to Forgotten Station by Spacemind, I am posting some work session updates.
I'm still working on the cruise control issue and elminating various parts of the system for faults. I tested the servo again to make sure the solenoids were firing and that power was properly being routed through the power switch on the panel to the servo. The ODB scanner (OBD-I was for California emission vehicles) confirmed the ECM knows when the power is turned on and the SET and RESUME switch signals were present. This leads to a permanent ground on the brake sense signal That hadn't been resolved yet. I thought there wasn't a problem but when I pulled the brake light switch out the brake sense signal was still grounded as if the pedal wasn't pressed down.
So here's how the Brake Sense signal is supposed to work. From a grounding point on the body under the dashboard, that line connects through the brake light switch that is normally closed until the brake pedal is pressed. From there the signal line splits to the ECM on pin 29 and the TCM on pin C10. The ECM saves the speed setting as the power line to the servo is interrupted on another pair of wires on the brake light switch. That then opens the switch and breaks the ground connection. The ECM and TCM see that as a HIGH signal and they do whatever coding in their microprocessors say for the condition.
Now the extra wire harness plugged in between the brake light switch and the main harness for it had one wire tied to that ground signal line. It went to the shifter lock solenoid and then to a B+ terminal on the ignition side of the fuse block. I removed that sub-harness and checked the ground singal again. NOW the ground signal went away. Odd since it went to the B+ on one side but there was no voltage when the key was on at the brake light switch. Very odd indeed.
After putting the brake switch back in and verifying the light worked as they should I checked all the previous items with the scanner again. Everything looked the same. Testing the ground signal showed that the brake switch also breaks the ground connections to the ECM and TCM as it should when the pedal is pressed. So far, so good.
I looked at the schematics again and couldn't figure out the circuit operation. No notes were made as to whether the switch in the schematic was activated or not so I took the brake switch back out with the sub-harness and went inside to map it out at the kitchen table.

After mapping out the switch I found the both schematics I had for the '93 and the '95 FSM's were incorrectly drawn for either actuated or not actuated states. Thinking there was different switch for those with cruise control I went to a few parts houses online to find the exact same numbers from '91 to '96 models. Some '91s had the old switch that was made for cruise control or not until the new wiring harnesses were switched out on the line. Some '96 models also had the older switch from '91-'95 but began using the newer switch when the new harnesses that were to be used in '97 year models were switched over using a different switch.
 |
| '84-'91 with Cruise Control |
 |
| '91-'96 with or without Cruise Control |
 |
| '96-01 with or without Cruise Control |
Note the overlapping years. As parts ran out the new parts would be installed. That also meant knowing which harness would already be isntalled on a vehicle by the time the brake switch was installed. Most of the newer version of the part was installed late in the model year. I guess it was easier to mark a vehicle with the new harness being used when they switch over and have both parts available to the installers until that switchover came to his/her station. Once done then the old parts bin could be removed and the line keep moving along as if nothing changed.
It made more sense to make one part instead of multiples so fewer had to be stocked at the assembly plant. Make one for all Left Hand Drive vehicles and one for all Right Hand Drive vehicles. If an option isn't used then just tuck the connector somewhere or wrap it in shrink tape. On my '93, I don't have ABS so they tucked the data connector to the ABS controller under the carpet near the steering column.
I can also use that connector to connect my ODB scanner into the TCM's CCD bus and troubleshoot/monitor the transmission.
Speaking of monitors, a fella has developed a cool little scanner for the Chrysler Collision Data bus. The bus is so named because Chrysler was using a networked connection between modules. There were data collisions galore on earlier computer controlled engines with computer controlled transmissions and their new CCD bus was built to cut down on the extra traffic. Since my '93 doesn't have a Body Control Module, there aren't really any collisions so the transmission and engine work well together. Their FWD cars with EATX controlled transaxles is also supported by the ODB scanner.
So as I said before the schematic is incorrectly notated as to the brake switch position. Here's the original switch plan and the corrected one.

I haven't messed with the image on the left. But there aren't any notes saying which state the switch is in. I notated on the right in my correction the brake is applied and shows the state of the switch it should be in. I verified this with the meter as well as the diagnostic procedures from the FSM.
As you can see in both, pins 3 and 4 are OPEN when the brake is applied. This is the brake sense signal line that is cut from ground. At first I thought the left diagram was right but the text didn't jive with the symbol.
So where am I at now? Only somewhat closer to getting the cruise control working. I'm not that hopeful this was the problem as my original thought was that the signal was supposed to be grounded when the brake was applied thus not allowing the cruise to be SET. Now that I have the working description of the circuit, my corrected schematic, and verification of all the signal lines are in the proper state for each button press and switch setting, I'm going to try it again. It it doesn't work then I'll have to find another servo since the flow chart indicates that is the problem if all else passes the tests.
______________________
August 25, 2020
Greetings!
Just a short update. Today I got 15 feet of some 16AWG 4 conductor trailer wiring cable for the in-cab winch control panel. After getting home from work I got started routing the cable from the winch to the center console. Sorry, I didn't take pictures as I got home later than expected and was losing light.
The cable starts at the winch controller box out front but is not connected yet. I capped the end with a rubber vacuum cap to keep water from getting in. The cable then runs through the grille and over to the driver's side in front of the A/C condenser then through a hole in the radiator core support. From there it runs upwards and around the ECM, slipping into the gap between it and the fender. I ran it along the main harness across the top firewall pinch seam. It runs down through a factory wiring harness grommet. I drilled a hole into the grommet boot just large enough to press the cable through with a drill bit leader. This is located above the accelerator pedal. At this point the cable is rolled up and draped over the center console and laying in the passenger's side footwell. When I finish this the cable follows the contour of the transmission tunnel and under the center console to the right past the gear selector then over to the coin tray where the switch panel is located.

Due to the depth of the factory rocker switches the bottom of the coin tray is too shallow to allow them to seat into the panel fully. The black insert of the console will be removed and the coin tray cut completely out allowing full access from the back. The insert will be reinstalled and the cable run up through the former coin tray. I don't believe I have the correct factory plugs that fit the switches I'm using so I'll have to use femail Quick Disconnects instead. If I do come across them I might use them so the wiring can't be altered easily if disconnected. Proper labeling does wonders too.
Here's a random Open Hood photo I found on the internet to help illustrate the cable routing (marked by a yellow line) from the bumper to the firewall.

So that's the current work I'm trying to get completed.
The cruise control still does not function. It still attempts to work but disengages. According to some further diagnostics it appears to be a bad servo. So I'll be off to the boneyard this weekend to locate another on the off chance it will work. They are cheap enough but one more is my last attempt before getting a new replacement.
That's is for now!
_______________________
August 29, 2020
Went to the boneyard this morning in search of a few things. When I got there the '95 XJ was still there but the '88 was gone already. A '98 with a lift kit had shown up too.
First the '95: Somebody took both front and rear carpeting which revealed the sorry state of the floors. Quite large holes actually. Never looked underneath so was a bit surprised. The front seats looked to be in okay condition but since the passenger's door was removed and the driver's door was wide open I think the foam in the seats will be pretty mildewed. They are the correct color as mine but in the newer, firmer style and high back bucket. A '99 XJ I had was equipped with the same seats and I found they weren't that comfortable. Also there's a raised rail across the floor pan the newer type seat bolts too I would have to add. I will eventually. I pulled the cruise control servo knowing it may not work but it's a minimal investment. It held vacuum and the solenoids did work. After installing it into my Jeep I went for a test drive. Where the old tried to engage, this one didn't even dip the accelerator pedal so I'll tear it apart and see what the insides look like and if there's anything that can be salvaged from it. The roof rack crossbows were still there so I removed them to put on mine.
I looked around the Jeep one last time and noted the grille insert was still in the back as were some interior trim pieces. Seems that my leaving removed parts in the back had to be taken out for the carpet and whoever did put them back in the back for safe keeping. The headliner was also removed. There were no switch panels left so I bid the old girl thanks for the parts and went to see the '98.
The '98 had a cheap lift kit from Rough Country as attested to by the name on the rear leaf springs. Somebody wanted the transfer case so bad they missed a couple of nice after market parts behind. Sadly I wasn't able to get to the motor mounts since I had no way of jacking up the transmission to get the assembly back up level again. They were nice ones too! They also missed the Plate-and-Fin style transmission oil cooler. I snipped that off and it began to rain. I wanted the hoses but, you know. Rain. There wasn't anything else I could use except the fuel injectors and those were the stock ones.
So here's the treasure...
 |
| The two crossbows nearest the camera were from the '95. |
 |
| Three in the rear and one up front. The front and second crossbows are spaced evenly around the 2M/70cm antenna. Trying to keep any parasitic reaction to a minimum. |
 |
| The roof racks unsed on the XJs of old all had two crossbows. It was one of the styling cues that made the XJ's signature look. In my application I wanted to keep as much of the look as I could while adding some capacity. Stock roof rack can handle 100 pounds. Adding two more bows will spread that out and probably gain 50 more pounds safely. |
 |
| Score! |
 |
| This will cool better than the factory piece I found on a '98 ZJ. It's volume capacity is maybe three times that of the stock one and likely has more than double the cooling efficiency. |
The servo was installed right away and tested. Fail. It didn't even blip the accelerator pedal like the other one. Will take it apart and see what's up with it. The solenoids did actuate with 12 volts so either the valves aren't sealing or the main diaphragm has a hole in it.
After several months sitting in the barn I finally got the front driveshaft reassembled with new u-joints and a new centering ball for the double-cardan. I misplaced the bolts and straps so I couldn't reinstall it. Pretty aggravated about it. When I went in an ammo box to get a 1/4 inch drive wratchet, I found them. By then it was pretty dark and it was threatening to rain yet again. I went to Advance Auto Parts and Autozone to get what I needed before all that. Now I have new parts for the transfer case side but the straps and bolt kits I bought for the axle end were wrong. My mistake. I didn't catch the fine print and the size of the u-joint cap. I'll have to return them later.
As for the winch I found a rocker switch for power as a back up. I also primed the mounting plate for the switches and will paint it tomorrow. Not sure what color I should paint it. Depends on the color of the switches, which are black right now but I have another switch I can use for power that is white with a chrome frame. I still need to wire the other end to the control box.
I want to install the oil cooler too. Just need to find the cooler hose I do have. It's in the barn somewhere. I would liked to have found a transmission oil temp gauge but no luck.
So I'm nearly ready to go on my trip over Labor Day Weekend. Just a few things left to do so I'll be pretty busy right up to departure Thursday morning. Now if I can just keep enough cash for fuel until Friday... ;-)
________________________
September 10, 2020
Labor Day Weekend was a blast. Not only did I get to see my sister but I also got to run Trails 1 and 8 at the Brown Mountain OHV Trail. This is an easy trail for 4x4s and I'm sure side-by-sides too. There were lots of them. Several dirt bikes too were traversing the trails Sunday.
Friday morning started with some work on the XJ's front axle. The pinion angle still wasn't right so before heading to see my sister I removed the front drive shaft after having put it in two days before. The trip to work wasn't all that fun with the vibrations coming from up front. I don't think the bearings would have survived the trip. I did manage to catch the odometer at 250000 miles though and felt she was just breaking in. LOL.

This was on the way to work Wednesday before the weekend. I almost missed it! And yes, the oil pressue at 68 mph is correct. I run the large M301 oil filter (Wix 51515) from Mobile 1 sometimes when I can't get the Wix locally. I use 5qts of Rotella T5 10W-30 synthetic blend, 1 pint of Rislone ZDDP additive, and 1 quart of 20W-50 Mobil 1 as a viscosity enhancer. I don't use Lucas as it's just too thick. Both the Rotella and Mobile 1 oils have excellent detergent compounds in them and I have zero sludge and very little build up of varnish inside.
If you recall, I disassembled the engine in-chassis to inpsect the internals since the previous owner allowed the oil to run low and starve the engine of lubrication several times. Knowing the AMC designed and produced the the 4.0L, I had no doubt it would have run fine. But it didn't take but a weekend's worth of effort to tear it down, inspect, and get new main and rod bearings ordered. A few were down to the copper layer but none were down to the steel shell. The pistons were removed and the cylinders inspected and measured. They are at their wear limits but look good as did the pistons. The rings were removed and the ring lands were cleaned out. Each compression ring end gap was checked before being reinstalled on the pistons and the pistons reinstalled into their respective cylinders. When the parts came in, another weekend's worth of time was spent installing the new parts and checking clearances.
Other parts replaced were the camshaft and lifters, rocker arms, fulcrums, bridges and oil pump with pickup tube. The water pump and crankshaft pulley as well as the radiator and distributor were also replaced. The radiator is from CSF and is made in old-school fashion with brass and copper instead of aluminium and plastic.
So now that I have a full trip on the new suspension with a tired engine, I'm confident she'll perform as needed in emergency work if I'm called to help.
The trails were fun and gave Nanyeh-he a good test of the suspension and steering kits. Though I do wish I had gotten 33's instead, she took to the trail and stuck to the ground. I don't have any traction enhancing devices like a LSD, lunchbox locker or e-locker. Strictly open diffs front and rear and no wheel slip. BUT, and its a big one, I don't think I'll fare as well at Uwharrie where the trails are more challenging and muddy. I'll need wider tires for that kind of environment. For now, the 9.50 wide tires will work just fine by giving me the best compromise between weight to footprint ratio in the traction department. After all, Willys (pronounced Willis) didn't even use as wide a tire on theirs and they still went anywhere. By concentrating the vehicle's weight onto a smaller contact patch, you gain tractive effort. The lighter weight our vehicles typically are, 9.50" tires are perfect.
Here's a peek at the first part of the trail. I had to stop because I realized the terrain was fighting the sway bar so I had to unhook the quick disco's and stow them with zip ties. I'm workin gon the next part of the video as Im integrating some taken by my sister in the Tacoma TRD behind me.
Part 1
During the trip back down I was getting some more heavy sounding popping noises than just the Heim joints. I need to remove the steering gear box and inspect the uni-frame it's attached too for cracks. If found they will have to be welded up, ground smooth and reinforcement plating installed to box in the uni-frame channel. Not something to really look forward to since I don't weld. I really should take a class at the local community college and get the automotive repair class to do the work. That way I can understand what's being done. I know what needs to be done I just don't know how to do it.
 |
| Where we stopped for a picnic. My sister, her husband and a friend with his son joined me on the trip. My niece rode with me in my XJ and had a lot of fun bouncing around on the trail. |
After coming off the trail we bid our goodbye's and I headed home with the front driveshaft installed. The vibration wasn't really a problem but the roaring in the transfer case was a bit much since I don't have any carpeting inside yet. I stopped for a restroom break and checked the temperatures of the front and rear differential housings with my infrared thermometer and didn't have any hot spots thankfully. I seemed to get amore vibes at 70+ mph so I kept it down at 65 mph. She seems happiest there. When I do go to 33x10.50R15 inch tires I'll need to change the gearing to at least a 4.10 set. As it is now she's hard pressed to stay in overdrive with the torque converter in lock up mode. Just a little hill causes it to disengage and that sends the temps up quickly in the transmission.
So these are a few things that need to be addressed and solved. For now, the uni-frame takes center stage.
Oh, I did get the cruise control working with the original ECM. Turns out the '95 ECM has a problem. Looks like I'm either going to spend $150 on a reworked piece and trade mine in or have mine reworked. But at least I know the servo from the '96 Fleet Service XJ does work.
That's it for this post. I'll continue the blog in the next rendition of Jeeps are 4X4Ever - II
Bye for now!
_________________________
Join me in Phase-II of this blog here.
Thanks for stopping in John! More project updates coming as they are installed!
ReplyDeleteJeep is a brand of American automobile. Jeep’s current product range consists solely of sport utility vehicles – both crossovers and fully off-road worthy SUVs and models, including one pickup truck. jeep contact information
ReplyDelete